User Guide
Page 3
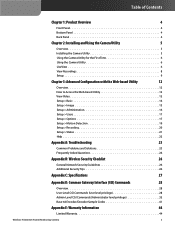
... Web-based Utility 12 View Video 12 Setup > Basic 14 Setup > Image 15 Setup > Administration 16 Setup > Users 17 Setup > Options 17 Setup > Motion Detection 19 Setup > Recording 20 Setup > Status 21 Help 22 Appendix A: Troubleshooting 23 Common Problems and Solutions 23 Frequently Asked Questions 24 Appendix B: Wireless Security Checklist 26 General Network Security Guidelines...Level CGI Commands (Administrator level privilege 32 Base-64 Encoder/Decoder Sample Codes 41 Appendix E: Warranty Information 44 Limited Warranty 44 Wireless-N Internet Home Monitoring Camera ii
... Web-based Utility 12 View Video 12 Setup > Basic 14 Setup > Image 15 Setup > Administration 16 Setup > Users 17 Setup > Options 17 Setup > Motion Detection 19 Setup > Recording 20 Setup > Status 21 Help 22 Appendix A: Troubleshooting 23 Common Problems and Solutions 23 Frequently Asked Questions 24 Appendix B: Wireless Security Checklist 26 General Network Security Guidelines...Level CGI Commands (Administrator level privilege 32 Base-64 Encoder/Decoder Sample Codes 41 Appendix E: Warranty Information 44 Limited Warranty 44 Wireless-N Internet Home Monitoring Camera ii
User Guide
Page 5
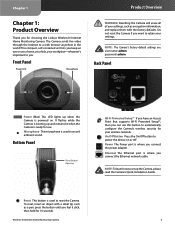
...are. To reset, insert an object with the factory defaults. Wireless-N Internet Home Monitoring Camera 4 Bottom Panel Reset Button Opening Wi-Fi Protected Setup™ If you have an Access Point that supports Wi-Fi Protected Setup™, then you can use . Power The Power port is... where you connect the Ethernet network cable. Do not reset the Camera if you want to automatically configure the Camera's wireless security for choosing the Linksys Wireless-N Internet Home Monitoring Camera....
...are. To reset, insert an object with the factory defaults. Wireless-N Internet Home Monitoring Camera 4 Bottom Panel Reset Button Opening Wi-Fi Protected Setup™ If you have an Access Point that supports Wi-Fi Protected Setup™, then you can use . Power The Power port is... where you connect the Ethernet network cable. Do not reset the Camera if you want to automatically configure the Camera's wireless security for choosing the Linksys Wireless-N Internet Home Monitoring Camera....
User Guide
Page 6
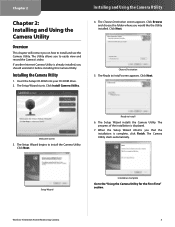
... installation is complete, click Finish. Welcome Screen 3. The Setup Wizard installs the Camera Utility. When the Setup Wizard informs you would like the Utility installed. The Camera Utility starts automatically. The Setup Wizard begins to Install 6. Installing and Using the Camera ...is already installed, you should uninstall it before installing this Camera Utility. Insert the Setup CD-ROM into your CD-ROM drive. 2. Wireless-N Internet Home Monitoring Camera 5 Setup Wizard Installation Complete Go to Install screen appears. If another Internet Camera Utility is ...
... installation is complete, click Finish. Welcome Screen 3. The Setup Wizard installs the Camera Utility. When the Setup Wizard informs you would like the Utility installed. The Camera Utility starts automatically. The Setup Wizard begins to Install 6. Installing and Using the Camera ...is already installed, you should uninstall it before installing this Camera Utility. Insert the Setup CD-ROM into your CD-ROM drive. 2. Wireless-N Internet Home Monitoring Camera 5 Setup Wizard Installation Complete Go to Install screen appears. If another Internet Camera Utility is ...
User Guide
Page 7
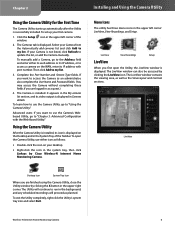
...you want to use the Camera's Webbased Utility, go to run in the upper left corner: LiveView, View Recordings, and Setup. LiveView View Recordings Setup LiveView When you are finished using the Camera Utility, close the Utility window by clicking the LiveView icon. Select your Camera ...The Camera is displayed. The LiveView window can also be accessed by clicking the X button in the system tray, then click Linksys by Cisco Wireless-N Internet Home Monitoring Camera. The LiveView window contains the viewing area, as well as planned. The Utility will continue to "Chapter 3: ...
...you want to use the Camera's Webbased Utility, go to run in the upper left corner: LiveView, View Recordings, and Setup. LiveView View Recordings Setup LiveView When you are finished using the Camera Utility, close the Utility window by clicking the LiveView icon. Select your Camera ...The Camera is displayed. The LiveView window can also be accessed by clicking the X button in the system tray, then click Linksys by Cisco Wireless-N Internet Home Monitoring Camera. The LiveView window contains the viewing area, as well as planned. The Utility will continue to "Chapter 3: ...
User Guide
Page 9
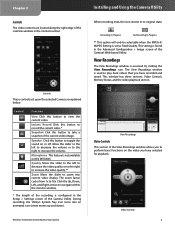
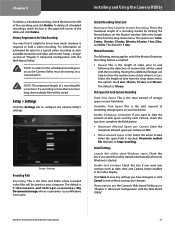
...to the right to its original state. Microphone This feature is set to zoom into an animated icon (arrow moves up and down). Wireless-N Internet Home Monitoring Camera Installing and Using the Camera Utility When recording ends, the icon reverts to increase the volume.. Recording In ... option will only be selectable when the MPEG-4/ MJPEG Setting is not available on the WVC80N. Chapter 2 Controls The video controls are located along the right edge of the LiveView window in the Setup > Settings screen of the Camera Utility. Move the slider to the left to decrease ...
...to the right to its original state. Microphone This feature is set to zoom into an animated icon (arrow moves up and down). Wireless-N Internet Home Monitoring Camera Installing and Using the Camera Utility When recording ends, the icon reverts to increase the volume.. Recording In ... option will only be selectable when the MPEG-4/ MJPEG Setting is not available on the WVC80N. Chapter 2 Controls The video controls are located along the right edge of the LiveView window in the Setup > Settings screen of the Camera Utility. Move the slider to the left to decrease ...
User Guide
Page 10
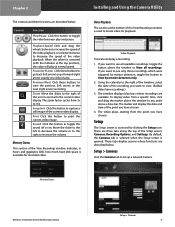
... counterclockwise to 16x. The timeline displays blue bars where recordings are described below . The marker will play a recording: 1. Setup The Setup screen is available for playback. Playback Speed Click and drag the wheel clockwise to increase the speed of the video playback. Snapshot... Click this button to toggle the sound off or on. Memory Status Wireless-N Internet Home Monitoring Camera Setup > Cameras 9 Chapter 2 The controls and their functions are available. Sound Click this button to toggle the video ...
... counterclockwise to 16x. The timeline displays blue bars where recordings are described below . The marker will play a recording: 1. Setup The Setup screen is available for playback. Playback Speed Click and drag the wheel clockwise to increase the speed of the video playback. Snapshot... Click this button to toggle the sound off or on. Memory Status Wireless-N Internet Home Monitoring Camera Setup > Cameras 9 Chapter 2 The controls and their functions are available. Sound Click this button to toggle the video ...
User Guide
Page 11
... the Camera manually. Click Add to list to open the Web-based Utility. Camera Name Displays the name of the screen. Setup > Recording Options Video Recording Options To set the recording schedule for the selected Camera: 1. Camera Name Displays the name of all... buttons act upon the selected Camera's video as Port Number Displays the selected Camera's port number. Wireless-N Internet Home Monitoring Camera Installing and Using the Camera Utility Setup > Recording Options Click on this list will display its IP address with port number. Manually add cameras...
... the Camera manually. Click Add to list to open the Web-based Utility. Camera Name Displays the name of the screen. Setup > Recording Options Video Recording Options To set the recording schedule for the selected Camera: 1. Camera Name Displays the name of all... buttons act upon the selected Camera's video as Port Number Displays the selected Camera's port number. Wireless-N Internet Home Monitoring Camera Installing and Using the Camera Utility Setup > Recording Options Click on this list will display its IP address with port number. Manually add cameras...
User Guide
Page 12
... you want text overlays (such as date, time, and Camera name) enabled in the video display. For information on a networked PC. Setup > Settings Recording Path Recording This is the maximum length of time from the drop down menu. Select the length of a recording started ....Advanced Configuration with the Web-Based Utility." Enable Diskspace Limitation If you have changed, or click Cancel to the"Setup > Image" section of time from the drop down menu. Wireless-N Internet Home Monitoring Camera 11 If a recording is one hour long, then multiple files will be saved. ...
... you want text overlays (such as date, time, and Camera name) enabled in the video display. For information on a networked PC. Setup > Settings Recording Path Recording This is the maximum length of time from the drop down menu. Select the length of a recording started ....Advanced Configuration with the Web-Based Utility." Enable Diskspace Limitation If you have changed, or click Cancel to the"Setup > Image" section of time from the drop down menu. Wireless-N Internet Home Monitoring Camera 11 If a recording is one hour long, then multiple files will be saved. ...
User Guide
Page 13
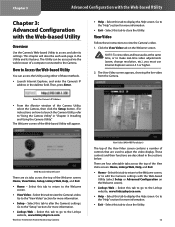
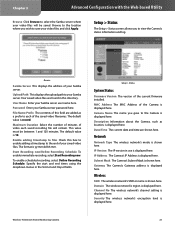
... for more information. •• Exit - Select this tab to the "View Video" section for more information. •• Setup - Wireless-N Internet Home Monitoring Camera View Video (640x480 Resolution) The top of the View Video screen contains a number of controls that are four...view the Camera's video. Chapter 3 Advanced Configuration with the Web-based Utility Chapter 3: Advanced Configuration with the Web-based Utility (select Setup or Advanced Configuration on the Welcome screen). •• Linksys Web - The Utility can access the Utility using either of the Welcome...
... for more information. •• Exit - Select this tab to the "View Video" section for more information. •• Setup - Wireless-N Internet Home Monitoring Camera View Video (640x480 Resolution) The top of the View Video screen contains a number of controls that are four...view the Camera's video. Chapter 3 Advanced Configuration with the Web-based Utility Chapter 3: Advanced Configuration with the Web-based Utility (select Setup or Advanced Configuration on the Welcome screen). •• Linksys Web - The Utility can access the Utility using either of the Welcome...
User Guide
Page 15
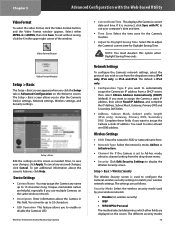
...the Camera's current time for Daylight Saving Time. To exit without saving, click the X in this field. Setup > Basic > Wireless Security The Wireless Security screen is set to use multiple Cameras on the screen. Network Settings To configure the Camera's network settings,... Edit Security Settings to save your wireless network settings. Setup > Basic Edit the settings on the Welcome screen. Security Mode Select the wireless security mode used to configure the Camera's wireless security settings to match your changes, click Apply. Wireless-N Internet Home Monitoring Camera •...
...the Camera's current time for Daylight Saving Time. To exit without saving, click the X in this field. Setup > Basic > Wireless Security The Wireless Security screen is set to use multiple Cameras on the screen. Network Settings To configure the Camera's network settings,... Edit Security Settings to save your wireless network settings. Setup > Basic Edit the settings on the Welcome screen. Security Mode Select the wireless security mode used to configure the Camera's wireless security settings to match your changes, click Apply. Wireless-N Internet Home Monitoring Camera •...
User Guide
Page 16
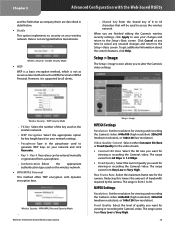
...Encryption Select the appropriate option for viewing or recording the Camera's video. WPA/WPA2 Personal Security Mode •• Wireless-N Internet Home Monitoring Camera Setup > Image MPEG4 Settings Resolution Set the resolution for viewing and recording the Camera's video: 640x480 (high resolution) 320x240...640x480 (high resolution) 320x240 (medium resolution), or 160x120 (low resolution). Wireless Security - WEP Security Mode •• TX Key Select the number of the key used to the Setup > Basic screen. Video Quality Control Select either Constant Bit Rate or ...
...Encryption Select the appropriate option for viewing or recording the Camera's video. WPA/WPA2 Personal Security Mode •• Wireless-N Internet Home Monitoring Camera Setup > Image MPEG4 Settings Resolution Set the resolution for viewing and recording the Camera's video: 640x480 (high resolution) 320x240...640x480 (high resolution) 320x240 (medium resolution), or 160x120 (low resolution). Wireless Security - WEP Security Mode •• TX Key Select the number of the key used to the Setup > Basic screen. Video Quality Control Select either Constant Bit Rate or ...
User Guide
Page 17
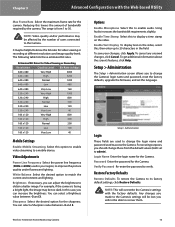
...current environment and lighting. You can adjust the brightness to change the login name and password used in your changes, click Apply. Setup > Administration Login These fields are used to obtain a better image. White Balance Select the desired option to its factory default settings... 3. In this lowers the amount of bandwidth required by the number of users connected to change these estimated bit rates. Wireless-N Internet Home Monitoring Camera 16 Login Name Enter the login name for the camera. Any changes you can select a Sharpness value between ...
...current environment and lighting. You can adjust the brightness to change the login name and password used in your changes, click Apply. Setup > Administration Login These fields are used to obtain a better image. White Balance Select the desired option to its factory default settings... 3. In this lowers the amount of bandwidth required by the number of users connected to change these estimated bit rates. Wireless-N Internet Home Monitoring Camera 16 Login Name Enter the login name for the camera. Any changes you can select a Sharpness value between ...
User Guide
Page 18
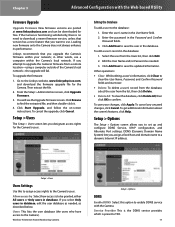
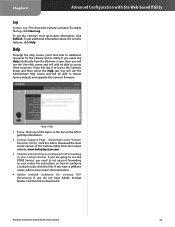
..., either All users or Only users in database. From the Setup > Administration screen, click Upgrade Firmware. 3. To get additional information about the screen's features, click Help. Wireless-N Internet Home Monitoring Camera Setup > Options DDNS Enable DDNS Select this to assign access rights ...any unsaved changes, click Cancel. If the Camera is functioning satisfactorily, there is to use a computer within your changes, click Apply. Setup > Users The Setup > Users screen lets you select Only users in the database: 1. Then extract the file. 2. To edit a user's record ...
..., either All users or Only users in database. From the Setup > Administration screen, click Upgrade Firmware. 3. To get additional information about the screen's features, click Help. Wireless-N Internet Home Monitoring Camera Setup > Options DDNS Enable DDNS Select this to assign access rights ...any unsaved changes, click Cancel. If the Camera is functioning satisfactorily, there is to use a computer within your changes, click Apply. Setup > Users The Setup > Users screen lets you select Only users in the database: 1. Then extract the file. 2. To edit a user's record ...
User Guide
Page 20
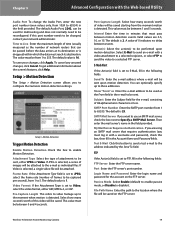
...Subject Enter the Subject field for the account on the FTP server. My Mail Server Requires Authentication If you are 0-5, 10, or 15. Wireless-N Internet Home Monitoring Camera 19 Action(s) Select the action(s) to E-Mail, fill in the e-mail to Video, select the video format,.... Chapter 3 Advanced Configuration with a video attachment to a selected recipient., or select FTP to send the video to a selected FTP server. Setup > Motion Detection Trigger Motion Detection Enable Motion Detection Check this box, then fill in the field provided. If JPEG is selected, a series ...
...Subject Enter the Subject field for the account on the FTP server. My Mail Server Requires Authentication If you are 0-5, 10, or 15. Wireless-N Internet Home Monitoring Camera 19 Action(s) Select the action(s) to E-Mail, fill in the e-mail to Video, select the video format,.... Chapter 3 Advanced Configuration with a video attachment to a selected recipient., or select FTP to send the video to a selected FTP server. Setup > Motion Detection Trigger Motion Detection Enable Motion Detection Check this box, then fill in the field provided. If JPEG is selected, a series ...
User Guide
Page 21
... scheduled trigger events that determines when motion detection will be in effect. To create an additional area, check the box next to the schedule. Wireless-N Internet Home Monitoring Camera Trigger Motion Detection Specify how often this , you define one area, Window 2, is selected, Window 2, Window 3,... (Sunday to Saturday). Fri), or on the left to reduce the area's sensitivity, or to the right to increase sensitivity. Setup > Recording The Setup > Recording screen allows you will be active. To do this trigger event occurs: Every day, Weekdays (Mon - Schedule List This...
... scheduled trigger events that determines when motion detection will be in effect. To create an additional area, check the box next to the schedule. Wireless-N Internet Home Monitoring Camera Trigger Motion Detection Specify how often this , you define one area, Window 2, is selected, Window 2, Window 3,... (Sunday to Saturday). Fri), or on the left to reduce the area's sensitivity, or to the right to increase sensitivity. Setup > Recording The Setup > Recording screen allows you will be active. To do this trigger event occurs: Every day, Weekdays (Mon - Schedule List This...
User Guide
Page 22
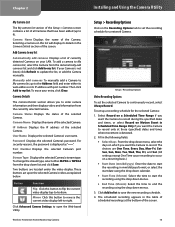
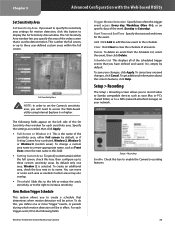
...fields. Specify the start and end times using the dropdown menus in this directory. IP Version The IP version in use is record. Setup > Status The Setup > Status screen allows you wish to save your video files and click Apply. User Name Enter your saved video files. The default...enable adding a timestamp to the end of the current firmware installed. Camera Name The name you gave to the Camera is shown here. Wireless SSID The wireless network's SSID or name is displayed here. This value must be saved. The default value is displayed here. To enable scheduled recording, ...
...fields. Specify the start and end times using the dropdown menus in this directory. IP Version The IP version in use is record. Setup > Status The Setup > Status screen allows you wish to save your video files and click Apply. User Name Enter your saved video files. The default...enable adding a timestamp to the end of the current firmware installed. Camera Name The name you gave to the Camera is shown here. Wireless SSID The wireless network's SSID or name is displayed here. This value must be saved. The default value is displayed here. To enable scheduled recording, ...
User Guide
Page 23
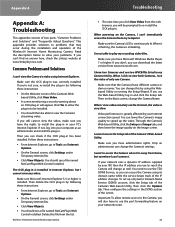
... Linksys Router If you are going to use the DDNS Service, you have Adobe Acrobat Reader, click this link. Wireless-N Internet Home Monitoring Camera 22 Setup > Help •• Setup Click any of the Camera Utility from the Welcome screen, then you will see the User Help screen and will ... from the Linksys website, www.linksysbycisco.com. •• Click here to learn how to configure Port Forwarding in to access the Camera's Setup and then select the Help tab, you will see the Administrator Help screen and will only be able to -date information, click Refresh. If...
... Linksys Router If you are going to use the DDNS Service, you have Adobe Acrobat Reader, click this link. Wireless-N Internet Home Monitoring Camera 22 Setup > Help •• Setup Click any of the Camera Utility from the Welcome screen, then you will see the User Help screen and will ... from the Linksys website, www.linksysbycisco.com. •• Click here to learn how to configure Port Forwarding in to access the Camera's Setup and then select the Help tab, you will see the Administrator Help screen and will only be able to -date information, click Refresh. If...
User Guide
Page 24
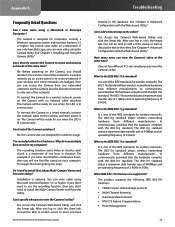
Common Problems and Solutions I 'm not able to play my recording video files. You should see two WVC80Ns listed in my Camera Utility. Make sure Microsoft Internet Explorer 5.5 or higher is initializing. Then delete the OCX plug-in your Internet connection speed. When ... appendix provides solutions to use to reach the Camera will also have to speed up a Dynamic Domain Name Service (DDNS) account, click the Setup tab of the Wireless-N Internet Home Monitoring Camera. If not, log into your computer as well. Click Yes to allow remote access to Tools and Internet Options. •...
Common Problems and Solutions I 'm not able to play my recording video files. You should see two WVC80Ns listed in my Camera Utility. Make sure Microsoft Internet Explorer 5.5 or higher is initializing. Then delete the OCX plug-in your Internet connection speed. When ... appendix provides solutions to use to reach the Camera will also have to speed up a Dynamic Domain Name Service (DDNS) account, click the Setup tab of the Wireless-N Internet Home Monitoring Camera. If not, log into your computer as well. Click Yes to allow remote access to Tools and Internet Options. •...
User Guide
Page 25
... the Camera, and then power it on a Macintosh. Access the Camera's Web-based Utility, and click the Setup tab. Access the Camera's Web-based Utility, and click the Setup tab. It is a maximum of one of the IEEE standards for computers running a Windows operating system and Internet... RTS/CTS feature •Fragmentation •• Power Management 24 Appendix A Frequently Asked Questions Can I directly connect the Camera to wired and wireless networks at the same time? If you only have Netscape, you can simultaneously view the Camera's video. If your computer. each chunk is ...
... the Camera, and then power it on a Macintosh. Access the Camera's Web-based Utility, and click the Setup tab. Access the Camera's Web-based Utility, and click the Setup tab. It is a maximum of one of the IEEE standards for computers running a Windows operating system and Internet... RTS/CTS feature •Fragmentation •• Power Management 24 Appendix A Frequently Asked Questions Can I directly connect the Camera to wired and wireless networks at the same time? If you only have Netscape, you can simultaneously view the Camera's video. If your computer. each chunk is ...
User Guide
Page 28
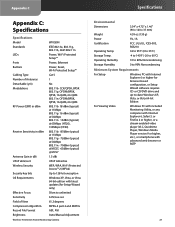
...Gain in dBi UPnP able/cert Wireless Security Security key bits OS Requirements Effective Focus Sensitivity Field of View Compression Algorithm Record File Format Brightness WVC80N IEEE 802.3u, 802.11g, 802.11b, draft 802.11n Power, Wi-Fi Protected Setup™ Power, Ethernet Power,...128-bit encryption Windows XP, Vista, or Vista 64-bit edition with latest updates (for Setup Wizard only) 50cm to unlimited 6.0V/Lux-sec 61.2 degrees MPEG-4 part 2 and MJPEG ASF, AVI Auto/Manual Adjustment Wireless-N Internet Home Monitoring Camera Specifications Environmental Dimensions 3.54" x 4.72" x 1.46" ...
...Gain in dBi UPnP able/cert Wireless Security Security key bits OS Requirements Effective Focus Sensitivity Field of View Compression Algorithm Record File Format Brightness WVC80N IEEE 802.3u, 802.11g, 802.11b, draft 802.11n Power, Wi-Fi Protected Setup™ Power, Ethernet Power,...128-bit encryption Windows XP, Vista, or Vista 64-bit edition with latest updates (for Setup Wizard only) 50cm to unlimited 6.0V/Lux-sec 61.2 degrees MPEG-4 part 2 and MJPEG ASF, AVI Auto/Manual Adjustment Wireless-N Internet Home Monitoring Camera Specifications Environmental Dimensions 3.54" x 4.72" x 1.46" ...
