User Guide
Page 3
... 4 Back Panel 4 Chapter 2: Installing and Using the Camera Utility 5 Overview 5 Installing the Camera Utility 5 Using the Camera Utility for the First Time 6 Using the Camera Utility 6 LiveView 6 View Recordings 8 Setup 9 Chapter 3: Advanced Configuration with the Web-based Utility 12 Overview 12 How to Access the Web-based Utility 12 View Video 12 Setup > Basic 14 Setup...
... 4 Back Panel 4 Chapter 2: Installing and Using the Camera Utility 5 Overview 5 Installing the Camera Utility 5 Using the Camera Utility for the First Time 6 Using the Camera Utility 6 LiveView 6 View Recordings 8 Setup 9 Chapter 3: Advanced Configuration with the Web-based Utility 12 Overview 12 How to Access the Web-based Utility 12 View Video 12 Setup > Basic 14 Setup...
User Guide
Page 6
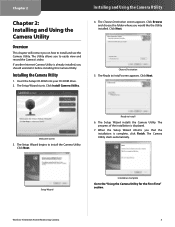
...into your CD-ROM drive. 2. Wireless-N Internet Home Monitoring Camera 5 Installing the Camera Utility 1. Installing and Using the Camera Utility 4. Click Next. The Ready to install the Camera Utility. Welcome Screen 3. The progress of the installation is complete, click Finish. The Choose ... and record the Camera's video. The Utility allows you on how to install and use the Camera Utility. If another Internet Camera Utility is already installed, you would like the Utility installed. Click Install Camera Utility. Click Browse and choose the folder where...
...into your CD-ROM drive. 2. Wireless-N Internet Home Monitoring Camera 5 Installing the Camera Utility 1. Installing and Using the Camera Utility 4. Click Next. The Ready to install the Camera Utility. Welcome Screen 3. The progress of the installation is complete, click Finish. The Choose ... and record the Camera's video. The Utility allows you on how to install and use the Camera Utility. If another Internet Camera Utility is already installed, you would like the Utility installed. Click Install Camera Utility. Click Browse and choose the folder where...
User Guide
Page 7
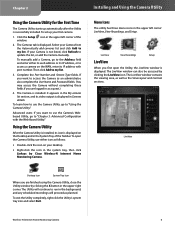
... and its video output is displayed. To learn how to "Using the Camera Utility." To open the Utility, the LiveView window is displayed in the system tray, then click Linksys by Cisco Wireless-N Internet Home Monitoring Camera. LiveView View Recordings Setup LiveView When you first ...open the Camera Utility, use the Camera Utility, go to use either its web address or its IP address with the Web-Based Utility." The Utility will continue to "Chapter...
... and its video output is displayed. To learn how to "Using the Camera Utility." To open the Utility, the LiveView window is displayed in the system tray, then click Linksys by Cisco Wireless-N Internet Home Monitoring Camera. LiveView View Recordings Setup LiveView When you first ...open the Camera Utility, use the Camera Utility, go to use either its web address or its IP address with the Web-Based Utility." The Utility will continue to "Chapter...
User Guide
Page 8
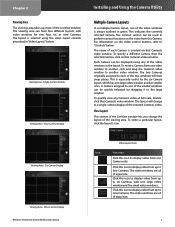
... using any Camera's video at full scale, doubleclick that Camera's video window. Single-Camera Display Viewing Area - Four-Camera Display Installing and Using the Camera Utility Multiple-Camera Layouts In a multiple-Camera layout, one of the viewing area. The two Cameras originally assigned to each Camera is overlaid on the video...
... using any Camera's video at full scale, doubleclick that Camera's video window. Single-Camera Display Viewing Area - Four-Camera Display Installing and Using the Camera Utility Multiple-Camera Layouts In a multiple-Camera layout, one of the viewing area. The two Cameras originally assigned to each Camera is overlaid on the video...
User Guide
Page 9
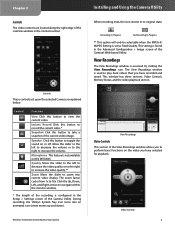
...the slider to toggle the sound on or off. Click the Up, Down, Left, and Right arrows to perform basic functions on the WVC80N. Recording In Progress No Recording In Progress ** This option will only be selectable when the MPEG-4/ MJPEG Setting is accessed by clicking the... View Recordings icon. Microphone This feature is configured in the Advanced Configuration > Image screen of the Camera's Web-based Utility. During recording, the Utility's System Tray icon turns into current video display. This setting is used to play back videos that you to navigate within ...
...the slider to toggle the sound on or off. Click the Up, Down, Left, and Right arrows to perform basic functions on the WVC80N. Recording In Progress No Recording In Progress ** This option will only be selectable when the MPEG-4/ MJPEG Setting is accessed by clicking the... View Recordings icon. Microphone This feature is configured in the Advanced Configuration > Image screen of the Camera's Web-based Utility. During recording, the Utility's System Tray icon turns into current video display. This setting is used to play back videos that you to navigate within ...
User Guide
Page 10
... you have chosen. 4. If you want to 16x. There are available. These tabs display screens whose functions are described below . Installing and Using the Camera Utility Video Playback The section at the top position), the video will display the date and time of the View Recordings window indicates, in hours and...
... you have chosen. 4. If you want to 16x. There are available. These tabs display screens whose functions are described below . Installing and Using the Camera Utility Video Playback The section at the top position), the video will display the date and time of the View Recordings window indicates, in hours and...
User Guide
Page 11
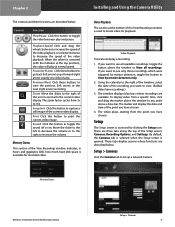
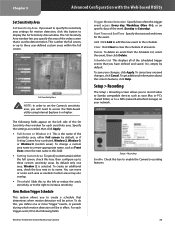
... Select the time to start the recording using the drop down list and click Save. Wireless-N Internet Home Monitoring Camera Installing and Using the Camera Utility Setup > Recording Options Click on a recurring basis.) •• Start Date (mm/dd/yyyy) Enter the date to start the recording, in... Details section of the selected Camera. To set the recording schedule for the selected Camera: 1. Then click Add to open the Web-based Utility. Camera Details The Camera Details section allows you want the Camera to end the recording using the drop down menus. •• End Time...
... Select the time to start the recording using the drop down list and click Save. Wireless-N Internet Home Monitoring Camera Installing and Using the Camera Utility Setup > Recording Options Click on a recurring basis.) •• Start Date (mm/dd/yyyy) Enter the date to start the recording, in... Details section of the selected Camera. To set the recording schedule for the selected Camera: 1. Then click Add to open the Web-based Utility. Camera Details The Camera Details section allows you want the Camera to end the recording using the drop down menus. •• End Time...
User Guide
Page 12
...video, refer to hold a video recording. NOTE: The maximum length of time from the drop down menu. Installing and Using the Camera Utility Instant Recording Time Limit Maximum Time Limit for Video Recordings You may find it occurs. Select the length of a recording file is 10 ... the"Setup > Image" section of "Chapter 3: Advanced Configuration with the recording. Having this additional footage can help to occur, the Camera Utility must be saved. Disk Space for the scheduled recordings to show the motion more than one hour. Enable text overlays Check this box, then...
...video, refer to hold a video recording. NOTE: The maximum length of time from the drop down menu. Installing and Using the Camera Utility Instant Recording Time Limit Maximum Time Limit for Video Recordings You may find it occurs. Select the length of a recording file is 10 ... the"Setup > Image" section of "Chapter 3: Advanced Configuration with the recording. Having this additional footage can help to occur, the Camera Utility must be saved. Disk Space for the scheduled recordings to show the motion more than one hour. Enable text overlays Check this box, then...
User Guide
Page 13
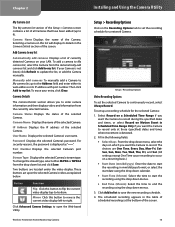
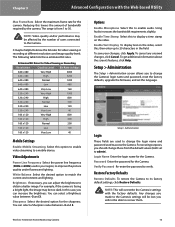
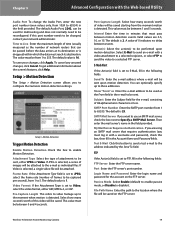
...View Video Follow these methods. •• Launch Internet Explorer, and enter the Camera's IP address in "Chapter 3: Installing and Using the Camera Utility." Click the View Video tab on the Welcome screen. Select this tab to go to the "Setup" sections for more information. •• Setup... Linksys Web - How to access and alter its features. Select this tab to display the Help screen. Select this tab to close the Utility. 12 Select this tab to the "Help" section for more information. •• Exit - These controls and their functions are used to...
...View Video Follow these methods. •• Launch Internet Explorer, and enter the Camera's IP address in "Chapter 3: Installing and Using the Camera Utility." Click the View Video tab on the Welcome screen. Select this tab to go to the "Setup" sections for more information. •• Setup... Linksys Web - How to access and alter its features. Select this tab to display the Help screen. Select this tab to close the Utility. 12 Select this tab to the "Help" section for more information. •• Exit - These controls and their functions are used to...
User Guide
Page 14
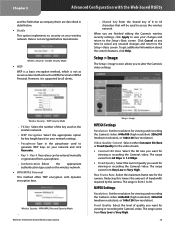
... display. Position the cursor over the part of the image you click the button, the cursor changes to a magnifying glass labeled with the Web-based Utility Resolution Use the Resolution drop-down menu to zoom in microphone.The button's appearance indicates whether the sound is on or off. The display changes...
... display. Position the cursor over the part of the image you click the button, the cursor changes to a magnifying glass labeled with the Web-based Utility Resolution Use the Resolution drop-down menu to zoom in microphone.The button's appearance indicates whether the sound is on or off. The display changes...
User Guide
Page 15
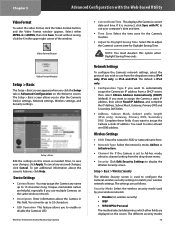
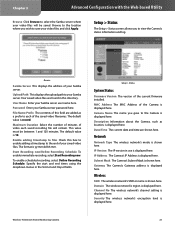
...; Network Type Select the network's mode, Ad-hoc or Infrastructure. •• Channel No If the Camera is incorrect, click Sync with the Web-based Utility Video Format To select the video format, click the Video Format button, and the Video Format window appears. Setup > Basic Edit the settings on the...
...; Network Type Select the network's mode, Ad-hoc or Infrastructure. •• Channel No If the Camera is incorrect, click Sync with the Web-based Utility Video Format To select the video format, click the Video Format button, and the Video Format window appears. Setup > Basic Edit the settings on the...
User Guide
Page 16
... authentication type used to generate WEP keys on the wireless network. •• WPA/WPA2 Personal This method offers TKIP encryption with the Web-based Utility and the fields that accompany them are finished editing the Camera's wireless security settings, click Apply to alter the Camera's video settings. Click Cancel at...
... authentication type used to generate WEP keys on the wireless network. •• WPA/WPA2 Personal This method offers TKIP encryption with the Web-based Utility and the fields that accompany them are finished editing the Camera's wireless security settings, click Apply to alter the Camera's video settings. Click Cancel at...
User Guide
Page 17
.... White Balance Select the desired option to 30. To save your region, to the Camera's settings will overwrite the Camera's settings with the Web-based Utility Max Frame Rate Select the maximum frame rate for the sharpness. The range is facing a bright light, the image may be too dark. To get...
.... White Balance Select the desired option to 30. To save your region, to the Camera's settings will overwrite the Camera's settings with the Web-based Utility Max Frame Rate Select the maximum frame rate for the sharpness. The range is facing a bright light, the image may be too dark. To get...
User Guide
Page 18
... Only users in other words, use . Users This lists the user database (the users who have access to enable DDNS service with the Web-based Utility Firmware Upgrade Upgrade Firmware New firmware versions are posted at www.linksysbycisco.com and can be granted, either All users or Only users in database...
... Only users in other words, use . Users This lists the user database (the users who have access to enable DDNS service with the Web-based Utility Firmware Upgrade Upgrade Firmware New firmware versions are posted at www.linksysbycisco.com and can be granted, either All users or Only users in database...
User Guide
Page 19
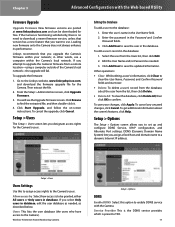
... RealPlayer: rtsp://< Camera IP Address>/img/video.sav •• Windows Media Player: rtsp:///img/video.asf •• Mobile phone with the Web-based Utility Domain Name Enter the domain name assigned to be reconfigured. NOTE: Go to www.tzo.com/linksys to see the camera's media stream while conserving...
... RealPlayer: rtsp://< Camera IP Address>/img/video.sav •• Windows Media Player: rtsp:///img/video.asf •• Mobile phone with the Web-based Utility Domain Name Enter the domain name assigned to be reconfigured. NOTE: Go to www.tzo.com/linksys to see the camera's media stream while conserving...
User Guide
Page 20
... before the data arrives at its destination or is set to Specify a SMTP Mail Server. Select E-Mail to send an e-mail with the Web-based Utility Audio Port To change the Audio Port, enter the new port number (even values only, from 1024 to 65534) in the Account Name and Password...
... before the data arrives at its destination or is set to Specify a SMTP Mail Server. Select E-Mail to send an e-mail with the Web-based Utility Audio Port To change the Audio Port, enter the new port number (even values only, from 1024 to 65534) in the Account Name and Password...
User Guide
Page 21
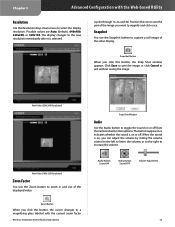
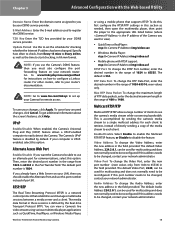
... to set the Camera's sensitivity area, you have defined and saved. The following fields. Chapter 3 Advanced Configuration with the Web-based Utility Set Sensitivity Area Set Sensitivity Area If you want to specify the sensitivity area settings for the event. Specify the settings as Front Door... then click Apply. •• Full Screen or Window 2-4 This is the name of the week (Sunday to access the Web-based utility using Internet Explorer 6 or higher. Delete To delete an event from the Schedule List, select the event, then click Delete. Schedule List This...
... to set the Camera's sensitivity area, you have defined and saved. The following fields. Chapter 3 Advanced Configuration with the Web-based Utility Set Sensitivity Area Set Sensitivity Area If you want to specify the sensitivity area settings for the event. Specify the settings as Front Door... then click Apply. •• Full Screen or Window 2-4 This is the name of the week (Sunday to access the Web-based utility using Internet Explorer 6 or higher. Delete To delete an event from the Schedule List, select the event, then click Delete. Schedule List This...
User Guide
Page 22
... Information about the Camera, such as a prefix to each saved recording file will be between 1 and 120 minutes. Chapter 3 Advanced Configuration with the Web-based Utility Browse Click Browse to select the Samba server where your Samba server user name here. Browse to the location where you to save your Samba...
... Information about the Camera, such as a prefix to each saved recording file will be between 1 and 120 minutes. Chapter 3 Advanced Configuration with the Web-based Utility Browse Click Browse to select the Samba server where your Samba server user name here. Browse to the location where you to save your Samba...
User Guide
Page 23
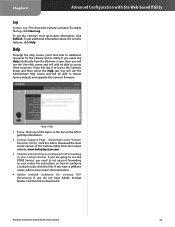
...-N Internet Home Monitoring Camera 22 To empty the log, click Clear Log. Setup > Help •• Setup Click any of the Camera Utility from the Welcome screen, then you do not have a different router, refer to access these resources. Help Through the Help screen, you'll... the topics in your Linksys Router If you are going to -date information, click Refresh. Chapter 3 Advanced Configuration with the Web-based Utility Log System Log This shows the Camera's activities. If you select the Help tab directly from the Linksys website, www.linksysbycisco.com. •...
...-N Internet Home Monitoring Camera 22 To empty the log, click Clear Log. Setup > Help •• Setup Click any of the Camera Utility from the Welcome screen, then you do not have a different router, refer to access these resources. Help Through the Help screen, you'll... the topics in your Linksys Router If you are going to -date information, click Refresh. Chapter 3 Advanced Configuration with the Web-based Utility Log System Log This shows the Camera's activities. If you select the Help tab directly from the Linksys website, www.linksysbycisco.com. •...
User Guide
Page 24
... View Video from my computer. Important: To allow the plug-in to be installed. •• You should see two WVC80Ns listed in my Camera Utility. When powering on the Basic screen, change the Camera's settings. Make sure you will be able to speed up a Dynamic... click Settings under Temporary Internet files. •• Click View Objects. •• You should then be prompted to use the Web-based Utility, log in Internet Explorer, but somehow I see a file named NetCamPlayerWeb Control installed. I 'm away from www.microsoft.com. Click Yes to allow...
... View Video from my computer. Important: To allow the plug-in to be installed. •• You should see two WVC80Ns listed in my Camera Utility. When powering on the Basic screen, change the Camera's settings. Make sure you will be able to speed up a Dynamic... click Settings under Temporary Internet files. •• Click View Objects. •• You should then be prompted to use the Web-based Utility, log in Internet Explorer, but somehow I see a file named NetCamPlayerWeb Control installed. I 'm away from www.microsoft.com. Click Yes to allow...