User Guide
Page 3
... Chapter 1: Product Overview 2 Front Panel 2 Back Panel 2 Chapter 2: How to Use the PrintServer 3 How to Access the PrintServer Utility 3 About the Print Server Information Screen 4 Chapter 3: Advanced Configuration 6 How to Access the Web-Based Utility 6 The Setup Tab 6 The Protocol Tab > TCP/IP 6 The ...Protocol Tab > SNMP 7 The Wireless Tab > Basic 8 The Wireless Tab > Security 8 The Printer Tab > Scan 9 The Printer Tab > Internet Printing 10 The Printer Tab > Logical Port 10 The Status Tab > Device 11 The Status Tab > Printer 11 The Status Tab > Wireless 12 The Exit...
... Chapter 1: Product Overview 2 Front Panel 2 Back Panel 2 Chapter 2: How to Use the PrintServer 3 How to Access the PrintServer Utility 3 About the Print Server Information Screen 4 Chapter 3: Advanced Configuration 6 How to Access the Web-Based Utility 6 The Setup Tab 6 The Protocol Tab > TCP/IP 6 The ...Protocol Tab > SNMP 7 The Wireless Tab > Basic 8 The Wireless Tab > Security 8 The Printer Tab > Scan 9 The Printer Tab > Internet Printing 10 The Printer Tab > Logical Port 10 The Status Tab > Device 11 The Status Tab > Printer 11 The Status Tab > Wireless 12 The Exit...
User Guide
Page 4
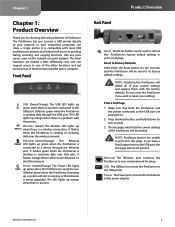
...factory defaults. Make sure that both the PrintServer and the printer connected to the USB port are treated a little differently-any print server, users on the Ethernet port. Press the Reset button, and hold it allows full access to restore the PrintServer's factory default settings ...the PrintServer if you have a PostScript printer on . 2. NOTE: PostScript printers are detected on the network can be printed. Power The Power port connects the PrintServer to print this test page. It flashes green when the PrintServer is an error. It flashes orange when collisions are unable to ...
...factory defaults. Make sure that both the PrintServer and the printer connected to the USB port are treated a little differently-any print server, users on the Ethernet port. Press the Reset button, and hold it allows full access to restore the PrintServer's factory default settings ...the PrintServer if you have a PostScript printer on . 2. NOTE: PostScript printers are detected on the network can be printed. Power The Power port connects the PrintServer to print this test page. It flashes green when the PrintServer is an error. It flashes orange when collisions are unable to ...
User Guide
Page 5
...a memory card, click Connect. Refer to control the PrintServer. When you right-click the PrintServer diagnostic icon, you will see the Print Server Information screen, click Info. About PrintServer Utlity Exit To close the utility, your computer will appear. If you must use the PrintServer....To exit the utility, click Yes. One way uses the PrintServer icon in the System Tray After you double-click the icon, the Print Server Information screen will automatically connect to scan, fax, or access a memory card, then you close the utility, click Exit. PrintServer Icon...
...a memory card, click Connect. Refer to control the PrintServer. When you right-click the PrintServer diagnostic icon, you will see the Print Server Information screen, click Info. About PrintServer Utlity Exit To close the utility, your computer will appear. If you must use the PrintServer....To exit the utility, click Yes. One way uses the PrintServer icon in the System Tray After you double-click the icon, the Print Server Information screen will automatically connect to scan, fax, or access a memory card, then you close the utility, click Exit. PrintServer Icon...
User Guide
Page 6
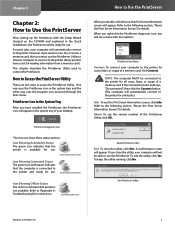
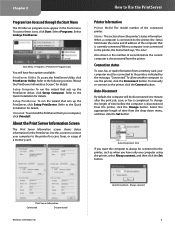
...for details. Setup Computer To run the wizard that sets up the PrintServer, click Setup PrintServer. About the Print Server Information Screen The Print Server Information screen shows status information for scans, faxes, or usage of time before the current computer is completed.... is currently connected. Chapter 2 Program Icon Accessed through the Start Menu The PrintServer program icons appear in the Start menu. Print Server Information Connected Disconnected Wireless-G PrintServer Auto-Disconnect, Always connect 4 To access these icons, click Start. How to the printer,...
...for details. Setup Computer To run the wizard that sets up the PrintServer, click Setup PrintServer. About the Print Server Information Screen The Print Server Information screen shows status information for scans, faxes, or usage of time before the current computer is completed.... is currently connected. Chapter 2 Program Icon Accessed through the Start Menu The PrintServer program icons appear in the Start menu. Print Server Information Connected Disconnected Wireless-G PrintServer Auto-Disconnect, Always connect 4 To access these icons, click Start. How to the printer,...
User Guide
Page 7
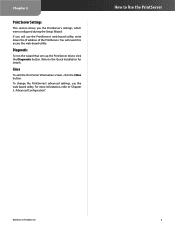
If you the PrintServer's settings, which were configured during the Setup Wizard. Close To exit the Print Server Information screen, click the Close button. Diagnostic To run the wizard that sets up the PrintServer driver, click the Diagnostic button. How to the Quick ... the PrintServer. Refer to Use the PrintServer Wireless-G PrintServer 5 For more information, refer to "Chapter 3: Advanced Configuration". You will use the web-based utility. Chapter 2 Print Server Settings This section shows you will need it to access the web-based utility.
If you the PrintServer's settings, which were configured during the Setup Wizard. Close To exit the Print Server Information screen, click the Close button. Diagnostic To run the wizard that sets up the PrintServer driver, click the Diagnostic button. How to the Quick ... the PrintServer. Refer to Use the PrintServer Wireless-G PrintServer 5 For more information, refer to "Chapter 3: Advanced Configuration". You will use the web-based utility. Chapter 2 Print Server Settings This section shows you will need it to access the web-based utility.
User Guide
Page 8
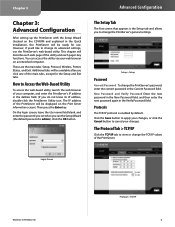
..., use . The Protocol Tab > TCP/IP Click the TCP/IP tab to change the TCP/IP values of the PrintServer will be displayed on the Print Server Information screen.) Then press the Enter key. Chapter 3 Chapter 3: Advanced Configuration After setting up the PrintServer with the Setup Wizard (located on the CD-ROM...
..., use . The Protocol Tab > TCP/IP Click the TCP/IP tab to change the TCP/IP values of the PrintServer will be displayed on the Print Server Information screen.) Then press the Enter key. Chapter 3 Chapter 3: Advanced Configuration After setting up the PrintServer with the Setup Wizard (located on the CD-ROM...
User Guide
Page 12
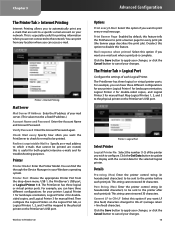
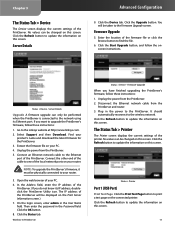
...this is useful for both graphic-intensive e-mails and for your network. This string cannot exceed 30 characters. Printer > Internet Printing Mail Server Mail Server IP Address Enter the IP address of your Windows operating system. Check Mail every Specify how often you wish to configure.... Enter the printer control string (in your mail server. (This value must be printed are not connected to print a banner page for manual feed. For example, you are routed; Print Banner Page Enabled by default, this option if you can print from the drop-down menu: USB 1, the PrintServer...
...this is useful for both graphic-intensive e-mails and for your network. This string cannot exceed 30 characters. Printer > Internet Printing Mail Server Mail Server IP Address Enter the IP address of your Windows operating system. Check Mail every Specify how often you wish to configure.... Enter the printer control string (in your mail server. (This value must be printed are not connected to print a banner page for manual feed. For example, you are routed; Print Banner Page Enabled by default, this option if you can print from the drop-down menu: USB 1, the PrintServer...
User Guide
Page 13
...field. It should automatically reconnect to the PrintServer. Click the Refresh button to print a test page on this screen. Status > Printer Port 1 (USB Port) Print Test Page Click the Print Test Page button to update the information on this screen. You will be ... from the PrintServer. 5. No values can be changed on the connected printer. Click the Refresh button to the Firmware Upgrade screen. Server Details Upgrade A firmware upgrade can be changed on this screen. Select Support and then Download. Extract the firmware file on this screen...
...field. It should automatically reconnect to the PrintServer. Click the Refresh button to print a test page on this screen. Status > Printer Port 1 (USB Port) Print Test Page Click the Print Test Page button to update the information on this screen. You will be ... from the PrintServer. 5. No values can be changed on the connected printer. Click the Refresh button to the Firmware Upgrade screen. Server Details Upgrade A firmware upgrade can be changed on this screen. Select Support and then Download. Extract the firmware file on this screen...
User Guide
Page 15
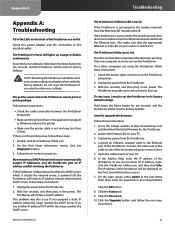
...: 1. Wait five seconds, and then plug in the User Name field. Also make sure that the appropriate Ethernet or Link LED on the Print Server Information screen.) 7. I need to factory defaults. Connect the other computers are not lit. In the Address field, enter the IP address of... the power from the PrintServer. 2. Go to see if another IP address NOT within the range used by the DHCP server. If the PrintServer is printing. Extract the firmware file on the front of your custom settings and replace them with the factory defaults. Wait five seconds...
...: 1. Wait five seconds, and then plug in the User Name field. Also make sure that the appropriate Ethernet or Link LED on the Print Server Information screen.) 7. I need to factory defaults. Connect the other computers are not lit. In the Address field, enter the IP address of... the power from the PrintServer. 2. Go to see if another IP address NOT within the range used by the DHCP server. If the PrintServer is printing. Extract the firmware file on the front of your custom settings and replace them with the factory defaults. Wait five seconds...