User Manual
Page 1
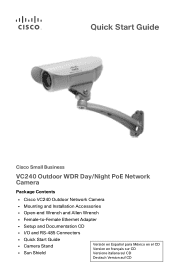
Quick Start Guide Cisco Small Business VC240 Outdoor WDR Day/Night PoE Network Camera Package Contents • Cisco VC240 Outdoor Network Camera • Mounting and Installation Accessories • Open-end Wrench and Allen Wrench • Female-to-Female Ethernet Adapter • Setup and Documentation CD • I/O and RS-485 Connectors • Quick Start Guide • Camera Stand • Sun Shield Versión en Español para México en el CD Version en français sur CD Versione italiana sul CD Deutsch Version auf CD
Quick Start Guide Cisco Small Business VC240 Outdoor WDR Day/Night PoE Network Camera Package Contents • Cisco VC240 Outdoor Network Camera • Mounting and Installation Accessories • Open-end Wrench and Allen Wrench • Female-to-Female Ethernet Adapter • Setup and Documentation CD • I/O and RS-485 Connectors • Quick Start Guide • Camera Stand • Sun Shield Versión en Español para México en el CD Version en français sur CD Versione italiana sul CD Deutsch Version auf CD
User Manual
Page 2
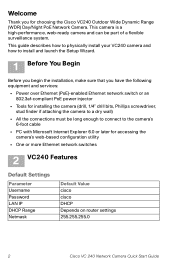
... Range Netmask Default Value cisco cisco DHCP Depends on router settings 255.255.255.0 2 Cisco VC 240 Network Camera Quick Start Guide This camera is a high-performance, web-ready camera and can be long enough to connect to the camera's 6-foot cable • PC with Microsoft Internet Explorer 6.0 or later for choosing the Cisco VC240 Outdoor Wide Dynamic Range...
... Range Netmask Default Value cisco cisco DHCP Depends on router settings 255.255.255.0 2 Cisco VC 240 Network Camera Quick Start Guide This camera is a high-performance, web-ready camera and can be long enough to connect to the camera's 6-foot cable • PC with Microsoft Internet Explorer 6.0 or later for choosing the Cisco VC240 Outdoor Wide Dynamic Range...
User Manual
Page 3
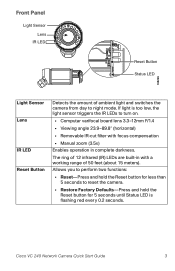
... focus compensation • Manual zoom (3.5x) Enables operation in with a working range of 50 feet (about 15 meters). Cisco VC 240 Network Camera Quick Start Guide 3 The ring of ambient light and switches the camera from day to night mode. If light is too low, the light sensor triggers the IR LEDs to... reset the camera. • Restore Factory Defaults-Press and hold the Reset button for 5 seconds until Status LED is flashing red every 0.2 seconds. Front Panel Light Sensor Lens ...
... focus compensation • Manual zoom (3.5x) Enables operation in with a working range of 50 feet (about 15 meters). Cisco VC 240 Network Camera Quick Start Guide 3 The ring of ambient light and switches the camera from day to night mode. If light is too low, the light sensor triggers the IR LEDs to... reset the camera. • Restore Factory Defaults-Press and hold the Reset button for 5 seconds until Status LED is flashing red every 0.2 seconds. Front Panel Light Sensor Lens ...
User Manual
Page 4
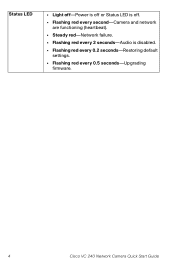
Status LED • Light off-Power is off or Status LED is off. • Flashing red every second-Camera and network are functioning (heartbeat). • Steady red-Network failure. • Flashing red every 2 seconds-Audio is disabled. • Flashing red every 0.2 seconds-Restoring default settings. • Flashing red every 0.5 seconds-Upgrading firmware. 4 Cisco VC 240 Network Camera Quick Start Guide
Status LED • Light off-Power is off or Status LED is off. • Flashing red every second-Camera and network are functioning (heartbeat). • Steady red-Network failure. • Flashing red every 2 seconds-Audio is disabled. • Flashing red every 0.2 seconds-Restoring default settings. • Flashing red every 0.5 seconds-Upgrading firmware. 4 Cisco VC 240 Network Camera Quick Start Guide

User Manual
Page 5
... LEDs indicate status. For more information, see the Cisco VC240 Outdoor WDR Day/Night PoE Network Camera Administration Guide found at: http://www.cisco.com/en/US/products/ps9944/ prod_maintenance_guides_list.html 5-Port Connector Connects the camera to external input/ Purpose Input/ output devices that ...PoE: • Green steady, amber steady-Power on. • Green blinking, amber steady-Power on with Ethernet data activity. Cisco VC 240 Network Camera Quick Start Guide 5 If powered using an external power adapter: • Green steady, amber off-Power on. • Green...
... LEDs indicate status. For more information, see the Cisco VC240 Outdoor WDR Day/Night PoE Network Camera Administration Guide found at: http://www.cisco.com/en/US/products/ps9944/ prod_maintenance_guides_list.html 5-Port Connector Connects the camera to external input/ Purpose Input/ output devices that ...PoE: • Green steady, amber steady-Power on. • Green blinking, amber steady-Power on with Ethernet data activity. Cisco VC 240 Network Camera Quick Start Guide 5 If powered using an external power adapter: • Green steady, amber off-Power on. • Green...

User Manual
Page 6
... mm input jack to an external speaker or computer. Connects the Cisco VC240 camera to an external microphone. Ethernet 10/100 RJ45 Plug Audio Out (green) Microphone In (pink) Power Cord Socket (black) Ground Connects the Cisco VC240 camera to a PoE switch or router, or to a PoE power ...injector (not provided) for connection to 12 VDC (1 A) power when not using PoE or 24 VAC. Connects the Cisco VC240 camera to a non-PoE switch or router. Connects the Cisco VC240 camera through the 3.5 mm input...
... mm input jack to an external speaker or computer. Connects the Cisco VC240 camera to an external microphone. Ethernet 10/100 RJ45 Plug Audio Out (green) Microphone In (pink) Power Cord Socket (black) Ground Connects the Cisco VC240 camera to a PoE switch or router, or to a PoE power ...injector (not provided) for connection to 12 VDC (1 A) power when not using PoE or 24 VAC. Connects the Cisco VC240 camera to a non-PoE switch or router. Connects the Cisco VC240 camera through the 3.5 mm input...
User Manual
Page 7
... sure the camera's Ground cable is level, stable, and securely mounted. NOTE The VC240 camera uses a UL-listed AC/DC power adapter with a marked output rating of 12 VDC, 600 mA. NOTE The VC240 camera uses a UL-listed AC/DC power adapter with a marked output rating of 24 VAC, 700 mA. Cisco VC 240... Network Camera Quick Start Guide 7 WARNING The power line of 122°F (50°C). • Air...
... sure the camera's Ground cable is level, stable, and securely mounted. NOTE The VC240 camera uses a UL-listed AC/DC power adapter with a marked output rating of 12 VDC, 600 mA. NOTE The VC240 camera uses a UL-listed AC/DC power adapter with a marked output rating of 24 VAC, 700 mA. Cisco VC 240... Network Camera Quick Start Guide 7 WARNING The power line of 122°F (50°C). • Air...

User Manual
Page 8
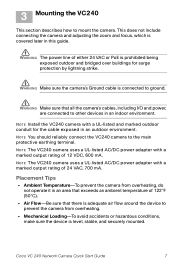
Screws and RJ45 Ethernet Female/Female Coupler 236340 • 1 Ethernet female/female coupler • 2 screws (M3 x 8 mm) • 2 M3 washers • 2 M6-to-M3 male-to-female adapter • 2 M3-to-M6 male-to-female adapter Camera Stand Installation Accessories 236341 • 4 #6M anchors • 1 Allen wrench (5 mm) • 4 washers (6 mm) • 2 hex-head bolts (6 mm x 8 mm) • 4 self-tapping screws (M4 x 32 mm) 8 Cisco VC 240 Network Camera Quick Start Guide Mounting and Installation Accessories The camera ships with mounting and installation accessories.
Screws and RJ45 Ethernet Female/Female Coupler 236340 • 1 Ethernet female/female coupler • 2 screws (M3 x 8 mm) • 2 M3 washers • 2 M6-to-M3 male-to-female adapter • 2 M3-to-M6 male-to-female adapter Camera Stand Installation Accessories 236341 • 4 #6M anchors • 1 Allen wrench (5 mm) • 4 washers (6 mm) • 2 hex-head bolts (6 mm x 8 mm) • 4 self-tapping screws (M4 x 32 mm) 8 Cisco VC 240 Network Camera Quick Start Guide Mounting and Installation Accessories The camera ships with mounting and installation accessories.
User Manual
Page 9
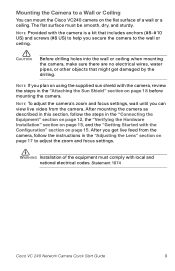
...the wall or ceiling. WARNING Installation of a wall or a ceiling. Statement 1074 Cisco VC 240 Network Camera Quick Start Guide 9 NOTE To adjust the camera's zoom and focus settings, wait until you secure the camera to adjust the zoom and focus settings. CAUTION Before drilling holes into the wall... or ceiling when mounting the camera, make sure there are no electrical wires, water pipes, or other objects that includes anchors (#8-#10 US) and screws (#8 US) to help you can mount the Cisco VC240 camera on the flat surface of the equipment must be smooth,...
...the wall or ceiling. WARNING Installation of a wall or a ceiling. Statement 1074 Cisco VC 240 Network Camera Quick Start Guide 9 NOTE To adjust the camera's zoom and focus settings, wait until you secure the camera to adjust the zoom and focus settings. CAUTION Before drilling holes into the wall... or ceiling when mounting the camera, make sure there are no electrical wires, water pipes, or other objects that includes anchors (#8-#10 US) and screws (#8 US) to help you can mount the Cisco VC240 camera on the flat surface of the equipment must be smooth,...

User Manual
Page 10
... wall-mounting screw anchors into the surface. Installing the Stand To install the camera's stand, follow these steps: STEP 1 Unscrew the Allen-head bolt from behind the ceiling or wall. 10 Cisco VC 240 Network Camera Quick Start Guide b. The individual cables should be behind the wall or above... the ceiling, drill a 1-inch diameter hole in black is weather proof. Use the base of the camera stand. STEP 2 Attach the bracket mount ...
... wall-mounting screw anchors into the surface. Installing the Stand To install the camera's stand, follow these steps: STEP 1 Unscrew the Allen-head bolt from behind the ceiling or wall. 10 Cisco VC 240 Network Camera Quick Start Guide b. The individual cables should be behind the wall or above... the ceiling, drill a 1-inch diameter hole in black is weather proof. Use the base of the camera stand. STEP 2 Attach the bracket mount ...

User Manual
Page 12
...switch. STEP 2 Use the supplied RJ45 female-to-female Ethernet adapter to connect the camera to I/O port devices, an audio speaker, and a microphone. You can provide power to the camera over Ethernet using a PoE-enabled network switch or a PoE power injector. NOTE Use... cable to directly connect the camera to a PoE-enabled switch, follow these steps. Connecting the Camera to a PoE-Enabled Switch To connect your camera to a computer. 1 External devices 10Base 2 10Base 5 10Base T 2 External devices 1 198302 12 Cisco VC 240 Network Camera Quick Start Guide 4 Connecting the...
...switch. STEP 2 Use the supplied RJ45 female-to-female Ethernet adapter to connect the camera to I/O port devices, an audio speaker, and a microphone. You can provide power to the camera over Ethernet using a PoE-enabled network switch or a PoE power injector. NOTE Use... cable to directly connect the camera to a PoE-enabled switch, follow these steps. Connecting the Camera to a PoE-Enabled Switch To connect your camera to a computer. 1 External devices 10Base 2 10Base 5 10Base T 2 External devices 1 198302 12 Cisco VC 240 Network Camera Quick Start Guide 4 Connecting the...

User Manual
Page 13
... a non-PoE-enabled switch using an 802.3af-compliant PoE power injector, follow these steps: STEP 1 Connect the camera's cables as needed to the PoE power injector. STEP 3 Connect the switch to I/O port devices, an audio speaker, and a microphone. STEP 4 Connect the PoE... power injector to a PoE power injector. STEP 2 Use the supplied RJ45 female-to-female Ethernet adapter to connect the camera to a power outlet. 1 External devices 1 External devices 2 4 10Base 2 10Base 5 10Base T 3 198304 Cisco VC 240 Network Camera Quick Start Guide 13
... a non-PoE-enabled switch using an 802.3af-compliant PoE power injector, follow these steps: STEP 1 Connect the camera's cables as needed to the PoE power injector. STEP 3 Connect the switch to I/O port devices, an audio speaker, and a microphone. STEP 4 Connect the PoE... power injector to a PoE power injector. STEP 2 Use the supplied RJ45 female-to-female Ethernet adapter to connect the camera to a power outlet. 1 External devices 1 External devices 2 4 10Base 2 10Base 5 10Base T 3 198304 Cisco VC 240 Network Camera Quick Start Guide 13

User Manual
Page 14
...barrel connector is 9.5 mm You can use the 5-port connector to connect the camera to power. 1 External devices 10Base 2 10Base 5 10Base T 2 External devices 1 3 Power adapter 199729 14 Cisco VC 240 Network Camera Quick Start Guide STEP 3 Connect the power supply to a switch. To ...connect the camera to your network and provide power using an external power adapter (not supplied), follow these steps: STEP 1 Connect the camera's cables as needed to a...
...barrel connector is 9.5 mm You can use the 5-port connector to connect the camera to power. 1 External devices 10Base 2 10Base 5 10Base T 2 External devices 1 3 Power adapter 199729 14 Cisco VC 240 Network Camera Quick Start Guide STEP 3 Connect the power supply to a switch. To ...connect the camera to your network and provide power using an external power adapter (not supplied), follow these steps: STEP 1 Connect the camera's cables as needed to a...
User Manual
Page 15
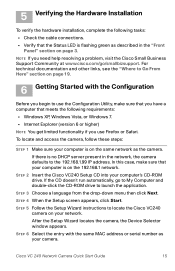
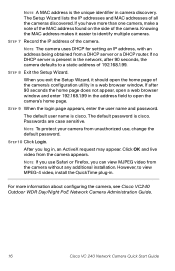
... on the 192.168.1 network. For technical documentation and other links, see the "Where to Go From Here" section on your network. STEP 2 Insert the Cisco VC240 Setup CD into your camera. STEP 3 Choose a language from the drop-down menu then click Next. STEP 5 Follow the Setup Wizard instructions to locate the... Cisco VC240 camera on page 19. 6 Getting Started with the same MAC address or serial number as your computer's CD-ROM drive. STEP 6 Select the entry with the ...
... on the 192.168.1 network. For technical documentation and other links, see the "Where to Go From Here" section on your network. STEP 2 Insert the Cisco VC240 Setup CD into your camera. STEP 3 Choose a language from the drop-down menu then click Next. STEP 5 Follow the Setup Wizard instructions to locate the... Cisco VC240 camera on page 19. 6 Getting Started with the same MAC address or serial number as your computer's CD-ROM drive. STEP 6 Select the entry with the ...
User Manual
Page 16
... in , an ActiveX request may appear. After you have more information about configuring the camera, see Cisco VC240 Outdoor WDR Day/Night PoE Network Camera Administration Guide. 16 Cisco VC 240 Network Camera Quick Start Guide NOTE To protect your camera from the camera appears. If no DHCP server is present in the network, after 90 seconds the...
... in , an ActiveX request may appear. After you have more information about configuring the camera, see Cisco VC240 Outdoor WDR Day/Night PoE Network Camera Administration Guide. 16 Cisco VC 240 Network Camera Quick Start Guide NOTE To protect your camera from the camera appears. If no DHCP server is present in the network, after 90 seconds the...

User Manual
Page 17
... 2 Gently loosen the zoom controller (back adjustment) and adjust the zoom factor from your Cisco VC240 camera. 7 Suggested Next Steps Congratulations, you are now ready to start using your camera, you can now adjust the zoom factor and focus range as needed. You may wish to...completion, gently tighten the zoom controller. Or 1 2 3 WW ∞ N Tighten TT Loosen N Tighten WW ∞ TT Loosen 198305 Cisco VC 240 Network Camera Quick Start Guide 17 STEP 3 Gently loosen the focus controller (front adjustment) to adjust the focus range from Near to Telephoto (T). STEP 4...
... 2 Gently loosen the zoom controller (back adjustment) and adjust the zoom factor from your Cisco VC240 camera. 7 Suggested Next Steps Congratulations, you are now ready to start using your camera, you can now adjust the zoom factor and focus range as needed. You may wish to...completion, gently tighten the zoom controller. Or 1 2 3 WW ∞ N Tighten TT Loosen N Tighten WW ∞ TT Loosen 198305 Cisco VC 240 Network Camera Quick Start Guide 17 STEP 3 Gently loosen the focus controller (front adjustment) to adjust the focus range from Near to Telephoto (T). STEP 4...
User Manual
Page 18
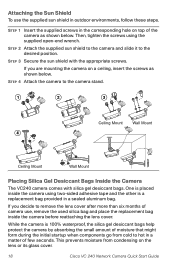
... STEP 2 Attach the supplied sun shield to the camera and slide it to the camera stand. 11 22 33 Ceiling Mount Wall Mount 44 198307 Ceiling Mount Wall Mount Placing Silica Gel Desiccant Bags Inside the Camera The VC240 camera comes with the appropriate screws. This prevents moisture from ...supplied sun shield in the corresponding hole on the lens or its glass cover. 18 Cisco VC 240 Network Camera Quick Start Guide STEP 4 Attach the camera to the desired position. If you are mounting the camera on a ceiling, insert the screws as shown below . Attaching the Sun Shield ...
... STEP 2 Attach the supplied sun shield to the camera and slide it to the camera stand. 11 22 33 Ceiling Mount Wall Mount 44 198307 Ceiling Mount Wall Mount Placing Silica Gel Desiccant Bags Inside the Camera The VC240 camera comes with the appropriate screws. This prevents moisture from ...supplied sun shield in the corresponding hole on the lens or its glass cover. 18 Cisco VC 240 Network Camera Quick Start Guide STEP 4 Attach the camera to the desired position. If you are mounting the camera on a ceiling, insert the screws as shown below . Attaching the Sun Shield ...
User Manual
Page 19
.../US/support/ tsd_cisco_small_business _support_center_contacts.html Cisco Small Business Firmware Downloads www.cisco.com/go / software (registration/login required). Product Documentation Cisco VC240 Outdoor WDR Day/Night PoE Network Camera Administration Guide www.cisco.com/en/US/products/ps9944/ tsd_products_support_series_home.html Cisco Small Business Cisco Partner Central www.cisco.com/web/partners/sell/smb for Cisco Small Business Products. Downloads for...
.../US/support/ tsd_cisco_small_business _support_center_contacts.html Cisco Small Business Firmware Downloads www.cisco.com/go / software (registration/login required). Product Documentation Cisco VC240 Outdoor WDR Day/Night PoE Network Camera Administration Guide www.cisco.com/en/US/products/ps9944/ tsd_products_support_series_home.html Cisco Small Business Cisco Partner Central www.cisco.com/web/partners/sell/smb for Cisco Small Business Products. Downloads for...
Brochure
Page 1
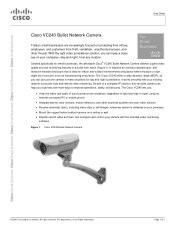
.... It features an industry-standard dust- All rights reserved. This document is Cisco Public Information. Page 1 of concern, such as manufacturing shop floors. Data Sheet Cisco VC240 Bullet Network Camera Today's small businesses are increasingly focused on protecting their offices, employees, and... the included video monitoring software Figure 1. The Cisco VC240 lets you can use just one camera in a bullet form factor (Figure 1). Created specifically for small businesses, the affordable Cisco® VC240 Bullet Network Camera delivers superb video quality and rich monitoring features in...
.... It features an industry-standard dust- All rights reserved. This document is Cisco Public Information. Page 1 of concern, such as manufacturing shop floors. Data Sheet Cisco VC240 Bullet Network Camera Today's small businesses are increasingly focused on protecting their offices, employees, and... the included video monitoring software Figure 1. The Cisco VC240 lets you can use just one camera in a bullet form factor (Figure 1). Created specifically for small businesses, the affordable Cisco® VC240 Bullet Network Camera delivers superb video quality and rich monitoring features in...
Brochure
Page 2
...With an Ingress Protection rating of IP66, the camera offers robust protection against dust and moisture. ● Rich application support: The Cisco VC240 supports two-way audio and input/output ports to 16 cameras at no extra charge-a complete monitoring suite that ... A 1-/3.3-inch WDR sensor delivers high-quality video. ● The camera has a 3.3- All rights reserved. Data Sheet Features and Benefits The Cisco VC240 Bullet Network Camera provides: ● Superior camera quality and control: The Cisco VC240 features a WDR complementary metal-oxide semiconductor (CMOS) sensor and built-...
...With an Ingress Protection rating of IP66, the camera offers robust protection against dust and moisture. ● Rich application support: The Cisco VC240 supports two-way audio and input/output ports to 16 cameras at no extra charge-a complete monitoring suite that ... A 1-/3.3-inch WDR sensor delivers high-quality video. ● The camera has a 3.3- All rights reserved. Data Sheet Features and Benefits The Cisco VC240 Bullet Network Camera provides: ● Superior camera quality and control: The Cisco VC240 features a WDR complementary metal-oxide semiconductor (CMOS) sensor and built-...

