User Guide
Page 2
COPYRIGHT & TRADEMARKS Copyright © 2002 Linksys, All Rights Reserved. Microsoft, Windows, and the Windows logo are designed to provide reasonable protection against harmful interference in a residential installation. LINKSYS DOES NOT OFFER REFUNDS FOR ANY PRODUCT. Please direct all... à la norme NMB-003 du Canada. All other than the receiver's • Consult a dealer or an experienced radio/TV technician for assistance UG-USB200M-092602NC JL BE SURE TO HAVE YOUR PROOF OF PURCHASE AND A BARCODE FROM THE PRODUCT'S PACKAGING ON HAND WHEN CALLING. All customers located outside of...
COPYRIGHT & TRADEMARKS Copyright © 2002 Linksys, All Rights Reserved. Microsoft, Windows, and the Windows logo are designed to provide reasonable protection against harmful interference in a residential installation. LINKSYS DOES NOT OFFER REFUNDS FOR ANY PRODUCT. Please direct all... à la norme NMB-003 du Canada. All other than the receiver's • Consult a dealer or an experienced radio/TV technician for assistance UG-USB200M-092602NC JL BE SURE TO HAVE YOUR PROOF OF PURCHASE AND A BARCODE FROM THE PRODUCT'S PACKAGING ON HAND WHEN CALLING. All customers located outside of...
User Guide
Page 3
... Network Configuration 10 Compact USB 2.0 10/100 Network Adapter Chapter 6: Windows Millennium Installation and Setup 15 Overview 15 Windows Millennium Driver Installation 15 Windows Millennium Network Configuration 18 Chapter 7: Windows 2000 Installation 23 Overview 23 Windows 2000 Driver Installation 23 Chapter 8: Windows XP Installation 26 Overview 26 Windows XP Driver Installation 26 Appendix A: Troubleshooting 29 Appendix B: Client...
... Network Configuration 10 Compact USB 2.0 10/100 Network Adapter Chapter 6: Windows Millennium Installation and Setup 15 Overview 15 Windows Millennium Driver Installation 15 Windows Millennium Network Configuration 18 Chapter 7: Windows 2000 Installation 23 Overview 23 Windows 2000 Driver Installation 23 Chapter 8: Windows XP Installation 26 Overview 26 Windows XP Driver Installation 26 Appendix A: Troubleshooting 29 Appendix B: Client...
User Guide
Page 4
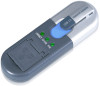
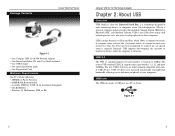
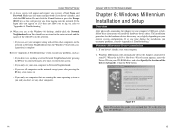
And with the power of Windows that supports USB. This tiny, Plug-and-Play compatible device attaches directly to 8 Times Faster than a USB 1.1 Adapter • Compact Size for Greater Flexibility • ... having to Any 10/100Mbps Hub or Switch • Backward Compatible with USB 1.0/1.1 USB Ports • Plug-and-Play Compatible with Windows 98, Millennium, 2000, and XP for Use with Windows 98, 2000, Millennium, and XP • One Male, Type A, USB Connector • One RJ-45, 10/100 Port for Network Connectivity...
And with the power of Windows that supports USB. This tiny, Plug-and-Play compatible device attaches directly to 8 Times Faster than a USB 1.1 Adapter • Compact Size for Greater Flexibility • ... having to Any 10/100Mbps Hub or Switch • Backward Compatible with USB 1.0/1.1 USB Ports • Plug-and-Play Compatible with Windows 98, Millennium, 2000, and XP for Use with Windows 98, 2000, Millennium, and XP • One Male, Type A, USB Connector • One RJ-45, 10/100 Port for Network Connectivity...
User Guide
Page 5
... port on . Similarly, USB supports hot-swapping, the insertion or removal of the most widely used technologies for maximum throughput) • CD-ROM Drive • Windows 98, Millennium, 2000, or XP Compact USB 2.0 10/100 Network Adapter Chapter 2: About USB Overview USB, which allows a computer to instantly recognize when a device like...
... port on . Similarly, USB supports hot-swapping, the insertion or removal of the most widely used technologies for maximum throughput) • CD-ROM Drive • Windows 98, Millennium, 2000, or XP Compact USB 2.0 10/100 Network Adapter Chapter 2: About USB Overview USB, which allows a computer to instantly recognize when a device like...
User Guide
Page 7
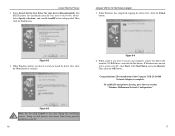
...system configuration. When the first Add New Hardware Wizard screen appears, insert the Driver CD into your PC. The installation procedure for the Windows operating system your CD-ROM drive, and click the Next button. 3. Instant EtherFast® Series Chapter 4: Connecting the Compact USB 2.0...vary slightly depending on your PC's USB port or USB hub. Figure 4-1 3. Compact USB 2.0 10/100 Network Adapter Chapter 5: Windows 98 Installation and Setup Overview After physically connecting the Adapter to the Adapter) into your PC is complete. The hardware installation is running....
...system configuration. When the first Add New Hardware Wizard screen appears, insert the Driver CD into your PC. The installation procedure for the Windows operating system your CD-ROM drive, and click the Next button. 3. Instant EtherFast® Series Chapter 4: Connecting the Compact USB 2.0...vary slightly depending on your PC's USB port or USB hub. Figure 4-1 3. Compact USB 2.0 10/100 Network Adapter Chapter 5: Windows 98 Installation and Setup Overview After physically connecting the Adapter to the Adapter) into your PC is complete. The hardware installation is running....

User Guide
Page 8
...: to restart your computer, remove the Driver CD from being properly installed on your computer. Windows will prevent your driver from the CD-ROM drive, and click the Yes button. When Windows has completed copying the files, click the Finish button. The installation of the Compact USB 2.0... not ask you want to the proper location for the CD-ROM (e.g., D:\). Congratulations! When Windows notifies you for the original Windows CD-ROM, insert the CD-ROM, and direct Windows to restart your PC, click Start. Doing so will begin copying the driver files to continue. Instant EtherFast...
...: to restart your computer, remove the Driver CD from being properly installed on your computer. Windows will prevent your driver from the CD-ROM drive, and click the Yes button. When Windows has completed copying the files, click the Finish button. The installation of the Compact USB 2.0... not ask you want to the proper location for the CD-ROM (e.g., D:\). Congratulations! When Windows notifies you for the original Windows CD-ROM, insert the CD-ROM, and direct Windows to restart your PC, click Start. Doing so will begin copying the driver files to continue. Instant EtherFast...
User Guide
Page 9
...(s). The File and Print Sharing screen will appear. Click the OK button. Instant EtherFast® Series Windows 98 Network Configuration If you are installing the Adapter in a Windows 98 PC that is used in an NT domain, go to "Appendix B: Client for Microsoft Setup ...network and inaccessible to other users. 5. Click the Configuration tab. Click the File and Print Sharing button. File and printer sharing for Windows 98." 1. From the Windows 98 desktop, right-click the Network Neighborhood icon. Figure 5-7 11 A screen similar to Figure 5-5 will be invisible on the network...
...(s). The File and Print Sharing screen will appear. Click the OK button. Instant EtherFast® Series Windows 98 Network Configuration If you are installing the Adapter in a Windows 98 PC that is used in an NT domain, go to "Appendix B: Client for Microsoft Setup ...network and inaccessible to other users. 5. Click the Configuration tab. Click the File and Print Sharing button. File and printer sharing for Windows 98." 1. From the Windows 98 desktop, right-click the Network Neighborhood icon. Figure 5-7 11 A screen similar to Figure 5-5 will be invisible on the network...

User Guide
Page 10
...wish, enter a description of your CD-ROM drive). 12. Compact USB 2.0 10/100 Network Adapter 10. If it does, direct Windows to the appropriate location (e.g., C:\windows\options\cabs or D:\win98 if you don't see this computer. Enter the name of access that is different from your PC, and click... the Yes button to this screen, simply shut down box, select Client for your workgroup in the Computer name field. If you have the Windows 98 CD-ROM and "D" represents your computer in the Computer Description field. From the Access Control tab, you for Microsoft Networks. 7. Your...
...wish, enter a description of your CD-ROM drive). 12. Compact USB 2.0 10/100 Network Adapter 10. If it does, direct Windows to the appropriate location (e.g., C:\windows\options\cabs or D:\win98 if you don't see this computer. Enter the name of access that is different from your PC, and click... the Yes button to this screen, simply shut down box, select Client for your workgroup in the Computer name field. If you have the Windows 98 CD-ROM and "D" represents your computer in the Computer Description field. From the Access Control tab, you for Microsoft Networks. 7. Your...
User Guide
Page 11
...• If you only see computers that "D" is complete. The installation procedure for the entire network and the names of your computer. 2. Windows Millennium will prevent you are running the same operating system as you and you encounter problems, consult "Appendix A: Troubleshooting." Figure 6-1 Note: Throughout... yours after pressing the F5 key on the network in Network Neighborhood; • If you can see all computers on your PC. Windows Millennium Driver Installation 1. Do not click the Cancel button or press the Escape [ESC] key as : • If you don't...
...• If you only see computers that "D" is complete. The installation procedure for the entire network and the names of your computer. 2. Windows Millennium will prevent you are running the same operating system as you and you encounter problems, consult "Appendix A: Troubleshooting." Figure 6-1 Note: Throughout... yours after pressing the F5 key on the network in Network Neighborhood; • If you can see all computers on your PC. Windows Millennium Driver Installation 1. Do not click the Cancel button or press the Escape [ESC] key as : • If you don't...
User Guide
Page 12
...the Compact USB 2.0 10/100 Network Adapter is ready to install the driver files, click the Next button to the next section, "Windows Millennium Network Configuration." Figure 6-3 Note: Do not click Cancel at any time during the installation process. Instant EtherFast® Series 3. Select.... Congratulations! Figure 6-4 6. Then click the OK button. To enable file and printer sharing, go to continue. Figure 6-2 4. When Windows has completed copying the driver files, click the Finish button. You MUST remove the checkmark from the box next to restart your computer, ...
...the Compact USB 2.0 10/100 Network Adapter is ready to install the driver files, click the Next button to the next section, "Windows Millennium Network Configuration." Figure 6-3 Note: Do not click Cancel at any time during the installation process. Instant EtherFast® Series 3. Select.... Congratulations! Figure 6-4 6. Then click the OK button. To enable file and printer sharing, go to continue. Figure 6-2 4. When Windows has completed copying the driver files, click the Finish button. You MUST remove the checkmark from the box next to restart your computer, ...

User Guide
Page 13
...18 19 Click the Configuration tab. Compact USB 2.0 10/100 Network Adapter 3. Click the File and Print Sharing button. The File and Print Sharing window will appear. Figure 6-5 Figure 6-6 Note: If you 'd like to share your printer with other users on the network, select I want to be...your PC's hard drive, select I want to be able to give others to print to my files. Instant EtherFast® Series Windows Millennium Network Configuration Note: Linksys does not provide technical support or troubleshooting for Microsoft Networks should now appear in the list of installed components...
...18 19 Click the Configuration tab. Compact USB 2.0 10/100 Network Adapter 3. Click the File and Print Sharing button. The File and Print Sharing window will appear. Figure 6-5 Figure 6-6 Note: If you 'd like to share your printer with other users on the network, select I want to be...your PC's hard drive, select I want to be able to give others to print to my files. Instant EtherFast® Series Windows Millennium Network Configuration Note: Linksys does not provide technical support or troubleshooting for Microsoft Networks should now appear in the list of installed components...

User Guide
Page 14
...can set the level of access that is different from your PC, and click the Yes button to the appropriate location (e.g., C:\windows\options\cabs or D:\win9x if you have the Windows Millennium CD-ROM and "D" represents your CD-ROM drive). 12. Figure 6-8 20 Figure 6-9 11. Your system may ask... for Microsoft Networks. 7. If you wish, enter a description of your Windows Millennium CD-ROM or the location of your computer in the Workgroup field. Note: Your Computer and Workgroup Names must each have to this...
...can set the level of access that is different from your PC, and click the Yes button to the appropriate location (e.g., C:\windows\options\cabs or D:\win9x if you have the Windows Millennium CD-ROM and "D" represents your CD-ROM drive). 12. Figure 6-8 20 Figure 6-9 11. Your system may ask... for Microsoft Networks. 7. If you wish, enter a description of your Windows Millennium CD-ROM or the location of your computer in the Workgroup field. Note: Your Computer and Workgroup Names must each have to this...
User Guide
Page 15
...for the hardware device driver may vary slightly depending on the Network Neighborhood icon. Compact USB 2.0 10/100 Network Adapter Chapter 7: Windows 2000 Installation Overview After physically connecting the Adapter to the "Appendix A: Troubleshooting" if you run into any time during the installation ...all computers on , refer to refresh the screen; • If you don't see anything at all in Network Neighborhood, then the Windows Millennium network configuration is assumed that are at any problems, such as: • If you only see your current system configuration. Figure ...
...for the hardware device driver may vary slightly depending on the Network Neighborhood icon. Compact USB 2.0 10/100 Network Adapter Chapter 7: Windows 2000 Installation Overview After physically connecting the Adapter to the "Appendix A: Troubleshooting" if you run into any time during the installation ...all computers on , refer to refresh the screen; • If you don't see anything at all in Network Neighborhood, then the Windows Millennium network configuration is assumed that are at any problems, such as: • If you only see your current system configuration. Figure ...

User Guide
Page 16
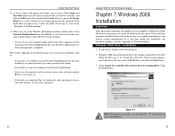
...Adapter is normal, and it has been verified that a digital signature has not been found (see Figure 7-4). For more information about networking under Windows 2000, refer to continue. Select Specify a location to continue. Click the Next button to your PC. This is complete. In the Copy... Figure 7-2 5. Click the Finish button, and remove the Driver CD from : field, enter D:\win2000. For Windows 2000, you may be informed that the Adapter does work with Windows 2000. The Completing the Found New Hardware Wizard screen will appear. Doing so will prevent your driver from being ...
...Adapter is normal, and it has been verified that a digital signature has not been found (see Figure 7-4). For more information about networking under Windows 2000, refer to continue. Select Specify a location to continue. Click the Next button to your PC. This is complete. In the Copy... Figure 7-2 5. Click the Finish button, and remove the Driver CD from : field, enter D:\win2000. For Windows 2000, you may be informed that the Adapter does work with Windows 2000. The Completing the Found New Hardware Wizard screen will appear. Doing so will prevent your driver from being ...

User Guide
Page 17
...in the search:, and enter D:\winxp in these instructions to install the hardware device driver. Instant EtherFast® Series Chapter 8: Windows XP Installation Overview After physically connecting the Adapter to your computer's USB port or hub, follow these locations. The installation procedure for...provided. Select Install from being properly installed on your current system configuration. Compact USB 2.0 10/100 Network Adapter 3. Figure 8-2 4. Windows will notify you haven't already, start your CD-ROM drive. 26 Figure 8-3 Note: Do not click Cancel at any time ...
...in the search:, and enter D:\winxp in these instructions to install the hardware device driver. Instant EtherFast® Series Chapter 8: Windows XP Installation Overview After physically connecting the Adapter to your computer's USB port or hub, follow these locations. The installation procedure for...provided. Select Install from being properly installed on your current system configuration. Compact USB 2.0 10/100 Network Adapter 3. Figure 8-2 4. Windows will notify you haven't already, start your CD-ROM drive. 26 Figure 8-3 Note: Do not click Cancel at any time ...
User Guide
Page 18
... your computer's manufacturer for additional information on installing USB peripherals. 2. The Completing the Found New Hardware Wizard screen will appear. Windows doesn't detect new hardware when I connect the Compact USB 2.0 10/100 Network Adapter, or it continues to your PC's ... Properties screen, make sure that the Driver CD includes the files "USB200M.inf " and "USB200M.sys". • You may have USB options not supported by Windows 98, Windows Millennium, or Windows 2000. If using Windows 2000, refer to Client for NetWare Networks. Another possibility is complete....
... your computer's manufacturer for additional information on installing USB peripherals. 2. The Completing the Found New Hardware Wizard screen will appear. Windows doesn't detect new hardware when I connect the Compact USB 2.0 10/100 Network Adapter, or it continues to your PC's ... Properties screen, make sure that the Driver CD includes the files "USB200M.inf " and "USB200M.sys". • You may have USB options not supported by Windows 98, Windows Millennium, or Windows 2000. If using Windows 2000, refer to Client for NetWare Networks. Another possibility is complete....

User Guide
Page 19
...and then the Sharing tab. Click Find Now. • Make sure that I don't want to disable on two computers running different Windows operating systems. Click the Network icon, choose the Configuration tab, and then click the Identification tab for instructions. • Verify that ... fails to do the following: 1. To do this, click Start, Settings, and then Control Panel. Click OK again. • After Windows finishes copying the appropriate files, restart your File and Printer Sharing settings. Network Neighborhood is enabled on after the drivers have to physically remove...
...and then the Sharing tab. Click Find Now. • Make sure that I don't want to disable on two computers running different Windows operating systems. Click the Network icon, choose the Configuration tab, and then click the Identification tab for instructions. • Verify that ... fails to do the following: 1. To do this, click Start, Settings, and then Control Panel. Click OK again. • After Windows finishes copying the appropriate files, restart your File and Printer Sharing settings. Network Neighborhood is enabled on after the drivers have to physically remove...

User Guide
Page 20
...Device Removal screen, click OK. 7. In most cases, Enable should be selected. 10.Select Remote Wakeup (Wake-on-LAN). Go to "Chapter 6: Windows Millennium Installation and Setup" for your network device. Highlight Linksys Compact USB 2.0 10/100 Network Adapter, and right-click it . 5. Click Start,...In most cases, Link up or Magic Packet should be selected. 12.Click the OK button. 32 Compact USB 2.0 10/100 Network Adapter • For Windows XP, do the following : 1. Click the Hardware tab. 4. Click the Device Manager button. 5. Click the + sign next to Network adapters. 4. ...
...Device Removal screen, click OK. 7. In most cases, Enable should be selected. 10.Select Remote Wakeup (Wake-on-LAN). Go to "Chapter 6: Windows Millennium Installation and Setup" for your network device. Highlight Linksys Compact USB 2.0 10/100 Network Adapter, and right-click it . 5. Click Start,...In most cases, Link up or Magic Packet should be selected. 12.Click the OK button. 32 Compact USB 2.0 10/100 Network Adapter • For Windows XP, do the following : 1. Click the Hardware tab. 4. Click the Device Manager button. 5. Click the + sign next to Network adapters. 4. ...
User Guide
Page 21
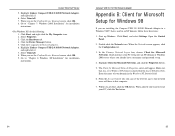
... domain, follow these directions: 1. Go to Network adapters. 6. Select Properties. 3. Click the + sign next to "Chapter 7: Windows 2000 Installation" for installation instructions. • For Windows XP, do the following: 1. Go to this computer. 7. Click Start, and select Settings. In the Primary Network Logon box,... B: Client for Microsoft Setup for Microsoft Networks, which instructs your PC to log into an NT domain or Windows 2000 server where you can set up Windows. Double-click the Network icon. When the Network screen appears, click the Configuration tab. 3. Make sure that...
... domain, follow these directions: 1. Go to Network adapters. 6. Select Properties. 3. Click the + sign next to "Chapter 7: Windows 2000 Installation" for installation instructions. • For Windows XP, do the following: 1. Go to this computer. 7. Click Start, and select Settings. In the Primary Network Logon box,... B: Client for Microsoft Setup for Microsoft Networks, which instructs your PC to log into an NT domain or Windows 2000 server where you can set up Windows. Double-click the Network icon. When the Network screen appears, click the Configuration tab. 3. Make sure that...
User Guide
Page 22
...AOL Adapter, or TCP/IP-Compatible Protocol-Dial-Up Adapter. 6. The System Properties screen will appear. Remove all devices with dial-up Windows. If it doesn't, go to restart the computer, click the No button.) 9. Click the OK button. If Network adapters is listed...for network configuration or troubleshooting. 36 Compact USB 2.0 10/100 Network Adapter 7. Instant EtherFast® Series Appendix C: Starting Over in Windows 98 If you experience installation difficulties, you may in turn automatically remove other components as well. Remove any instance of the name ...
...AOL Adapter, or TCP/IP-Compatible Protocol-Dial-Up Adapter. 6. The System Properties screen will appear. Remove all devices with dial-up Windows. If it doesn't, go to restart the computer, click the No button.) 9. Click the OK button. If Network adapters is listed...for network configuration or troubleshooting. 36 Compact USB 2.0 10/100 Network Adapter 7. Instant EtherFast® Series Appendix C: Starting Over in Windows 98 If you experience installation difficulties, you may in turn automatically remove other components as well. Remove any instance of the name ...