User Guide
Page 3
... Back Panel 5 The Side Panel 5 Chapter 3: Connecting the Switch 7 Overview 7 Pre-Installation Considerations 8 Hardware Installation 8 Placement Options 9 Uplinking the Switch 10 Chapter 4: Configuration using the Console Interface 11 Overview 11 Configuring the HyperTerminal Application 11 Configuring the Switch through the Console Interface 12 Chapter 5: Configuring the Switch through the Web Utility 19 Overview 19 System Tab...
... Back Panel 5 The Side Panel 5 Chapter 3: Connecting the Switch 7 Overview 7 Pre-Installation Considerations 8 Hardware Installation 8 Placement Options 9 Uplinking the Switch 10 Chapter 4: Configuration using the Console Interface 11 Overview 11 Configuring the HyperTerminal Application 11 Configuring the Switch through the Console Interface 12 Chapter 5: Configuring the Switch through the Web Utility 19 Overview 19 System Tab...
User Guide
Page 7
...for choosing the 24-port 10/100 + 2-Port Gigabit Switch with WebView. Head-of the 24-port 10/100 + 2-Port Gigabit Switch with WebView. Or if you prefer, you connect the Switch, set it up, and configure it easy to manage the 26 VLANs and up your workstations, while the two... allow you need to network better than ever. This new Linksys rackmount switch delivers non-blocking, wire speed switching for your network can use the integrated console port to 7 trunking groups. The non-blocking, wire-speed switching forwards packets as fast as your 10, and 100 megabit network clients, plus ...
...for choosing the 24-port 10/100 + 2-Port Gigabit Switch with WebView. Head-of the 24-port 10/100 + 2-Port Gigabit Switch with WebView. Or if you prefer, you connect the Switch, set it up, and configure it easy to manage the 26 VLANs and up your workstations, while the two... allow you need to network better than ever. This new Linksys rackmount switch delivers non-blocking, wire speed switching for your network can use the integrated console port to 7 trunking groups. The non-blocking, wire-speed switching forwards packets as fast as your 10, and 100 megabit network clients, plus ...
User Guide
Page 8
... chapter describes the physical features of the Switch. • Chapter 3: Connecting the Switch This chapter describes how to connect the Switch. • Chapter 4: Configuration using the Console Interface This chapter instructs you on how to use the Switch's console interface for configuring the Switch. • Chapter 5: Configuring the Switch through the Web Utility This chapter shows you how...
... chapter describes the physical features of the Switch. • Chapter 3: Connecting the Switch This chapter describes how to connect the Switch. • Chapter 4: Configuration using the Console Interface This chapter instructs you on how to use the Switch's console interface for configuring the Switch. • Chapter 5: Configuring the Switch through the Web Utility This chapter shows you how...
User Guide
Page 10
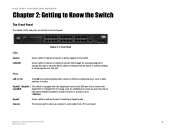
...Lights to indicate a functional network link through the corresponding port (1 through 24) with WebView Chapter 2: Getting to indicate that the Switch is actively sending or receiving data over that is being used, the minGBIC port cannot be used. Blinks to Know the... Switch The Front Panel The Switch's LEDs and ports are located on the front panel. Figure 2-1: Front Panel LEDs System Green. Lights to Ethernet network devices, such as other switches or routers. Gigabit Green. Console The Console port is working in Gigabit mode.
...Lights to indicate a functional network link through the corresponding port (1 through 24) with WebView Chapter 2: Getting to indicate that the Switch is actively sending or receiving data over that is being used, the minGBIC port cannot be used. Blinks to Know the... Switch The Front Panel The Switch's LEDs and ports are located on the front panel. Figure 2-1: Front Panel LEDs System Green. Lights to Ethernet network devices, such as other switches or routers. Gigabit Green. Console The Console port is working in Gigabit mode.

User Guide
Page 12
...fiber optic cabling. For more information on twisted-pair cabling, refer to 1000Mbps (Gigabit Ethernet). for configuration purposes) using the console port. Auto-sensing technology enables each port to automatically detect the speed of up to the Twisted-Pair Cabling section. To ... will need to Know the Switch 6 The Side Panel The Console Port The Switch is equipped with a serial port labeled CONSOLE (located on the front of the switch) that work with twenty-four auto-sensing RJ-45 ports. You will need to manage the Switch using the provided serial cable....
...fiber optic cabling. For more information on twisted-pair cabling, refer to 1000Mbps (Gigabit Ethernet). for configuration purposes) using the console port. Auto-sensing technology enables each port to automatically detect the speed of up to the Twisted-Pair Cabling section. To ... will need to Know the Switch 6 The Side Panel The Console Port The Switch is equipped with a serial port labeled CONSOLE (located on the front of the switch) that work with twenty-four auto-sensing RJ-45 ports. You will need to manage the Switch using the provided serial cable....
User Guide
Page 17
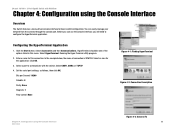
... Application 1. Enter a name for the application. You can use the console interface, you can easily manage your network from the screens through the console port. Bits per Second: 19200 Databits: 8 Parity: None Stop bits...: 1 Flow control: None Figure 4-1: Finding HyperTerminal Figure 4-2: Connection Description Chapter 4: Configuration using the Console Interface Overview The Switch features a menu-driven console interface for basic switch...
... Application 1. Enter a name for the application. You can use the console interface, you can easily manage your network from the screens through the console port. Bits per Second: 19200 Databits: 8 Parity: None Stop bits...: 1 Flow control: None Figure 4-1: Finding HyperTerminal Figure 4-2: Connection Description Chapter 4: Configuration using the Console Interface Overview The Switch features a menu-driven console interface for basic switch...

User Guide
Page 18
...and Logout. The first time you wish to choose; Figure 4-4: COM1 Properties Figure 4-5: Login Chapter 4: Configuration using the Console Interface Configuring the Switch through the Console Interface use the Up Arrow or Down Arrow keys to the previous selection; Each menu has several options, which are ... that the bottom of the window always has a listing of menus. 24-port 10/100 + 2-Port Gigabit Switch with WebView Configuring the Switch through the Console Interface Login When you finish configuring the Hyper Terminal, the Login screen will get highlighted. A highlight in each ...
...and Logout. The first time you wish to choose; Figure 4-4: COM1 Properties Figure 4-5: Login Chapter 4: Configuration using the Console Interface Configuring the Switch through the Console Interface use the Up Arrow or Down Arrow keys to the previous selection; Each menu has several options, which are ... that the bottom of the window always has a listing of menus. 24-port 10/100 + 2-Port Gigabit Switch with WebView Configuring the Switch through the Console Interface Login When you finish configuring the Hyper Terminal, the Login screen will get highlighted. A highlight in each ...
User Guide
Page 19
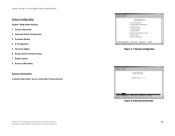
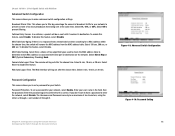
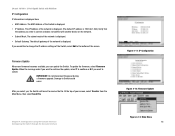
Advanced Switch Configuration 3. Password Setting 4. 24-port 10/100 + 2-Port Gigabit Switch with WebView System Configuration System Configuration displays: 1. System Information 2. System Information In System Information, you can check the Firmware Version. Reboot System 0. IP Configuration 5. Firmware Update 6. Return to Main Menu. Chapter 4: Configuration using the Console Interface Configuring the Switch through the Console Interface Figure 4-7: System Configuration Figure 4-8: System Information 13 Restore System Default Setting 7.
Advanced Switch Configuration 3. Password Setting 4. 24-port 10/100 + 2-Port Gigabit Switch with WebView System Configuration System Configuration displays: 1. System Information 2. System Information In System Information, you can check the Firmware Version. Reboot System 0. IP Configuration 5. Firmware Update 6. Return to Main Menu. Chapter 4: Configuration using the Console Interface Configuring the Switch through the Console Interface Figure 4-7: System Configuration Figure 4-8: System Information 13 Restore System Default Setting 7.
User Guide
Page 20
...If you to set a password for a MAC address within the chosen time, the switch will be a maximum of six characters, using the Console Interface 14 Configuring the Switch through 9. To enable this feature, select Disable. To disable this feature, select Enable... Never to prevent filtering. Figure 4-9: Advanced Switch Configuration Figure 4-10: Password Setting Chapter 4: Configuration using the letters a through z, and numbers 0 through the Console Interface Broadcast Storm Filter. This allows you to make advanced switch configuration settings. Select Off to disable the ...
...If you to set a password for a MAC address within the chosen time, the switch will be a maximum of six characters, using the Console Interface 14 Configuring the Switch through 9. To enable this feature, select Disable. To disable this feature, select Enable... Never to prevent filtering. Figure 4-9: Advanced Switch Configuration Figure 4-10: Password Setting Chapter 4: Configuration using the letters a through z, and numbers 0 through the Console Interface Broadcast Storm Filter. This allows you to make advanced switch configuration settings. Select Off to disable the ...
User Guide
Page 21
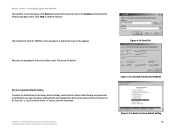
...displayed here. • MAC Address. Figure 4-11: IP Configuration Figure 4-12: Firmware Update Chapter 4: Configuration using the Console Interface Configuring the Switch through the Console Interface Figure 4-13: Main Menu 15 If you would like to cancel. When the message asks if you want to continue... the update, select Y to continue or N if you select yes, the Switch will be set to Switch could occur. Firmware ...
...displayed here. • MAC Address. Figure 4-11: IP Configuration Figure 4-12: Firmware Update Chapter 4: Configuration using the Console Interface Configuring the Switch through the Console Interface Figure 4-13: Main Menu 15 If you would like to cancel. When the message asks if you want to continue... the update, select Y to continue or N if you select yes, the Switch will be set to Switch could occur. Firmware ...
User Guide
Page 22
...Send File When you are prompted to restart the Switch, select Y to cancel the restoration. Press the "y" key to continue or the "n" key to restart the Switch. Chapter 4: Configuration using the Console Interface Configuring the Switch through the Console Interface Figure 4-15: Xmodem File Send for SRW224... screen will appear. 24-port 10/100 + 2-Port Gigabit Switch with WebView The Send File screen will...
...Send File When you are prompted to restart the Switch, select Y to cancel the restoration. Press the "y" key to continue or the "n" key to restart the Switch. Chapter 4: Configuration using the Console Interface Configuring the Switch through the Console Interface Figure 4-15: Xmodem File Send for SRW224... screen will appear. 24-port 10/100 + 2-Port Gigabit Switch with WebView The Send File screen will...

User Guide
Page 23
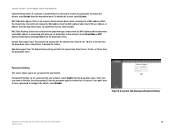
Chapter 4: Configuration using the Console Interface Configuring the Switch through the Console Interface Figure 4-17: Reboot System Figure 4-18: Return to reboot the Switch, select Reboot System and press Enter. 24-port 10/100 + 2-Port Gigabit Switch with WebView Reboot System If you want to return to the main menu. Return to Main Menu Select Return to Main Menu if you would like to Main Menu 17
Chapter 4: Configuration using the Console Interface Configuring the Switch through the Console Interface Figure 4-17: Reboot System Figure 4-18: Return to reboot the Switch, select Reboot System and press Enter. 24-port 10/100 + 2-Port Gigabit Switch with WebView Reboot System If you want to return to the main menu. Return to Main Menu Select Return to Main Menu if you would like to Main Menu 17

User Guide
Page 24
... 4-19: Port Status Logout Select Logout to control the flow of the console configuration utility. Figure 4-20: Port Configuration Chapter 4: Configuration using the Console Interface Configuring the Switch through the Console Interface Figure 4-21: Logout 18 24-port 10/100 + 2-Port Gigabit Switch with WebView Port Status This screen allows you don't. The Port, Enable...
... 4-19: Port Status Logout Select Logout to control the flow of the console configuration utility. Figure 4-20: Port Configuration Chapter 4: Configuration using the Console Interface Configuring the Switch through the Console Interface Figure 4-21: Logout 18 24-port 10/100 + 2-Port Gigabit Switch with WebView Port Status This screen allows you don't. The Port, Enable...
User Guide
Page 27
... to have a password to determine which MAC address is correct. 24-port 10/100 + 2-Port Gigabit Switch with what port or destination on the network. Select from the drop-down menu. The console will log out after the chosen time. To enable this feature, select Enable from a choice of two ...algorithm type used to check the MAC address table to configure the Switch, select Disable. Enter the password again to disable the ...
... to have a password to determine which MAC address is correct. 24-port 10/100 + 2-Port Gigabit Switch with what port or destination on the network. Select from the drop-down menu. The console will log out after the chosen time. To enable this feature, select Enable from a choice of two ...algorithm type used to check the MAC address table to configure the Switch, select Disable. Enter the password again to disable the ...

User Guide
Page 44
MiniGBIC, 1-Console Cabling Type UTP CAT 5e or better LEDs System, Link/Act, Gigabit, Gigabit 1, Gigabit 2/miniGBIC Dimensions (L x W x H) 17.01" x 1.77" x 13.74" (43 mm x 45 mm x ... 158ºF) Operating Humidity 10% to 90% Non-Condensing Storage Humidity 10% to 95% Non-Condensing Appendix E: Specifications 38 24-port 10/100 + 2-Port Gigabit Switch with WebView Appendix E: Specifications Standards IEEE 802.3, IEEE 802.3u, IEEE 802.3ab Ports 24 - 10/100 , 2 - 10/100/1000, 1 -
MiniGBIC, 1-Console Cabling Type UTP CAT 5e or better LEDs System, Link/Act, Gigabit, Gigabit 1, Gigabit 2/miniGBIC Dimensions (L x W x H) 17.01" x 1.77" x 13.74" (43 mm x 45 mm x ... 158ºF) Operating Humidity 10% to 90% Non-Condensing Storage Humidity 10% to 95% Non-Condensing Appendix E: Specifications 38 24-port 10/100 + 2-Port Gigabit Switch with WebView Appendix E: Specifications Standards IEEE 802.3, IEEE 802.3u, IEEE 802.3ab Ports 24 - 10/100 , 2 - 10/100/1000, 1 -