
Administration Guide
Page 2
... Guide? 1 2 Getting to Know the SGE2010/SGE2010P 2 SGE2010/P Front Panel 2 SGE2010/P Back Panel 3 3 Connecting Devices to the SGE2010/SGE2010P 4 Sample Network Configuration 4 Maximum Cabling Distances 4 Before You Install the Switch... 5 Placement Options 5 Desktop Placement 5 Rack-Mount Placement 6 Wall-Mount Placement 7 Connecting the Cables 7 4 Using the Console 9 Connecting to Your Switch with HyperTerminal 9 Connecting to the Switch with Telnet 12 Logging On to...
... Guide? 1 2 Getting to Know the SGE2010/SGE2010P 2 SGE2010/P Front Panel 2 SGE2010/P Back Panel 3 3 Connecting Devices to the SGE2010/SGE2010P 4 Sample Network Configuration 4 Maximum Cabling Distances 4 Before You Install the Switch... 5 Placement Options 5 Desktop Placement 5 Rack-Mount Placement 6 Wall-Mount Placement 7 Connecting the Cables 7 4 Using the Console 9 Connecting to Your Switch with HyperTerminal 9 Connecting to the Switch with Telnet 12 Logging On to...

Administration Guide
Page 4
... steps for choosing a Linksys Switch. These instructions should be all you connect the switch, set it up and using the Switch. • Chapter 2, "Getting to manage your different networks. Or if you prefer, you can use of the switch console, which allows you for setting up , and configure it easy to Know the SGE2010/SGE2010P" This chapter describes...
... steps for choosing a Linksys Switch. These instructions should be all you connect the switch, set it up and using the Switch. • Chapter 2, "Getting to manage your different networks. Or if you prefer, you can use of the switch console, which allows you for setting up , and configure it easy to Know the SGE2010/SGE2010P" This chapter describes...

Administration Guide
Page 6
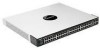
...SGE2010/SGE2010P Feature 1-48 miniGBIC1-4 Description The Switch is equipped with the switch. Auto-sensing technology enables each port to automatically detect the speed of up to 1000Mbps. Ports 45, 46, 47 and 48 are shared with an RJ-45 connector. The Console port is where you will connect..., respectively. With regular AC power supply, there is a connection point for more information about stacking, refer to Chapter 4: Using the Console Interface for Configuration for a mini-GBIC expansion module, so the Switch can deliver a maximum of 10Mbps, 100Mbps, or 1000Mbps. The...
...SGE2010/SGE2010P Feature 1-48 miniGBIC1-4 Description The Switch is equipped with the switch. Auto-sensing technology enables each port to automatically detect the speed of up to 1000Mbps. Ports 45, 46, 47 and 48 are shared with an RJ-45 connector. The Console port is where you will connect..., respectively. With regular AC power supply, there is a connection point for more information about stacking, refer to Chapter 4: Using the Console Interface for Configuration for a mini-GBIC expansion module, so the Switch can deliver a maximum of 10Mbps, 100Mbps, or 1000Mbps. The...

Administration Guide
Page 11
... light up . 8. The bottom mini-GBIC ports are upside down in relation to "Console Configuration" section on page 50. Connect the other end into a miniGBIC port. Use of a different power cord could damage the Ethernet switch. 7. Connecting Devices to the SGE2010/SGE2010P Connecting the Cables CAUTION: Observe the orientation of the mini-GBIC module before inserting...
... light up . 8. The bottom mini-GBIC ports are upside down in relation to "Console Configuration" section on page 50. Connect the other end into a miniGBIC port. Use of a different power cord could damage the Ethernet switch. 7. Connecting Devices to the SGE2010/SGE2010P Connecting the Cables CAUTION: Observe the orientation of the mini-GBIC module before inserting...

Administration Guide
Page 12
..., press the Enter key. You can be performed through a telnet connection. Telnet to the switch IP address 192.168.1.254. SGE2010/SGE2010P Administration Guide 9 4 Using the Console Connecting to Your Switch with HyperTerminal Using the Console This chapter describes the use of the switch console, which allows you must configure the application on page 12 • Logging On to...
..., press the Enter key. You can be performed through a telnet connection. Telnet to the switch IP address 192.168.1.254. SGE2010/SGE2010P Administration Guide 9 4 Using the Console Connecting to Your Switch with HyperTerminal Using the Console This chapter describes the use of the switch console, which allows you must configure the application on page 12 • Logging On to...

Administration Guide
Page 13
On the Connection Description screen, type a name for this connection, select an icon, and then click OK. 3. SGE2010/SGE2010P Administration Guide 10 Click the Start button. On the Connect To screen, use the Connect using drop-down list to select a port to Your Switch with the switch: COMn, or TCP/ IP. Using the Console Connecting to communicate with HyperTerminal 1. Choose Programs > Accessories > Communications > HyperTerminal. 2.
On the Connection Description screen, type a name for this connection, select an icon, and then click OK. 3. SGE2010/SGE2010P Administration Guide 10 Click the Start button. On the Connect To screen, use the Connect using drop-down list to select a port to Your Switch with the switch: COMn, or TCP/ IP. Using the Console Connecting to communicate with HyperTerminal 1. Choose Programs > Accessories > Communications > HyperTerminal. 2.

Administration Guide
Page 14
The next time that you can open this saved connection. Then, click the OK button. 6. SGE2010/SGE2010P Administration Guide 11 Using the Console Connecting to the console, you need to connect to Your Switch with HyperTerminal 4. Optionally, on the File menu, click Save to save these settings. Set the serial port settings as follows: • Bits per second: 115200 • Data bits: 8 • Parity: None • Stop bits: 1 • Flow control: None 5.
The next time that you can open this saved connection. Then, click the OK button. 6. SGE2010/SGE2010P Administration Guide 11 Using the Console Connecting to the console, you need to connect to Your Switch with HyperTerminal 4. Optionally, on the File menu, click Save to save these settings. Set the serial port settings as follows: • Bits per second: 115200 • Data bits: 8 • Parity: None • Stop bits: 1 • Flow control: None 5.

Administration Guide
Page 15
... editor and enter telnet . Select an option that you configured previously. 2. Using the Console Connecting to the Switch with Telnet Connecting to the Switch with telnet. 1. When the blinking cursor appears, press the Enter key. 3. When prompted...connection that is highlighted by the cursor. Selecting Menu Options and Actions Within the Console Interface, menus list options in the User Name field. Then, press the Enter key. 2. Press the Esc key to return to Action list. To select menu options and actions, use the following keys on an editing screen. SGE2010...
... editor and enter telnet . Select an option that you configured previously. 2. Using the Console Connecting to the Switch with Telnet Connecting to the Switch with telnet. 1. When the blinking cursor appears, press the Enter key. 3. When prompted...connection that is highlighted by the cursor. Selecting Menu Options and Actions Within the Console Interface, menus list options in the User Name field. Then, press the Enter key. 2. Press the Esc key to return to Action list. To select menu options and actions, use the following keys on an editing screen. SGE2010...

Administration Guide
Page 48
... Menu, press 2. See "Port Settings," on page 47. From the Port Status Menu, press 1. To open this screen: 1. Port Status. 2. From the Switch Main Menu, press 2. NOTE: To configure ports, use the PoE Configuration screen. See "PoE Settings," on page 46. Poe Status. Port Status. NOTE: To... the up or down arrow keys to scroll through all the ports on the switch. SGE2010/SGE2010P Administration Guide 45 You can use the PoE Status screen to view the port connection status. Using the Console Port Status Port Status You can use the Port Status screen to view the ...
... Menu, press 2. See "Port Settings," on page 47. From the Port Status Menu, press 1. To open this screen: 1. Port Status. 2. From the Switch Main Menu, press 2. NOTE: To configure ports, use the PoE Configuration screen. See "PoE Settings," on page 46. Poe Status. Port Status. NOTE: To... the up or down arrow keys to scroll through all the ports on the switch. SGE2010/SGE2010P Administration Guide 45 You can use the PoE Status screen to view the port connection status. Using the Console Port Status Port Status You can use the Port Status screen to view the ...

Administration Guide
Page 62
... Model Ports Cabling Type Switching Capacity Forwarding Capacity LEDs Stack Operation Buttons Layer 2 options Layer 3 options • SGE2010 48-port 10/100/1000 Ethernet Switch • SGE2010P 48-port 10/100/1000 Ethernet Switch with PoE • ...TX/1000Base-T with 4 Gigabit combo ports shared between mini-GBIC ports Console port Auto MDI/MDI-X Autonegotiate/Manual setting RPS port for connecting to Redundant Power Supply unit UTP CAT 5 or better for 10BASE-T/...802.1Q Tag-based VLANs Protocol-based VLAN Management VLAN Multicast TV VLAN Private VLAN Edge (PVE) GVRP Head of layer 3 traffic...
... Model Ports Cabling Type Switching Capacity Forwarding Capacity LEDs Stack Operation Buttons Layer 2 options Layer 3 options • SGE2010 48-port 10/100/1000 Ethernet Switch • SGE2010P 48-port 10/100/1000 Ethernet Switch with PoE • ...TX/1000Base-T with 4 Gigabit combo ports shared between mini-GBIC ports Console port Auto MDI/MDI-X Autonegotiate/Manual setting RPS port for connecting to Redundant Power Supply unit UTP CAT 5 or better for 10BASE-T/...802.1Q Tag-based VLANs Protocol-based VLAN Management VLAN Multicast TV VLAN Private VLAN Edge (PVE) GVRP Head of layer 3 traffic...
