
Administration Guide
Page 2
... Actions 12 Using the Switch Main Menu 13 System Configuration 13 System Information 14 Management Settings 16 Username & Password Settings 21 Security Settings 22 VLAN Management 25 IP Configuration 26 File Management 40 Restore System Default Settings 43 Reset to Factory Settings 43 Reboot System 43 Stack Configuration 44 Port Status 44 SGE2010/SGE2010P Administration Guide i
... Actions 12 Using the Switch Main Menu 13 System Configuration 13 System Information 14 Management Settings 16 Username & Password Settings 21 Security Settings 22 VLAN Management 25 IP Configuration 26 File Management 40 Restore System Default Settings 43 Reset to Factory Settings 43 Reboot System 43 Stack Configuration 44 Port Status 44 SGE2010/SGE2010P Administration Guide i

Administration Guide
Page 5
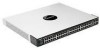
... that the port is linked to indicate that the Switch is powered on that this Switch is stacked and the corresponding number indicates its default settings. The SGE2010 and SGE2010P are 48-port, layer-2 Ethernet switches that the Switch is pressed for more than 10 seconds, the Switch will be reset by inserting a pin or paper clip...
... that the port is linked to indicate that the Switch is powered on that this Switch is stacked and the corresponding number indicates its default settings. The SGE2010 and SGE2010P are 48-port, layer-2 Ethernet switches that the Switch is pressed for more than 10 seconds, the Switch will be reset by inserting a pin or paper clip...

Administration Guide
Page 6
...) port is a connection point for more information about stacking, refer to the SFE2010/SGE2010 Reference Guide. NOTE: If shared ports are reserved for configuration using your PC's HyperTerminal program. Getting to Know the SGE2010/SGE2010P Feature 1-48 miniGBIC1-4 Description The Switch is equipped with the switch. With regular AC power supply, there is 360W available...
...) port is a connection point for more information about stacking, refer to the SFE2010/SGE2010 Reference Guide. NOTE: If shared ports are reserved for configuration using your PC's HyperTerminal program. Getting to Know the SGE2010/SGE2010P Feature 1-48 miniGBIC1-4 Description The Switch is equipped with the switch. With regular AC power supply, there is 360W available...

Administration Guide
Page 16
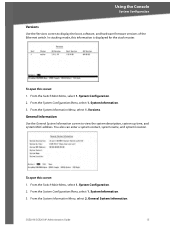
...to screens where you need to restore default settings, reset the switch to the factory default configuration, or reboot the system. 1. System Information (see page 44) 3. System Configuration (see page 16) SGE2010/SGE2010P Administration Guide 13 Management Settings (see page 13) 2. You also will use to ... system, view or modify port and PoE settings, and view or modify system and stacking mode. 1. It also provides access to screens where you can use this menu if you can manage VLAN IDs, IPv4 and IPv6 settings, and download upgrade files. Port Configuration (see page...
...to screens where you need to restore default settings, reset the switch to the factory default configuration, or reboot the system. 1. System Information (see page 44) 3. System Configuration (see page 16) SGE2010/SGE2010P Administration Guide 13 Management Settings (see page 13) 2. You also will use to ... system, view or modify port and PoE settings, and view or modify system and stacking mode. 1. It also provides access to screens where you can use this menu if you can manage VLAN IDs, IPv4 and IPv6 settings, and download upgrade files. Port Configuration (see page...

Administration Guide
Page 17
...: 1. Versions (see page 21) 4. System Configuration. 2. SGE2010/SGE2010P Administration Guide 14 Stack Configuration (see page 44) 0.Back (Select return to the previous menu.) To open this screen: From the Switch Main Menu, select 1. System Information. 3. From the Switch Main Menu, select 1. From the System Configuration Menu, select 1. File Management (see page 43) 11. Reboot System...
...: 1. Versions (see page 21) 4. System Configuration. 2. SGE2010/SGE2010P Administration Guide 14 Stack Configuration (see page 44) 0.Back (Select return to the previous menu.) To open this screen: From the Switch Main Menu, select 1. System Information. 3. From the Switch Main Menu, select 1. From the System Configuration Menu, select 1. File Management (see page 43) 11. Reboot System...
Administration Guide
Page 18
...system up time, and system MAC address. Versions. From the System Information Menu, select 2. To open this screen: 1. From the Switch Main Menu, select 1. From the System Configuration Menu, select 1. System Information. 3. You also can enter a system contact, system ...name, and system location. From the System Configuration Menu, select 1. General System Information. From the Switch Main Menu, select 1. SGE2010/SGE2010P Administration Guide 15 General Information Use the General System Information screen to display the boot, software, and hardware ...
...system up time, and system MAC address. Versions. From the System Information Menu, select 2. To open this screen: 1. From the Switch Main Menu, select 1. From the System Configuration Menu, select 1. System Information. 3. You also can enter a system contact, system ...name, and system location. From the System Configuration Menu, select 1. General System Information. From the Switch Main Menu, select 1. SGE2010/SGE2010P Administration Guide 15 General Information Use the General System Information screen to display the boot, software, and hardware ...

Administration Guide
Page 46
... Menu, select 9. NOTE: Restoring factory settings from the console or web resets all values except stacking configuration (stacking mode, stacking ports, and auto-numbering settings are not reset). SGE2010/SGE2010P Administration Guide 43 From the Switch Main Menu, select 1. From the Switch Main Menu, select 1. When the confirmation message appears, press y to restore the default settings...
... Menu, select 9. NOTE: Restoring factory settings from the console or web resets all values except stacking configuration (stacking mode, stacking ports, and auto-numbering settings are not reset). SGE2010/SGE2010P Administration Guide 43 From the Switch Main Menu, select 1. From the Switch Main Menu, select 1. When the confirmation message appears, press y to restore the default settings...

Administration Guide
Page 47
... port status and the PoE status for the Ethernet switch. From the System Configuration Menu, select 11. Port Status. Stack Configuration. Port Status (see page 45) 0.Back (Select to return to screens where you can use the Stack Configuration screen to each port on the switch. 1. SGE2010/SGE2010P Administration Guide 44 By default, ID numbers...
... port status and the PoE status for the Ethernet switch. From the System Configuration Menu, select 11. Port Status. Stack Configuration. Port Status (see page 45) 0.Back (Select to return to screens where you can use the Stack Configuration screen to each port on the switch. 1. SGE2010/SGE2010P Administration Guide 44 By default, ID numbers...

Administration Guide
Page 51
...Select Save to the field, and then press the Space Bar until the desired setting appears. SGE2010/SGE2010P Administration Guide 48 Press the right arrow key to specify whether the Ethernet switch is operating in Layer 2 or Layer 3 mode. Press the Esc key to move the cursor... Low, High, or Critical Enable or Disable 3. b. Select Edit. 2. c. System Mode. System Mode (Layer 2 / Layer 3) Selection You can also configure stacking mode from one field to the Action list. Press the down arrow key to the Action list. 4. When the Operation complete message appears, press the...
...Select Save to the field, and then press the Space Bar until the desired setting appears. SGE2010/SGE2010P Administration Guide 48 Press the right arrow key to specify whether the Ethernet switch is operating in Layer 2 or Layer 3 mode. Press the Esc key to move the cursor... Low, High, or Critical Enable or Disable 3. b. Select Edit. 2. c. System Mode. System Mode (Layer 2 / Layer 3) Selection You can also configure stacking mode from one field to the Action list. Press the down arrow key to the Action list. 4. When the Operation complete message appears, press the...

Administration Guide
Page 52
..., press the Esc key to move the cursor from one field to scroll down through the list of ports. To open this screen: From the Switch Main Menu, press 5. Press the Tab key to move the cursor to the Action list. 4. Press the down arrow key to the next.... Field System Mode after Reset Stacking Mode after reboot. Select Save to save your settings 5. Help. c. SGE2010/SGE2010P Administration Guide 49 Select Edit. 2. b. Your new settings will take effect after Reset Settings Layer 2 or Layer...
..., press the Esc key to move the cursor from one field to scroll down through the list of ports. To open this screen: From the Switch Main Menu, press 5. Press the Tab key to move the cursor to the Action list. 4. Press the down arrow key to the next.... Field System Mode after Reset Stacking Mode after reboot. Select Save to save your settings 5. Help. c. SGE2010/SGE2010P Administration Guide 49 Select Edit. 2. b. Your new settings will take effect after Reset Settings Layer 2 or Layer...

Administration Guide
Page 62
... Tag-based VLANs Protocol-based VLAN Management VLAN Multicast TV VLAN Private VLAN Edge (PVE) GVRP Head of layer 3 traffic SGE2010/SGE2010P Administration Guide 59 E Specifications Model Ports Cabling Type Switching Capacity Forwarding Capacity LEDs Stack Operation Buttons Layer 2 options Layer 3 options • SGE2010 48-port 10/100/1000 Ethernet Switch • SGE2010P 48-port 10...
... Tag-based VLANs Protocol-based VLAN Management VLAN Multicast TV VLAN Private VLAN Edge (PVE) GVRP Head of layer 3 traffic SGE2010/SGE2010P Administration Guide 59 E Specifications Model Ports Cabling Type Switching Capacity Forwarding Capacity LEDs Stack Operation Buttons Layer 2 options Layer 3 options • SGE2010 48-port 10/100/1000 Ethernet Switch • SGE2010P 48-port 10...