User Guide
Page 4
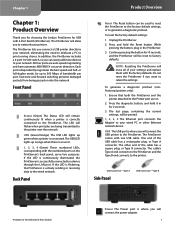
...PrintServer for USB with 4-Port Switch Power The Power port is where you will connect the power adapter. 1 Back Panel Product Overview Reset The Reset button can easily add more devices to the wired network. The other Ethernet network device. USB Connector-Type A Side Panel USB ... successfully connected to the printer over the network. Press and hold it in the PrintServer. 3. Press the diagnostic button, and hold the Reset button. All four ports are on. 2. Fast store-and-forward switching prevents damaged packets from being transmitted to a device through the LAN...
...PrintServer for USB with 4-Port Switch Power The Power port is where you will connect the power adapter. 1 Back Panel Product Overview Reset The Reset button can easily add more devices to the wired network. The other Ethernet network device. USB Connector-Type A Side Panel USB ... successfully connected to the printer over the network. Press and hold it in the PrintServer. 3. Press the diagnostic button, and hold the Reset button. All four ports are on. 2. Fast store-and-forward switching prevents damaged packets from being transmitted to a device through the LAN...

User Guide
Page 18
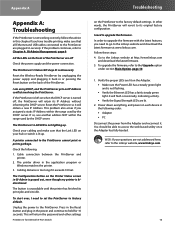
... Switch 15 For more information, click Help. Attached Remote Diagnostic Option When you select Diagnostic from the menu bar, these options are displayed: •• Reset Device •• Restore to Factory Default •• Attached Remote •• Connected Protocol If you click Attached Remote, the Attached Remote screen appears...
... Switch 15 For more information, click Help. Attached Remote Diagnostic Option When you select Diagnostic from the menu bar, these options are displayed: •• Reset Device •• Restore to Factory Default •• Attached Remote •• Connected Protocol If you click Attached Remote, the Attached Remote screen appears...
User Guide
Page 19
... for 10 seconds. Verify the proper LEDs are lit on the front of the PrintServer. The PrintServer's Status LED stays lit continuously Reset the Wireless-Ready PrintServer by unplugging the power supply and plugging it will retain its IP Address without informing the DHCP server. The ... access the web-based utility once the Adapter has fully booted. The Configuration button on the Printer Status screen in or pressing the Reset button on the PrintServer to the Linksys website and download the latest firmware at http://www.linksys.com and download the latest firmware. ...
... for 10 seconds. Verify the proper LEDs are lit on the front of the PrintServer. The PrintServer's Status LED stays lit continuously Reset the Wireless-Ready PrintServer by unplugging the power supply and plugging it will retain its IP Address without informing the DHCP server. The ... access the web-based utility once the Adapter has fully booted. The Configuration button on the Printer Status screen in or pressing the Reset button on the PrintServer to the Linksys website and download the latest firmware at http://www.linksys.com and download the latest firmware. ...
User Guide
Page 20
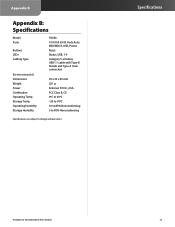
... B: Specifications Model Ports Buttons LEDs Cabling Type Environmental Dimensions Weight Power Certification Operating Temp. Storage Temp. Operating Humidity Storage Humidity PSUS4 4 10/100 RJ-45 Ports Auto MDI/MDI-X, USB, Power Reset Status, USB, 1-4 Category 5 or better, USB 1.1 cable with 4-Port Switch 17 Specifications PrintServer for USB with Type-B female and Type...
... B: Specifications Model Ports Buttons LEDs Cabling Type Environmental Dimensions Weight Power Certification Operating Temp. Storage Temp. Operating Humidity Storage Humidity PSUS4 4 10/100 RJ-45 Ports Auto MDI/MDI-X, USB, Power Reset Status, USB, 1-4 Category 5 or better, USB 1.1 cable with 4-Port Switch 17 Specifications PrintServer for USB with Type-B female and Type...