
Quick Start Guide
Page 1
Quick Start Guide Cisco PIX 506/506E Firewall Quick Start Guide For Cisco PIX Firewall Version 6.2 and PDM Version 2.0 1 About the Cisco PIX 506/506E Firewall 2 2 Check Items Included 3 3 Connect the Cables 4 4 Power On the PIX 506/506E 5 5 Check the LEDs 6 6 Configuring the PIX 506/506E 7 7 PDM Startup Wizard 8 8 Alternative Ways to Access the PIX 506/506E 10 9 Upgrade to DES or 3DES 11 10 Restore the Default Configuration 12
Quick Start Guide Cisco PIX 506/506E Firewall Quick Start Guide For Cisco PIX Firewall Version 6.2 and PDM Version 2.0 1 About the Cisco PIX 506/506E Firewall 2 2 Check Items Included 3 3 Connect the Cables 4 4 Power On the PIX 506/506E 5 5 Check the LEDs 6 6 Configuring the PIX 506/506E 7 7 PDM Startup Wizard 8 8 Alternative Ways to Access the PIX 506/506E 10 9 Upgrade to DES or 3DES 11 10 Restore the Default Configuration 12
Quick Start Guide
Page 3
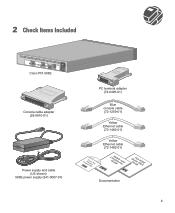
2 Check Items Included ACT LINK ETHERNET 1 ACT LINK ETHERNET 0 USB CONSOLE DC POWER INPUT Cisco PIX 506E Console cable adapter (29-0810-01) Power supply and cable (US shown) 506E power supply (341-0007-01) PC terminal adapter (74-0495-01) Blue console cable (72-1259-01) Yellow Ethernet cable (72-1482-01) ProdFuicCrteisCwcDaollPIX Yellow Ethernet cable (72-1482-01) CGoumSidapefleiatyncaend QGuuiPicdkIeXS5ta0r6tE Documentation 3
2 Check Items Included ACT LINK ETHERNET 1 ACT LINK ETHERNET 0 USB CONSOLE DC POWER INPUT Cisco PIX 506E Console cable adapter (29-0810-01) Power supply and cable (US shown) 506E power supply (341-0007-01) PC terminal adapter (74-0495-01) Blue console cable (72-1259-01) Yellow Ethernet cable (72-1482-01) ProdFuicCrteisCwcDaollPIX Yellow Ethernet cable (72-1482-01) CGoumSidapefleiatyncaend QGuuiPicdkIeXS5ta0r6tE Documentation 3
Quick Start Guide
Page 4
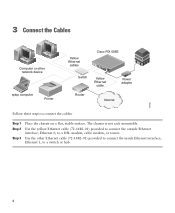
... the outside Ethernet interface, Ethernet 0, to connect the cables: Step 1 Step 2 Step 3 Place the chassis on a flat, stable surface. Use the other network device aptop computer Printer Yellow Ethernet cables Switch Cisco PIX 506E ACT ETHERNET 1 LINK ACT ETHERNET 0 LINK USB DC CONSOLE IPNOPWUETR Yellow Ethernet cable Power adapter Router Internet 71116 Follow these steps...
... the outside Ethernet interface, Ethernet 0, to connect the cables: Step 1 Step 2 Step 3 Place the chassis on a flat, stable surface. Use the other network device aptop computer Printer Yellow Ethernet cables Switch Cisco PIX 506E ACT ETHERNET 1 LINK ACT ETHERNET 0 LINK USB DC CONSOLE IPNOPWUETR Yellow Ethernet cable Power adapter Router Internet 71116 Follow these steps...
Quick Start Guide
Page 5
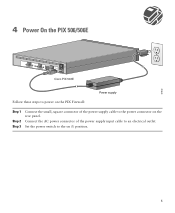
Connect the AC power connector of the power supply cable to the power connector on the rear panel. Set the power switch to the on (|) position. 67932 5 4 Power On the PIX 506/506E ACT LINK ETHERNET 1 ACT LINK ETHERNET 0 DC POWER USB CONSOLE INPUT DC POWER INPUT Cisco PIX 506E Power supply Follow these steps to power on the PIX Firewall: Step 1 Step 2 Step 3 Connect the small, square connector of the power supply input cable to an electrical outlet.
Connect the AC power connector of the power supply cable to the power connector on the rear panel. Set the power switch to the on (|) position. 67932 5 4 Power On the PIX 506/506E ACT LINK ETHERNET 1 ACT LINK ETHERNET 0 DC POWER USB CONSOLE INPUT DC POWER INPUT Cisco PIX 506E Power supply Follow these steps to power on the PIX Firewall: Step 1 Step 2 Step 3 Connect the small, square connector of the power supply input cable to an electrical outlet.
Quick Start Guide
Page 9
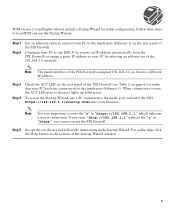
...a secure connection. Note It is assigned 192.168.1.1, so choose a different IP address. For online help, click the Help button at the bottom of the PIX Firewall. If you enter "http://192.168.1.1" without the "s" in the Startup Wizard. Follow these steps to load PDM and use the Startup Wizard: Step 1 ...Step 2 Use an Ethernet cable to connect your PC to the inside port and enter the URL https://192.168.1.1/startup.html into your PC to use a PC connected to...
...a secure connection. Note It is assigned 192.168.1.1, so choose a different IP address. For online help, click the Help button at the bottom of the PIX Firewall. If you enter "http://192.168.1.1" without the "s" in the Startup Wizard. Follow these steps to load PDM and use the Startup Wizard: Step 1 ...Step 2 Use an Ethernet cable to connect your PC to the inside port and enter the URL https://192.168.1.1/startup.html into your PC to use a PC connected to...
Quick Start Guide
Page 10
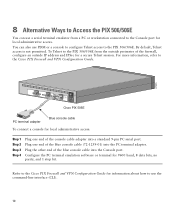
...and 1 stop bit. For more information, refer to the Cisco PIX Firewall and VPN Configuration Guide. 67935 ACT LINK ETHERNET 1 ACT LINK ETHERNET 0 DC POWER USB CONSOLE INPUT DC POWER INPUT Cisco PIX 506E PC terminal adapter Blue console cable To connect a console for local administrative access: Step 1 ...Step 2 Step 3 Step 4 Plug one end of the firewall, configure an outside IP address and IPSec for local administrative access. To Telnet to the PIX 506/...
...and 1 stop bit. For more information, refer to the Cisco PIX Firewall and VPN Configuration Guide. 67935 ACT LINK ETHERNET 1 ACT LINK ETHERNET 0 DC POWER USB CONSOLE INPUT DC POWER INPUT Cisco PIX 506E PC terminal adapter Blue console cable To connect a console for local administrative access: Step 1 ...Step 2 Step 3 Step 4 Plug one end of the firewall, configure an outside IP address and IPSec for local administrative access. To Telnet to the PIX 506/...
