Hardware Installation Guide
Page 22
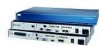
All interface slots are on the back of the two IAD243x chassis. This is not a redundant failover power supply connection. Physical Description Figure 1-8 Cisco IAD2435-8FXS Chassis Chapter 1 Overview of Cisco IAD2430 Series IADs FXS IAD2435-8FXS WAN FastEthernet CONSOLE T1/E1 0/1 0/0 AUX 12V DC SA 231873 Physical Description Figure 1-9 and Figure 1-10 show the function options of...
All interface slots are on the back of the two IAD243x chassis. This is not a redundant failover power supply connection. Physical Description Figure 1-8 Cisco IAD2435-8FXS Chassis Chapter 1 Overview of Cisco IAD2430 Series IADs FXS IAD2435-8FXS WAN FastEthernet CONSOLE T1/E1 0/1 0/0 AUX 12V DC SA 231873 Physical Description Figure 1-9 and Figure 1-10 show the function options of...

Hardware Installation Guide
Page 32
...or 200- Desktop Installation If you install the chassis by experimenting with AC power supply autoselects either 100- Access to 240-V operation. Power Source A Cisco IAD2430 series IADs with various equipment arrangements. to Chassis Allow space at the back of space...lug and hardware provided. The Cisco IADs with AC power supply include a 6-foot (1.8-meter) electrical power cord. (A label near the power cord indicates the correct voltage, frequency, current draw, and power dissipation.) The Cisco IAD2435 IAD connects to a 60-W, 12-VDC power adapter with the following specifications:...
...or 200- Desktop Installation If you install the chassis by experimenting with AC power supply autoselects either 100- Access to 240-V operation. Power Source A Cisco IAD2430 series IADs with various equipment arrangements. to Chassis Allow space at the back of space...lug and hardware provided. The Cisco IADs with AC power supply include a 6-foot (1.8-meter) electrical power cord. (A label near the power cord indicates the correct voltage, frequency, current draw, and power dissipation.) The Cisco IAD2435 IAD connects to a 60-W, 12-VDC power adapter with the following specifications:...
Hardware Installation Guide
Page 48
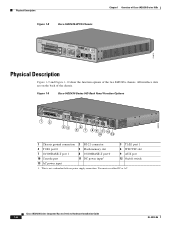
... the screws as shown in Figure 3-12. If the power supply is not supported, it could pull the router from the wall. To wall-mount the Cisco IAD2435 IADs, follow these steps: Step 1 Step 2 Step 3 Secure two screws 7 5/8 inches (19.35 centimeters) apart into a wall ...cable connections. • The external 60-W power supply adapter must rest on the router back panel. Hang the router on a horizontal surface. 3-12 Cisco IAD2430 Series Integrated Access Devices Hardware Installation Guide OL-4234-06 Figure 3-11 Screw Holes for Wall-Mounting the IAD2435 1 1 2 2 231984 1 1 1...
... the screws as shown in Figure 3-12. If the power supply is not supported, it could pull the router from the wall. To wall-mount the Cisco IAD2435 IADs, follow these steps: Step 1 Step 2 Step 3 Secure two screws 7 5/8 inches (19.35 centimeters) apart into a wall ...cable connections. • The external 60-W power supply adapter must rest on the router back panel. Hang the router on a horizontal surface. 3-12 Cisco IAD2430 Series Integrated Access Devices Hardware Installation Guide OL-4234-06 Figure 3-11 Screw Holes for Wall-Mounting the IAD2435 1 1 2 2 231984 1 1 1...

Hardware Installation Guide
Page 49
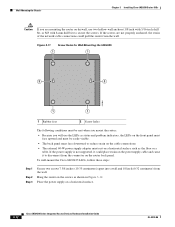
... the two screws (7 5/8 in. [19.35 cm]) 3 Cisco IAD2435 router 4 Mounting brackets 5 Maximum distance between the router and 6 Horizontal surface for placing the external the external 60-W power supply adapter 60-W power supply adapter (6 ft [1.8 m]) 7 Distance between the screw and the wall (1/8 in . Chapter 3 Installing Cisco IAD2430 Series IADs Figure 3-12 Mounting the IAD2435 Router on a Wall 1 2 Wall-Mounting the Chassis 3 7 4 5 231985...
... the two screws (7 5/8 in. [19.35 cm]) 3 Cisco IAD2435 router 4 Mounting brackets 5 Maximum distance between the router and 6 Horizontal surface for placing the external the external 60-W power supply adapter 60-W power supply adapter (6 ft [1.8 m]) 7 Distance between the screw and the wall (1/8 in . Chapter 3 Installing Cisco IAD2430 Series IADs Figure 3-12 Mounting the IAD2435 Router on a Wall 1 2 Wall-Mounting the Chassis 3 7 4 5 231985...

Hardware Installation Guide
Page 57
... is used for both AC and DC power. Step 1 Connect the AC power cable (supplied) to the recessed power plug on the Cisco IAD2435 IAD To connect input power to the Cisco IAD2435, perform the following steps: Step 1 Step 2 Connect the router to an AC power outlet as shown in Figure 3-19. Chapter 3 Installing Cisco IAD2430 Series IADs Connecting Cables 1 Fast Ethernet port 3 Fast...
... is used for both AC and DC power. Step 1 Connect the AC power cable (supplied) to the recessed power plug on the Cisco IAD2435 IAD To connect input power to the Cisco IAD2435, perform the following steps: Step 1 Step 2 Connect the router to an AC power outlet as shown in Figure 3-19. Chapter 3 Installing Cisco IAD2430 Series IADs Connecting Cables 1 Fast Ethernet port 3 Fast...
Hardware Installation Guide
Page 58
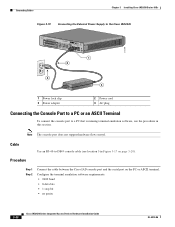
... in Figure 3-17 on the PC or ASCII terminal. Connecting Cables Chapter 3 Installing Cisco IAD2430 Series IADs Figure 3-19 Connecting the External Power Supply to the Cisco IAD2435 272268 FXS IAD2435-8FXS WAN FastEthernet CONSOLE T1/E1 0/1 0/0 AUX 12V DC SA 2 1 4 3 1 Power lock clip 3 Power adapter 2 Power cord 4 AC plug Connecting the Console Port to a PC or an ASCII Terminal...
... in Figure 3-17 on the PC or ASCII terminal. Connecting Cables Chapter 3 Installing Cisco IAD2430 Series IADs Figure 3-19 Connecting the External Power Supply to the Cisco IAD2435 272268 FXS IAD2435-8FXS WAN FastEthernet CONSOLE T1/E1 0/1 0/0 AUX 12V DC SA 2 1 4 3 1 Power lock clip 3 Power adapter 2 Power cord 4 AC plug Connecting the Console Port to a PC or an ASCII Terminal...
Hardware Installation Guide
Page 69
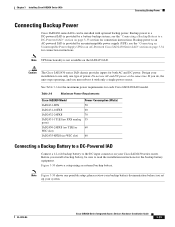
... equipment. Caution The Cisco IAD2430 series IAD chassis provides inputs for each Cisco IAD2430 IAD model. see the "Connecting an Uninteruptible Power Supply UPS to an AC-Powered Cisco IAD2430 Series IAD" section on page 3-33 section for connection instructions. Backup power to the DC input connector on the IAD2435 IAD. Table 3-6 Maximum Power Requirements Cisco IAD2430 Model IAD2431-8FX IAD2431-16FXS IAD2432-24FXS IAD2431...
... equipment. Caution The Cisco IAD2430 series IAD chassis provides inputs for each Cisco IAD2430 IAD model. see the "Connecting an Uninteruptible Power Supply UPS to an AC-Powered Cisco IAD2430 Series IAD" section on page 3-33 section for connection instructions. Backup power to the DC input connector on the IAD2435 IAD. Table 3-6 Maximum Power Requirements Cisco IAD2430 Model IAD2431-8FX IAD2431-16FXS IAD2432-24FXS IAD2431...
Hardware Installation Guide
Page 73
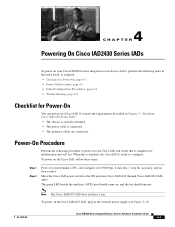
... Power-On You can power on a Cisco IAD if it completes its initialization and self-test. Note The Cisco IAD2435 IAD does not have a fan. The green LED beside the auxiliary (AUX) port should operate. 4 C H A P T E R Powering On Cisco IAD2430 Series IADs To power on your Cisco IAD2430 series integrated access device (IAD), perform the following procedure to power on the Cisco IAD2435 IAD, plug in the external power supply...
... Power-On You can power on a Cisco IAD if it completes its initialization and self-test. Note The Cisco IAD2435 IAD does not have a fan. The green LED beside the auxiliary (AUX) port should operate. 4 C H A P T E R Powering On Cisco IAD2430 Series IADs To power on your Cisco IAD2430 series integrated access device (IAD), perform the following procedure to power on the Cisco IAD2435 IAD, plug in the external power supply...


