Quick Start Guide
Page 3
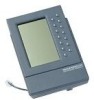
... Equipment • Safety Notices Package List Make sure that you have received all of the following parts in your package: • One Cisco IP Phone 7914 Expansion Module • One RS 232 cable • One Quick Start Guide • One Warranty Card Footstand Kits In addition to the package list items, you will also need...
... Equipment • Safety Notices Package List Make sure that you have received all of the following parts in your package: • One Cisco IP Phone 7914 Expansion Module • One RS 232 cable • One Quick Start Guide • One Warranty Card Footstand Kits In addition to the package list items, you will also need...
Quick Start Guide
Page 5
... extra low voltage (SELV) circuits to its power source. Use caution when connecting cables. Warning Do not work on the system or connect or disconnect cables during periods of this product should be handled according to work with the 7914 Expansion Module: Warning This product relies on the phase conductors (all national laws and regulations...
... extra low voltage (SELV) circuits to its power source. Use caution when connecting cables. Warning Do not work on the system or connect or disconnect cables during periods of this product should be handled according to work with the 7914 Expansion Module: Warning This product relies on the phase conductors (all national laws and regulations...
Quick Start Guide
Page 6
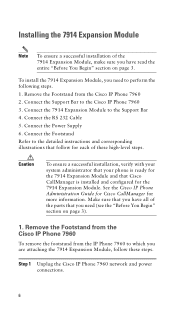
Remove the Footstand from the IP Phone 7960 to which you are attaching the 7914 Expansion Module, follow for each of the parts that Cisco CallManager is installed and configured for more information. Connect the RS 232 Cable 5. Connect the Footstand Refer to perform the following steps. 1. Make sure that you have read the entire "Before...
Remove the Footstand from the IP Phone 7960 to which you are attaching the 7914 Expansion Module, follow for each of the parts that Cisco CallManager is installed and configured for more information. Connect the RS 232 Cable 5. Connect the Footstand Refer to perform the following steps. 1. Make sure that you have read the entire "Before...
Quick Start Guide
Page 10
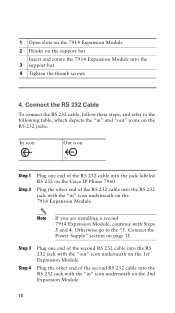
... the 7914 Expansion Module. Note If you are installing a second 7914 Expansion Module, continue with the "out" icon underneath on the 2nd Expansion Module. 10 Connect the RS 232 Cable To connect the RS 232 cable, follow these steps, and refer to the "5. Plug the other end of the RS 232 cable into the jack labeled RS 232 on the Cisco IP...
... the 7914 Expansion Module. Note If you are installing a second 7914 Expansion Module, continue with the "out" icon underneath on the 2nd Expansion Module. 10 Connect the RS 232 Cable To connect the RS 232 cable, follow these steps, and refer to the "5. Plug the other end of the RS 232 cable into the jack labeled RS 232 on the Cisco IP...
Quick Start Guide
Page 11
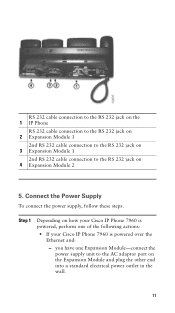
...steps. Step 1 Depending on how your Cisco IP Phone 7960 is powered, perform one Expansion Module-connect the power supply unit to the RS 232 jack on the Expansion Module and plug the other end into a standard electrical power outlet in the wall. 11 RS 232 cable connection to the RS 232 jack on... the 1 IP Phone RS 232 cable connection to the RS 232 jack on 2 Expansion Module 1 2nd RS 232 cable connection to the RS 232 jack on 3 Expansion Module 1 2nd RS 232 cable connection to the AC adaptor port on...
...steps. Step 1 Depending on how your Cisco IP Phone 7960 is powered, perform one Expansion Module-connect the power supply unit to the RS 232 jack on the Expansion Module and plug the other end into a standard electrical power outlet in the wall. 11 RS 232 cable connection to the RS 232 jack on... the 1 IP Phone RS 232 cable connection to the RS 232 jack on 2 Expansion Module 1 2nd RS 232 cable connection to the RS 232 jack on 3 Expansion Module 1 2nd RS 232 cable connection to the AC adaptor port on...
Quick Start Guide
Page 18
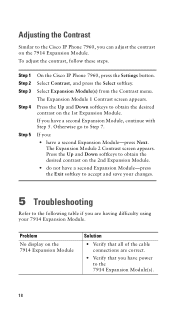
... 7914 Expansion Module. Select Contrast, and press the Select softkey. The Expansion Module 2 Contrast screen appears. Adjusting the Contrast Similar to the following table if you are correct. • Verify that all of the cable connections are having difficulty using your changes. 5 Troubleshooting Refer to the Cisco IP Phone 7960, you can adjust the contrast on the 7914 Expansion Module...
... 7914 Expansion Module. Select Contrast, and press the Select softkey. The Expansion Module 2 Contrast screen appears. Adjusting the Contrast Similar to the following table if you are correct. • Verify that all of the cable connections are having difficulty using your changes. 5 Troubleshooting Refer to the Cisco IP Phone 7960, you can adjust the contrast on the 7914 Expansion Module...
Quick Start Guide
Page 20
The miniature power plug required to mate with 6 pin connectors for the RS 232 cable connections • 48-volt power connector. Cable Specifications • 2 RJ-11 jacks with the power jack on the Expansion Module is a Switchcraft 760 or equivalent. Regulatory Compliance The 7914 Expansion Module meets the following safety and EMC standards. The center pin is .1" (2.5 mm...
The miniature power plug required to mate with 6 pin connectors for the RS 232 cable connections • 48-volt power connector. Cable Specifications • 2 RJ-11 jacks with the power jack on the Expansion Module is a Switchcraft 760 or equivalent. Regulatory Compliance The 7914 Expansion Module meets the following safety and EMC standards. The center pin is .1" (2.5 mm...
