Getting Started Guide
Page 3
...LAN connections as defined by Environment A of the IEEE 802.af Standard. Caution This product and all 4 indented holes on the mounting bracket. Note The access point is rated not greater than: 20A. Statement 1005 Warning Do not operate your wireless network device near unshielded ...frequency (RF) exposure limits, antennas should not install the power supply or power injector in air handling spaces. Warning This product relies on the building's installation for use in environmental air space in accordance with section 300.22.C of the National Electrical Code and sections 2-128...
...LAN connections as defined by Environment A of the IEEE 802.af Standard. Caution This product and all 4 indented holes on the mounting bracket. Note The access point is rated not greater than: 20A. Statement 1005 Warning Do not operate your wireless network device near unshielded ...frequency (RF) exposure limits, antennas should not install the power supply or power injector in air handling spaces. Warning This product relies on the building's installation for use in environmental air space in accordance with section 300.22.C of the National Electrical Code and sections 2-128...

Getting Started Guide
Page 4
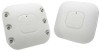
Adjustable ceiling-rail clip (selected when you have received the items listed below. If any packing material to the shipping container and save it for instructions. - 3500 series access point - Step 2 Return any item is missing or damaged, contact your Cisco representative or reseller for future use. Step 3 Verify that you ordered the access point) 4 Mounting bracket (selected when you ordered the access point) - 3 Unpacking Follow these steps: Step 1 Unpack and remove the access point and the accessory kit from the shipping box.
Adjustable ceiling-rail clip (selected when you have received the items listed below. If any packing material to the shipping container and save it for instructions. - 3500 series access point - Step 2 Return any item is missing or damaged, contact your Cisco representative or reseller for future use. Step 3 Verify that you ordered the access point) 4 Mounting bracket (selected when you ordered the access point) - 3 Unpacking Follow these steps: Step 1 Unpack and remove the access point and the accessory kit from the shipping box.
Getting Started Guide
Page 6
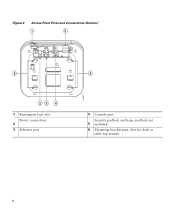
Figure 2 Access Point Ports and Connections (bottom) 1 5 6 23 4 1 Kensington lock slot Power connection 2 3 Ethernet port 272377 6 4 Console port Security padlock and hasp (padlock not 5 included) 6 Mounting bracket pins (feet for desk or table-top mount) 6
Figure 2 Access Point Ports and Connections (bottom) 1 5 6 23 4 1 Kensington lock slot Power connection 2 3 Ethernet port 272377 6 4 Console port Security padlock and hasp (padlock not 5 included) 6 Mounting bracket pins (feet for desk or table-top mount) 6


