

Owners Manual
Page 1
z Be sure to read the precautions in the separate User's Guide (Basic Operation). E DATA PROJECTOR XJ-S31/XJ-S36 XJ-S41/XJ-S46 User's Guide z Be sure to keep all user documentation handy for future reference. For details about setting up the projector and lamp replacement, see the User's Guide (Basic Operation).
z Be sure to read the precautions in the separate User's Guide (Basic Operation). E DATA PROJECTOR XJ-S31/XJ-S36 XJ-S41/XJ-S46 User's Guide z Be sure to keep all user documentation handy for future reference. For details about setting up the projector and lamp replacement, see the User's Guide (Basic Operation).
Owners Manual
Page 3
Contents About this manual 4 XJ-S36/XJ-S46 Users 4 Operation During ... the projected image 9 Eco Mode ...9 Using the [FUNC] Key 10 Configuring Advanced Projector Settings 11 Basic Setup Menu Operations 11 Displaying the Setup Menu 11 Configuring Setup Menu...Projector 15 Restoring Projector Settings to Their Initial Factory Defaults 16 Setup Menu Contents 17 Image Adjustment Main Menu 18 Volume Adjustment Main Menu 20 Screen Settings Main Menu 21 Input Settings Main Menu 23 Option Settings 1 Main Menu 24 Option Settings 2 Main Menu 26 USB Settings Main Menu Items (XJ-S36/XJ...
Contents About this manual 4 XJ-S36/XJ-S46 Users 4 Operation During ... the projected image 9 Eco Mode ...9 Using the [FUNC] Key 10 Configuring Advanced Projector Settings 11 Basic Setup Menu Operations 11 Displaying the Setup Menu 11 Configuring Setup Menu...Projector 15 Restoring Projector Settings to Their Initial Factory Defaults 16 Setup Menu Contents 17 Image Adjustment Main Menu 18 Volume Adjustment Main Menu 20 Screen Settings Main Menu 21 Input Settings Main Menu 23 Option Settings 1 Main Menu 24 Option Settings 2 Main Menu 26 USB Settings Main Menu Items (XJ-S36/XJ...
Owners Manual
Page 4
... about using the remote controller that you are already familiar with the [S] and [T] buttons XJ-S36/XJ-S46 Users This manual does not include information about connecting USB devices to the XJ-S36/XJ-S46 projector and procedures you need to perform to its USB port. To perform this remote controller operation...31 Supported Signals 32 About this manual are explained using the XJ-S36/XJ-S46 model projector while a USB device is connected to project images from a USB device, see "USB Function Guide" on the projector instead of the operations in combination with the contents of the...
... about using the remote controller that you are already familiar with the [S] and [T] buttons XJ-S36/XJ-S46 Users This manual does not include information about connecting USB devices to the XJ-S36/XJ-S46 projector and procedures you need to perform to its USB port. To perform this remote controller operation...31 Supported Signals 32 About this manual are explained using the XJ-S36/XJ-S46 model projector while a USB device is connected to project images from a USB device, see "USB Function Guide" on the projector instead of the operations in combination with the contents of the...
Owners Manual
Page 5
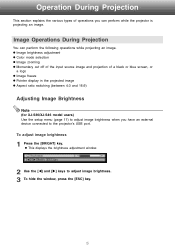
... (between 4:3 and 16:9) Adjusting Image Brightness Note (for XJ-S36/XJ-S46 model users) Use the setup menu (page 11) to adjust image brightness when you can perform the following operations while projecting an image. Image Operations During Projection You can perform while the projector is projecting an image. To adjust image brightness 1 Press...
... (between 4:3 and 16:9) Adjusting Image Brightness Note (for XJ-S36/XJ-S46 model users) Use the setup menu (page 11) to adjust image brightness when you can perform the following operations while projecting an image. Image Operations During Projection You can perform while the projector is projecting an image. To adjust image brightness 1 Press...
Owners Manual
Page 6
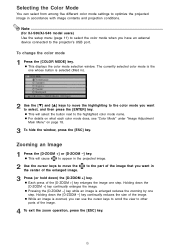
...can use the cursor keys to scroll the view to select the color mode when you want to the highlighted color mode name. Note (for XJ-S36/XJ-S46 model users) Use the setup menu (page 11) to other parts of the image that you have an external device connected to optimize the... image. 2 Use the cursor keys to move the highlighting to the color mode you can select from among five different color mode settings to the projector's USB port. Zooming an Image 1 Press the [D-ZOOM +] or [D-ZOOM -] key. z This will cause to appear in accordance with image contents and projection conditions....
...can use the cursor keys to scroll the view to select the color mode when you want to the highlighted color mode name. Note (for XJ-S36/XJ-S46 model users) Use the setup menu (page 11) to other parts of the image that you have an external device connected to optimize the... image. 2 Use the cursor keys to move the highlighting to the color mode you can select from among five different color mode settings to the projector's USB port. Zooming an Image 1 Press the [D-ZOOM +] or [D-ZOOM -] key. z This will cause to appear in accordance with image contents and projection conditions....
Owners Manual
Page 7
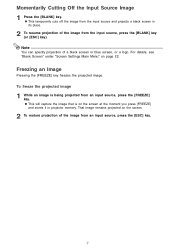
... the Input Source Image 1 Press the [BLANK] key. Note You can specify projection of the image from the input source and projects a black screen in projector memory. Freezing an Image Pressing the [FREEZE] key freezes the projected image. That image remains projected on page 22. z This temporarily cuts off the image...
... the Input Source Image 1 Press the [BLANK] key. Note You can specify projection of the image from the input source and projects a black screen in projector memory. Freezing an Image Pressing the [FREEZE] key freezes the projected image. That image remains projected on page 22. z This temporarily cuts off the image...
Owners Manual
Page 9
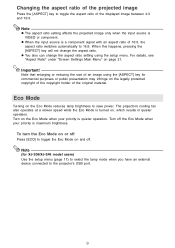
...results in quieter operation. When this happens, pressing the [ASPECT] key will not change the aspect ratio setting using the [ASPECT] key for XJ-S36/XJ-S46 model users) Use the setup menu (page 11) to select the lamp mode when you have an external device connected to save power. ...:9. z You also can change the aspect ratio. Note (for commercial purposes or public presentation may infringe on the Eco Mode reduces lamp brightness to the projector's USB port. 9 Turn off . For details, see "Aspect Ratio" under "Screen Settings Main Menu" on or off Press [ECO] to 16:9. ...
...results in quieter operation. When this happens, pressing the [ASPECT] key will not change the aspect ratio setting using the [ASPECT] key for XJ-S36/XJ-S46 model users) Use the setup menu (page 11) to select the lamp mode when you have an external device connected to save power. ...:9. z You also can change the aspect ratio. Note (for commercial purposes or public presentation may infringe on the Eco Mode reduces lamp brightness to the projector's USB port. 9 Turn off . For details, see "Aspect Ratio" under "Screen Settings Main Menu" on or off Press [ECO] to 16:9. ...
Owners Manual
Page 10
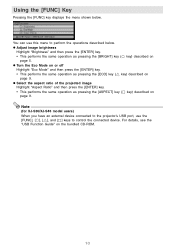
...] key (U key) described on the bundled CD-ROM. 10 You can use the [FUNC], [ ], [U], and […] keys to perform the operations described below . Note (for XJ-S36/XJ-S46 model users) When you have an external device connected to the projector's USB port, use this menu to control the connected device.
...] key (U key) described on the bundled CD-ROM. 10 You can use the [FUNC], [ ], [U], and […] keys to perform the operations described below . Note (for XJ-S36/XJ-S46 model users) When you have an external device connected to the projector's USB port, use this menu to control the connected device.
Owners Manual
Page 11
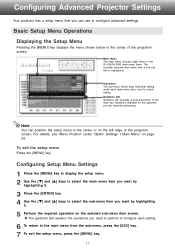
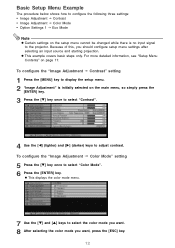
... [MENU] key. Basic Setup Menu Operations Displaying the Setup Menu Pressing the [MENU] key displays the menu shown below in the center or on the XJ-S36/XJ-S46) main menu items. The currently selected main menu item is the one that you are currently performing. Main menu The main menu includes eight... the projection screen. For details, see "Menu Position" under each setting. 6 To return to configure each main menu item, and its current setting. Configuring Advanced Projector Settings Your projector has a setup menu that is highlighted.
... [MENU] key. Basic Setup Menu Operations Displaying the Setup Menu Pressing the [MENU] key displays the menu shown below in the center or on the XJ-S36/XJ-S46) main menu items. The currently selected main menu item is the one that you are currently performing. Main menu The main menu includes eight... the projection screen. For details, see "Menu Position" under each setting. 6 To return to configure each main menu item, and its current setting. Configuring Advanced Projector Settings Your projector has a setup menu that is highlighted.
Owners Manual
Page 12
... on the main menu, so simply press the [ENTER] key. 3 Press the [T] key once to select "Contrast". 4 Use the [W] (lighter) and [X] (darker) keys to the projector. z This example covers basic steps only. To configure the "Image Adjustment J Contrast" setting 1 Press the [MENU] key to display the setup menu. 2 "Image Adjustment" is...
... on the main menu, so simply press the [ENTER] key. 3 Press the [T] key once to select "Contrast". 4 Use the [W] (lighter) and [X] (darker) keys to the projector. z This example covers basic steps only. To configure the "Image Adjustment J Contrast" setting 1 Press the [MENU] key to display the setup menu. 2 "Image Adjustment" is...
Owners Manual
Page 13
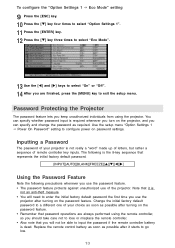
... [MENU] key to configure power on password settings. Change the initial factory default password to go low. 13 Password Protecting the Projector The password feature lets you keep unauthorized individuals from using the remote controller, so you use the password feature. • The password... feature protects against unauthorized use the projector after it is dead. Replace the remote control battery as soon as required. You can specify whether password input is required ...
... [MENU] key to configure power on password settings. Change the initial factory default password to go low. 13 Password Protecting the Projector The password feature lets you keep unauthorized individuals from using the remote controller, so you use the password feature. • The password... feature protects against unauthorized use the projector after it is dead. Replace the remote control battery as soon as required. You can specify whether password input is required ...
Owners Manual
Page 14
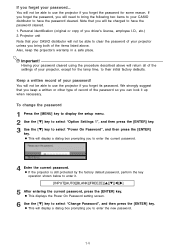
... be charged to your password! You will be able to use the projector if you forget the password for the lamp time, to have the password cleared. 1. Keep a written record of your CASIO distributor to their initial factory defaults. To change the password 1 Press.... z This will not be able to clear the password of you to select "Change Password", and then press the [ENTER] key. Projector unit Note that your CASIO distributor will display a dialog box prompting you driver's license, employee I.D., etc.) 2. Important! z This displays the Power On Password setting ...
... be charged to your password! You will be able to use the projector if you forget the password for the lamp time, to have the password cleared. 1. Keep a written record of your CASIO distributor to their initial factory defaults. To change the password 1 Press.... z This will not be able to clear the password of you to select "Change Password", and then press the [ENTER] key. Projector unit Note that your CASIO distributor will display a dialog box prompting you driver's license, employee I.D., etc.) 2. Important! z This displays the Power On Password setting ...

Owners Manual
Page 15
... the correct password and press the [ENTER] key. z The message "Your new password has been registered." To turn on page 14. All projector operations will be accessible to eight key operations long. Press the [ESC] key to return to step 7. 10 After you are finished, press the.... Press the [ESC] key. Note You can use any of the following keys as part of the procedure under "To change the password" on the projector while password protection is wrong." z You can perform the projection size adjustment operation ([ZOOM +] / [ZOOM -] keys), focus operation ([FOCUS S] / [FOCUS T] keys), ...
... the correct password and press the [ENTER] key. z The message "Your new password has been registered." To turn on page 14. All projector operations will be accessible to eight key operations long. Press the [ESC] key to return to step 7. 10 After you are finished, press the.... Press the [ESC] key. Note You can use any of the following keys as part of the procedure under "To change the password" on the projector while password protection is wrong." z You can perform the projection size adjustment operation ([ZOOM +] / [ZOOM -] keys), focus operation ([FOCUS S] / [FOCUS T] keys), ...
Owners Manual
Page 16
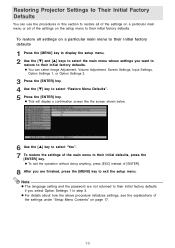
... initial factory defaults. z For details about how the above procedure initializes settings, see the explanations of the main menu to their initial factory defaults. Restoring Projector Settings to Their Initial Factory Defaults You can select Image Adjustment, Volume Adjustment, Screen Settings, Input Settings, Option Settings 1, or Option Settings 2. 3 Press the [ENTER...
... initial factory defaults. z For details about how the above procedure initializes settings, see the explanations of the main menu to their initial factory defaults. Restoring Projector Settings to Their Initial Factory Defaults You can select Image Adjustment, Volume Adjustment, Screen Settings, Input Settings, Option Settings 1, or Option Settings 2. 3 Press the [ENTER...
Owners Manual
Page 19
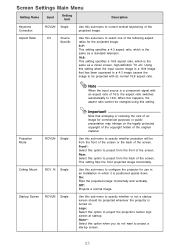
...valid when VIDEO is selected as the input source, it means that the frequency setting is performed, and not for the specific type of signal (XGA/60Hz, SXGA/60Hz, etc.) that is selected as the input source. Normal*: Optimized for still images. If, for the currently selected input ... defaults for some reason, your manual frequency settings cause the image input from the computer to disappear from a digital camera connected to the projector's VIDEO terminal. Still Image: Optimized for movies. When this happens, use this sub-menu to adjust the horizontal position of the input ...
...valid when VIDEO is selected as the input source, it means that the frequency setting is performed, and not for the specific type of signal (XGA/60Hz, SXGA/60Hz, etc.) that is selected as the input source. Normal*: Optimized for still images. If, for the currently selected input ... defaults for some reason, your manual frequency settings cause the image input from the computer to disappear from a digital camera connected to the projector's VIDEO terminal. Still Image: Optimized for movies. When this happens, use this sub-menu to adjust the horizontal position of the input ...

Owners Manual
Page 20
Volume Adjustment Main Menu Setting Name Input Setting Unit Description Volume RCVUN Source Specific Use this sub-menu to its initial default setting. z Changing this sub-menu to return Volume to adjust the volume level of the currently selected signal source. Restore Menu Defaults RCVUN Source Specific Use this setting when there is no input signal changes the volume setting of the projector's speaker. z Restoring menu defaults when there is no input signal will restore defaults for the currently selected input source. 20
Volume Adjustment Main Menu Setting Name Input Setting Unit Description Volume RCVUN Source Specific Use this sub-menu to its initial default setting. z Changing this sub-menu to return Volume to adjust the volume level of the currently selected signal source. Restore Menu Defaults RCVUN Source Specific Use this setting when there is no input signal changes the volume setting of the projector's speaker. z Restoring menu defaults when there is no input signal will restore defaults for the currently selected input source. 20
Owners Manual
Page 21
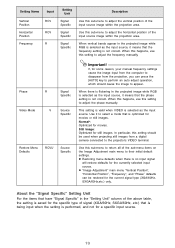
...of the screen. Front*: Select this setting. Off*: Projects a normal image. Using this happens, the aspect ratio cannot be projected whenever the projector is positioned upside down. When this setting when the input source image is a 16:9 image that enlarging or reducing the size of the screen....-definition TV, etc. On: Flips the projected image horizontally and vertically. Aspect Ratio RCV Source Specific Use this sub-menu to project the projector's built-in which is a component signal with its normal 16:9 aspect ratio. Rear: Select this option when you do not want to ...
...of the screen. Front*: Select this setting. Off*: Projects a normal image. Using this happens, the aspect ratio cannot be projected whenever the projector is positioned upside down. When this setting when the input source image is a 16:9 image that enlarging or reducing the size of the screen....-definition TV, etc. On: Flips the projected image horizontally and vertically. Aspect Ratio RCV Source Specific Use this sub-menu to project the projector's built-in which is a component signal with its normal 16:9 aspect ratio. Rear: Select this option when you do not want to ...

Owners Manual
Page 22
Logo: Select this option to project the projector's built-in logo screen. Logo: Select this option to project the projector's built-in logo screen. Use this sub-menu to return all of the currently selected input source. 22 Black: Select this option to ...project a blue screen. z Restoring menu defaults when there is no input signal to the projector. Blue: Select this option to project a black screen. z Note that the "Keystone Correction", "Projection Mode", "Startup Screen", "No Signal Screen", and "Blank ...
Logo: Select this option to project the projector's built-in logo screen. Logo: Select this option to project the projector's built-in logo screen. Use this sub-menu to return all of the currently selected input source. 22 Black: Select this option to ...project a blue screen. z Restoring menu defaults when there is no input signal to the projector. Blue: Select this option to project a black screen. z Note that the "Keystone Correction", "Projection Mode", "Startup Screen", "No Signal Screen", and "Blank ...
Owners Manual
Page 23
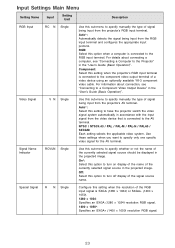
... video output terminal of the RGB input signal is connected to the RGB input terminal. Use these settings when you want to the Projector" in the "User's Guide (Basic Operation)". Special Signal RUUUN Single Configure this setting when the resolution of a video device using an... optionally available YK-3 component video cable. Auto*: Automatically detects the signal being input from the projector's RGB input terminal. RGB: Select this option when a computer is SXGA (1280 × 1024) or SXGA+ (1400 × 1050). 1280 ...
... video output terminal of the RGB input signal is connected to the RGB input terminal. Use these settings when you want to the Projector" in the "User's Guide (Basic Operation)". Special Signal RUUUN Single Configure this setting when the resolution of a video device using an... optionally available YK-3 component video cable. Auto*: Automatically detects the signal being input from the projector's RGB input terminal. RGB: Select this option when a computer is SXGA (1280 × 1024) or SXGA+ (1400 × 1050). 1280 ...
Owners Manual
Page 24
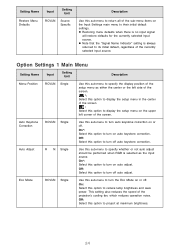
...-menu to specify whether or not auto adjust should be performed when RGB is selected as either the center or the left corner of the projector's cooling fan, which reduces operation noise.
...-menu to specify whether or not auto adjust should be performed when RGB is selected as either the center or the left corner of the projector's cooling fan, which reduces operation noise.

