Owners Manual
Page 2
...trademarks of their respective owners. • The contents of this User's Guide are subject to change without notice. • Copying of this manual, either in the United States and other countries. • Other company and product names may not be exactly the same as the screens ...lost profits or claims from third parties arising out of the use is forbidden. Any other use of this product or this manual. • CASIO COMPUTER CO., LTD. • DLP is a registered trademark of Texas Instruments of the United States. • Microsoft, Windows, Windows NT, and Windows Vista are...
...trademarks of their respective owners. • The contents of this User's Guide are subject to change without notice. • Copying of this manual, either in the United States and other countries. • Other company and product names may not be exactly the same as the screens ...lost profits or claims from third parties arising out of the use is forbidden. Any other use of this product or this manual. • CASIO COMPUTER CO., LTD. • DLP is a registered trademark of Texas Instruments of the United States. • Microsoft, Windows, Windows NT, and Windows Vista are...
Owners Manual
Page 3
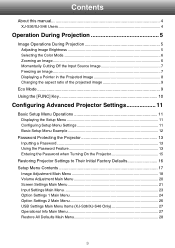
Contents About this manual 4 XJ-S36/XJ-S46 Users 4 Operation During ... the projected image 9 Eco Mode ...9 Using the [FUNC] Key 10 Configuring Advanced Projector Settings 11 Basic Setup Menu Operations 11 Displaying the Setup Menu 11 Configuring Setup Menu...Projector 15 Restoring Projector Settings to Their Initial Factory Defaults 16 Setup Menu Contents 17 Image Adjustment Main Menu 18 Volume Adjustment Main Menu 20 Screen Settings Main Menu 21 Input Settings Main Menu 23 Option Settings 1 Main Menu 24 Option Settings 2 Main Menu 26 USB Settings Main Menu Items (XJ-S36/XJ...
Contents About this manual 4 XJ-S36/XJ-S46 Users 4 Operation During ... the projected image 9 Eco Mode ...9 Using the [FUNC] Key 10 Configuring Advanced Projector Settings 11 Basic Setup Menu Operations 11 Displaying the Setup Menu 11 Configuring Setup Menu...Projector 15 Restoring Projector Settings to Their Initial Factory Defaults 16 Setup Menu Contents 17 Image Adjustment Main Menu 18 Volume Adjustment Main Menu 20 Screen Settings Main Menu 21 Input Settings Main Menu 23 Option Settings 1 Main Menu 24 Option Settings 2 Main Menu 26 USB Settings Main Menu Items (XJ-S36/XJ...
Owners Manual
Page 4
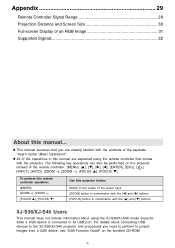
...an RGB Image 31 Supported Signals 32 About this manual are explained using the XJ-S36/XJ-S46 model projector while a USB device is connected to project images from a USB device, see "USB Function Guide" on the projector instead of the separate "User's Guide (Basic ...perform to its USB port. z All of the operations in combination with the [S] and [T] buttons XJ-S36/XJ-S46 Users This manual does not include information about connecting USB devices to the XJ-S36/XJ-S46 projector and procedures you are already familiar with the contents of the remote controller: [MENU], [S], [T], [X], ...
...an RGB Image 31 Supported Signals 32 About this manual are explained using the XJ-S36/XJ-S46 model projector while a USB device is connected to project images from a USB device, see "USB Function Guide" on the projector instead of the separate "User's Guide (Basic ...perform to its USB port. z All of the operations in combination with the [S] and [T] buttons XJ-S36/XJ-S46 Users This manual does not include information about connecting USB devices to the XJ-S36/XJ-S46 projector and procedures you are already familiar with the contents of the remote controller: [MENU], [S], [T], [X], ...
Owners Manual
Page 19
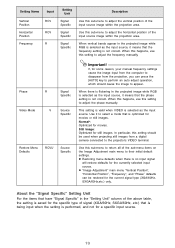
...Use this sub-menu to adjust the horizontal position of the input source image within the projection area. In particular, this setting to the projector's VIDEO terminal. This setting is valid when VIDEO is not correct. When this happens, use this setting to their initial default settings.... [AUTO] key to perform an auto adjust operation, which should be restored for the current signal type (XGA/60Hz, SXGA/60Hz,etc.) only. If, for some reason, your manual frequency settings cause the image input from the computer to disappear from a digital camera connected to adjust the frequency...
...Use this sub-menu to adjust the horizontal position of the input source image within the projection area. In particular, this setting to the projector's VIDEO terminal. This setting is valid when VIDEO is not correct. When this happens, use this setting to their initial default settings.... [AUTO] key to perform an auto adjust operation, which should be restored for the current signal type (XGA/60Hz, SXGA/60Hz,etc.) only. If, for some reason, your manual frequency settings cause the image input from the computer to disappear from a digital camera connected to adjust the frequency...
Owners Manual
Page 23
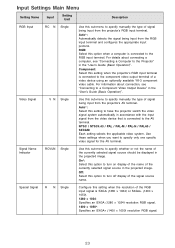
...Signal Name Indicator RCVUN Single Use this sub-menu to specify manually the type of the currently selected signal source should be displayed in the projected image. For details about connection, see "Connecting a Computer to the Projector" in the "User's Guide (Basic Operation)". Special Signal ... with the input signal from the video device that is connected to the AV terminal. Auto*: Automatically detects the signal being input from the projector's RGB input terminal. For information about connecting a computer, see "Connecting to a Component Video Output Device" in the "User's Guide ...
...Signal Name Indicator RCVUN Single Use this sub-menu to specify manually the type of the currently selected signal source should be displayed in the projected image. For details about connection, see "Connecting a Computer to the Projector" in the "User's Guide (Basic Operation)". Special Signal ... with the input signal from the video device that is connected to the AV terminal. Auto*: Automatically detects the signal being input from the projector's RGB input terminal. For information about connecting a computer, see "Connecting to a Component Video Output Device" in the "User's Guide ...