Owners Manual
Page 3
...14 Using Picture-in-Picture (P-IN-P 15 Freezing the Projected Image (FREEZE 17 Displaying the Pointer 18 Operating the Computer with the Remote Controller (Wireless Mouse) ......... 19 Using the Setup Menu 21 Setup Menu Overview 21 Setup Menu Screen Operations 24 Setup Menu Reference 31 Image...Option Settings2 59 Operational Info 62 Restore All Defaults 63 Appendix 64 Remote Controller Signal Range 64 Projection Distance and Screen Size 65 Connecting to a Component Video Output Device 66 Connecting a Computer to the Projector's USB Port 67 Full-screen Display of an RGB Image 68 ...
...14 Using Picture-in-Picture (P-IN-P 15 Freezing the Projected Image (FREEZE 17 Displaying the Pointer 18 Operating the Computer with the Remote Controller (Wireless Mouse) ......... 19 Using the Setup Menu 21 Setup Menu Overview 21 Setup Menu Screen Operations 24 Setup Menu Reference 31 Image...Option Settings2 59 Operational Info 62 Restore All Defaults 63 Appendix 64 Remote Controller Signal Range 64 Projection Distance and Screen Size 65 Connecting to a Component Video Output Device 66 Connecting a Computer to the Projector's USB Port 67 Full-screen Display of an RGB Image 68 ...
Owners Manual
Page 6
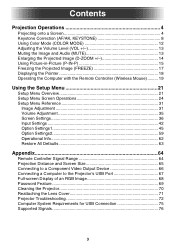
... menu. 6 Projection Operations Manually Selecting the Input Source The procedure you should use to select the input source depends on whether you are using projector keys or remote controller keys. [Projector] [Remote Controller] [RGB] key [VIDEO] key [S-VIDEO] key ZOOM FOCUS D-ZOOM RGB VIDEO S-VIDEO AUTO MUTE P-IN-P FREEZE VOLUME [INPUT] key z To select the input...
... menu. 6 Projection Operations Manually Selecting the Input Source The procedure you should use to select the input source depends on whether you are using projector keys or remote controller keys. [Projector] [Remote Controller] [RGB] key [VIDEO] key [S-VIDEO] key ZOOM FOCUS D-ZOOM RGB VIDEO S-VIDEO AUTO MUTE P-IN-P FREEZE VOLUME [INPUT] key z To select the input...
Owners Manual
Page 13
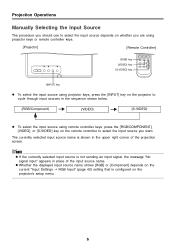
To select the color mode in this case, use the remote controller keys to adjust the volume level of the audio from the speaker. 2. z This causes the [Volume... again or press the [ESC] key. On the remote controller, press the [VOL +] or [VOL -] key. z You can use "Image Adjustment J Color Mode" (page 32). Projection Operations z The [COLOR MODE] key is disabled while the projector is the way you want, press the [ESC] ...VOL -] or [W] key to black screen, and stop output of the audio that is output from the projector's speaker. On the remote controller, press the [MUTE] key.
To select the color mode in this case, use the remote controller keys to adjust the volume level of the audio from the speaker. 2. z This causes the [Volume... again or press the [ESC] key. On the remote controller, press the [VOL +] or [VOL -] key. z You can use "Image Adjustment J Color Mode" (page 32). Projection Operations z The [COLOR MODE] key is disabled while the projector is the way you want, press the [ESC] ...VOL -] or [W] key to black screen, and stop output of the audio that is output from the projector's speaker. On the remote controller, press the [MUTE] key.

Owners Manual
Page 14
... the [D-ZOOM +] key again to further enlarge the image, up to 4 times. On the remote controller, press the [D-ZOOM +] or [D-ZOOM -] key. z You can use the remote controller's zoom keys to enlarge a specific part of the projected image 1. Use the remote controller's cursor keys to move the cross cursor to its original size. z You can back...
... the [D-ZOOM +] key again to further enlarge the image, up to 4 times. On the remote controller, press the [D-ZOOM +] or [D-ZOOM -] key. z You can use the remote controller's zoom keys to enlarge a specific part of the projected image 1. Use the remote controller's cursor keys to move the cross cursor to its original size. z You can back...
Owners Manual
Page 16
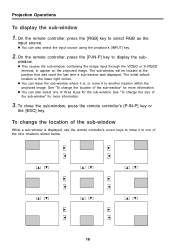
...more information. To change the location of the nine locations shown below. 16 window. Projection Operations To display the sub-window 1. On the remote controller, press the [RGB] key to appear on the projected image. The initial default location is , or move it to display the sub-... sub-window. To close the sub-window, press the remote controller's [P-IN-P] key or the [ESC] key. On the remote controller, press the [P-IN-P] key to another location within the projected image. z You can also select the input source using the projector's [INPUT] key. 2. z You can leave the sub...
...more information. To change the location of the nine locations shown below. 16 window. Projection Operations To display the sub-window 1. On the remote controller, press the [RGB] key to appear on the projected image. The initial default location is , or move it to display the sub-... sub-window. To close the sub-window, press the remote controller's [P-IN-P] key or the [ESC] key. On the remote controller, press the [P-IN-P] key to another location within the projected image. z You can also select the input source using the projector's [INPUT] key. 2. z You can leave the sub...
Owners Manual
Page 17
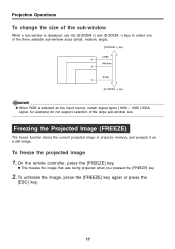
... again or press the [ESC] key. 17 On the remote controller, press the [FREEZE] key. z This freezes the image that was being projected when you pressed the [FREEZE] key. 2. Freezing the Projected Image (FREEZE) The freeze function stores the current projected image in projector memory, and projects it as the input source, certain...
... again or press the [ESC] key. 17 On the remote controller, press the [FREEZE] key. z This freezes the image that was being projected when you pressed the [FREEZE] key. 2. Freezing the Projected Image (FREEZE) The freeze function stores the current projected image in projector memory, and projects it as the input source, certain...
Owners Manual
Page 19
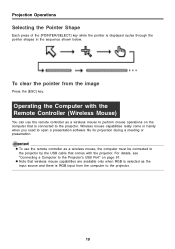
...you need to the Projector's USB Port" on the computer that comes with the Remote Controller (Wireless Mouse) You can use the remote controller as a wireless mouse, the computer must be connected to the projector by the USB cable that is connected to the projector. Wireless mouse capabilities ...presentation. z Note that wireless mouse capabilities are available only when RGB is selected as a wireless mouse to the projector. 19 Operating the Computer with the projector. Projection Operations Selecting the Pointer Shape Each press of the [POINTER/SELECT] key while the pointer is RGB ...
...you need to the Projector's USB Port" on the computer that comes with the Remote Controller (Wireless Mouse) You can use the remote controller as a wireless mouse, the computer must be connected to the projector by the USB cable that is connected to the projector. Wireless mouse capabilities ...presentation. z Note that wireless mouse capabilities are available only when RGB is selected as a wireless mouse to the projector. 19 Operating the Computer with the projector. Projection Operations Selecting the Pointer Shape Each press of the [POINTER/SELECT] key while the pointer is RGB ...
Owners Manual
Page 20
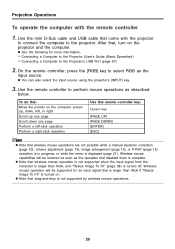
... the computer. z See the following for an input signal that come with the remote controller 1. Projection Operations To operate the computer with the projector to connect the computer to the projector. Use the mini D-Sub cable and USB cable that is larger than XGA, and "Resize Image To Fit" (page 38) is displayed (page 21).
... the computer. z See the following for an input signal that come with the remote controller 1. Projection Operations To operate the computer with the projector to connect the computer to the projector. Use the mini D-Sub cable and USB cable that is larger than XGA, and "Resize Image To Fit" (page 38) is displayed (page 21).
Owners Manual
Page 35
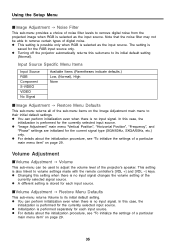
... even when there is no input signal. Note that the noise filter may not be used to volume settings made with the remote controller's [VOL +] and [VOL -] keys. z Turning off the projector automatically returns this case, the initialization is selected as the input source. In this sub-menu to their initial default settings... setting is performed separately for the RGB input source only. In this setting when there is also linked to adjust the volume level of the projector's speaker. z Initialization is stored for the current signal type (XGA/60Hz, SXGA/60Hz, etc.) only.
... even when there is no input signal. Note that the noise filter may not be used to volume settings made with the remote controller's [VOL +] and [VOL -] keys. z Turning off the projector automatically returns this case, the initialization is selected as the input source. In this sub-menu to their initial default settings... setting is performed separately for the RGB input source only. In this setting when there is also linked to adjust the volume level of the projector's speaker. z Initialization is stored for the current signal type (XGA/60Hz, SXGA/60Hz, etc.) only.

Owners Manual
Page 48
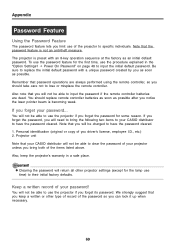
...password is entered. Initial Factory Default Password The following operations can also be input using the remote controller only. z While the projector is the 8-key operation you need to keep projector operation secure, be sure to change the initial factory default password to turn off key lock... etc. While the password is not really a "word", but rather a series of remote controller key operations. z The password can use the above , the following is off: Simultaneously hold down the projector's [ESC] key for about what you should perform to turn the power on password ...
...password is entered. Initial Factory Default Password The following operations can also be input using the remote controller only. z While the projector is the 8-key operation you need to keep projector operation secure, be sure to change the initial factory default password to turn off key lock... etc. While the password is not really a "word", but rather a series of remote controller key operations. z The password can use the above , the following is off: Simultaneously hold down the projector's [ESC] key for about what you should perform to turn the power on password ...

Owners Manual
Page 49
... input, press the [ESC] key. 49 z You can be operated without inputting a password. Setting Storage A single setting is stored, which allows the projector to be from one of the 20 remote controller key operations shown below when inputting a password. [AF/AK], [PAGE UP], [PAGE DOWN], [MENU], [KEYSTONE], [D-ZOOM +], [D-ZOOM -], [RGB], [VIDEO], [S-VIDEO], [AUTO...
... input, press the [ESC] key. 49 z You can be operated without inputting a password. Setting Storage A single setting is stored, which allows the projector to be from one of the 20 remote controller key operations shown below when inputting a password. [AF/AK], [PAGE UP], [PAGE DOWN], [MENU], [KEYSTONE], [D-ZOOM +], [D-ZOOM -], [RGB], [VIDEO], [S-VIDEO], [AUTO...

Owners Manual
Page 64
....53 feet) max. Remote Controller Range The allowable distance between the remote controller and the projector is less when there is a sharp angle between the remote controller and the remote controller receiver. 64 The following illustration shows the range of the projector. Appendix Appendix Remote Controller Signal Range When performing an operation on the remote controller, point it at the remote control signal port on the...
....53 feet) max. Remote Controller Range The allowable distance between the remote controller and the projector is less when there is a sharp angle between the remote controller and the remote controller receiver. 64 The following illustration shows the range of the projector. Appendix Appendix Remote Controller Signal Range When performing an operation on the remote controller, point it at the remote control signal port on the...

Owners Manual
Page 67
... the Computer with the Remote Controller (Wireless Mouse)" on page 75. The illustration shows how to connect to perform computer mouse operations, and previous page and next page operations. Appendix Connecting a Computer to the Projector's USB Port After you connect a computer to the projector's USB port, you can use the remote controller to the USB port...
... the Computer with the Remote Controller (Wireless Mouse)" on page 75. The illustration shows how to connect to perform computer mouse operations, and previous page and next page operations. Appendix Connecting a Computer to the Projector's USB Port After you connect a computer to the projector's USB port, you can use the remote controller to the USB port...
Owners Manual
Page 69
... you bring the following two items to your CASIO distributor to bring both of your CASIO distributor will not be able to lose or misplace the remote controller. You should take care not to use the projector if you forget the password for the first time, use the password feature for... some reason. Note that you keep the projector's warranty in the "...
... you bring the following two items to your CASIO distributor to bring both of your CASIO distributor will not be able to lose or misplace the remote controller. You should take care not to use the projector if you forget the password for the first time, use the password feature for... some reason. Note that you keep the projector's warranty in the "...
Owners Manual
Page 74
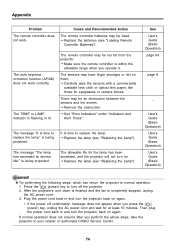
.... The auto keystone correction function (AF/AK) does not work . J Make sure the remote controller is being projected. J Remove the obstruction. is within the allowable range when you perform the above steps, take the projector to your retailer or authorized CASIO Service Center. 74 The message "It is time to turn on them. Press...
.... The auto keystone correction function (AF/AK) does not work . J Make sure the remote controller is being projected. J Remove the obstruction. is within the allowable range when you perform the above steps, take the projector to your retailer or authorized CASIO Service Center. 74 The message "It is time to turn on them. Press...