Owners Manual
Page 1
Also see the "User's Guide (Basic Operations)" for information about setting up the projector and replacing its lamp. • Keep this manual in the printed "User's Guide (Basic Operations)" first. E DATA PROJECTOR XJ-360 User's Guide • Make sure you read all of the precautions in a safe place for future reference.
Also see the "User's Guide (Basic Operations)" for information about setting up the projector and replacing its lamp. • Keep this manual in the printed "User's Guide (Basic Operations)" first. E DATA PROJECTOR XJ-360 User's Guide • Make sure you read all of the precautions in a safe place for future reference.

Owners Manual
Page 4
... functions to adjust the projected image as required. 4 Starting Projection User's Guide (Basic Operations): Turning On the Projector Perform fine adjustment of the projection position and angle. "Manually Selecting the Input Source" (page 6) Adjust the projected image size and focus the image. "Zoom and Focus" (page 7) Start projection (presentation, video, etc.). •...
... functions to adjust the projected image as required. 4 Starting Projection User's Guide (Basic Operations): Turning On the Projector Perform fine adjustment of the projection position and angle. "Manually Selecting the Input Source" (page 6) Adjust the projected image size and focus the image. "Zoom and Focus" (page 7) Start projection (presentation, video, etc.). •...
Owners Manual
Page 6
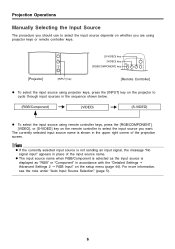
...[VIDEO], or [S-VIDEO] key on the setup menu (page 44). Projection Operations Manually Selecting the Input Source The procedure you should use to select the input source depends on whether you are using projector keys or remote controller keys. [S-VIDEO] key [VIDEO] key [RGB/COMPONENT] key... [Projector] [INPUT] key [Remote Controller] z To select the input source using projector keys, press the [INPUT] key on the projector to cycle through input sources in accordance...
...[VIDEO], or [S-VIDEO] key on the setup menu (page 44). Projection Operations Manually Selecting the Input Source The procedure you should use to select the input source depends on whether you are using projector keys or remote controller keys. [S-VIDEO] key [VIDEO] key [RGB/COMPONENT] key... [Projector] [INPUT] key [Remote Controller] z To select the input source using projector keys, press the [INPUT] key on the projector to cycle through input sources in accordance...
Owners Manual
Page 7
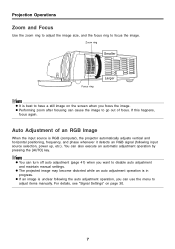
... to go out of an RGB Image When the input source is best to disable auto adjustment and maintain manual settings. Zoom ring Smaller Focus ring Larger z It is RGB (computer), the projector automatically adjusts vertical and horizontal positioning, frequency, and phase whenever it detects an RGB signal (following the auto adjustment... to focus the image. Projection Operations Zoom and Focus Use the zoom ring to adjust the image size, and the focus ring to adjust items manually. z If an image is in progress.
... to go out of an RGB Image When the input source is best to disable auto adjustment and maintain manual settings. Zoom ring Smaller Focus ring Larger z It is RGB (computer), the projector automatically adjusts vertical and horizontal positioning, frequency, and phase whenever it detects an RGB signal (following the auto adjustment... to focus the image. Projection Operations Zoom and Focus Use the zoom ring to adjust the image size, and the focus ring to adjust items manually. z If an image is in progress.

Owners Manual
Page 8
... 20 degrees z The angles shown in the above illustration are subject to the following shows the allowable angle that the projector can be aligned with functions for automatic as well as manual keystone correction, which provides a regularly shaped projected image. z Projection of an image from a computer (Resolution: 1024 × 768; Vertical Frequency...
... 20 degrees z The angles shown in the above illustration are subject to the following shows the allowable angle that the projector can be aligned with functions for automatic as well as manual keystone correction, which provides a regularly shaped projected image. z Projection of an image from a computer (Resolution: 1024 × 768; Vertical Frequency...
Owners Manual
Page 9
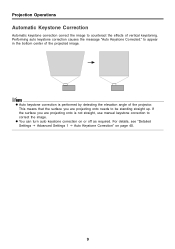
... projecting onto is performed by detecting the elevation angle of the projected image. z Auto keystone correction is not straight, use manual keystone correction to appear in the bottom center of the projector. z You can turn auto keystone correction on page 40. 9 to correct the image. For details, see "Detailed Settings J Advanced Settings...
... projecting onto is performed by detecting the elevation angle of the projected image. z Auto keystone correction is not straight, use manual keystone correction to appear in the bottom center of the projector. z You can turn auto keystone correction on page 40. 9 to correct the image. For details, see "Detailed Settings J Advanced Settings...
Owners Manual
Page 30
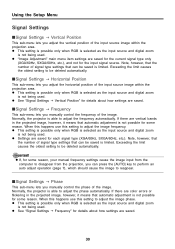
...projector is able to reappear. z See "Signal Settings J Frequency" for details about how settings are saved. 30 z This setting is possible only when RGB is selected as the input source and digital zoom is not being used . z See "Signal Settings J Vertical Position" for some reason, your manual...some reason. When this happens use this setting to adjust the image phase. z Settings are saved for the current signal type only (XGA/60Hz, SXGA/60Hz, etc.), and not for some reason. Exceeding the limit causes the oldest setting to be deleted automatically. ISignal ...
...projector is able to reappear. z See "Signal Settings J Frequency" for details about how settings are saved. 30 z This setting is possible only when RGB is selected as the input source and digital zoom is not being used . z See "Signal Settings J Vertical Position" for some reason, your manual...some reason. When this happens use this setting to adjust the image phase. z Settings are saved for the current signal type only (XGA/60Hz, SXGA/60Hz, etc.), and not for some reason. Exceeding the limit causes the oldest setting to be deleted automatically. ISignal ...


