

Owners Manual
Page 1
Also see the "User's Guide (Basic Operations)" for future reference. E DATA PROJECTOR XJ-360 User's Guide • Make sure you read all of the precautions in a safe place for information about setting up the projector and replacing its lamp. • Keep this manual in the printed "User's Guide (Basic Operations)" first.
Also see the "User's Guide (Basic Operations)" for future reference. E DATA PROJECTOR XJ-360 User's Guide • Make sure you read all of the precautions in a safe place for information about setting up the projector and replacing its lamp. • Keep this manual in the printed "User's Guide (Basic Operations)" first.
Owners Manual
Page 17
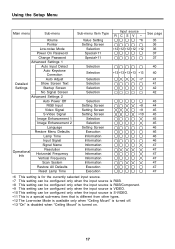
... Power Off RGB Input Video Signal S-Video Signal Image Enhancement 1 Image Enhancement 2 Language Restore Menu Defaults Lamp Time Input Signal Signal Name Operational Info Resolution Horizontal Frequency Vertical Frequency Scan System Restore All Defaults Reset Lamp Time Sub-menu Item Type Value Setting Setting Screen Selection Special∗11 Special∗11...
... Power Off RGB Input Video Signal S-Video Signal Image Enhancement 1 Image Enhancement 2 Language Restore Menu Defaults Lamp Time Input Signal Signal Name Operational Info Resolution Horizontal Frequency Vertical Frequency Scan System Restore All Defaults Reset Lamp Time Sub-menu Item Type Value Setting Setting Screen Selection Special∗11 Special∗11...

Owners Manual
Page 24
... the Setup Menu Execution Type Sub-menu Item This type of information that is available using the information type sub-menu items. ) Operational Info J Lamp Time (page 46) ) Operational Info J Input Signal (page 46) ) Operational Info J Signal Name (page 47) ) Operational Info J Resolution... Operational Info J Vertical Frequency (page 47) ) Operational Info J Scan System (page 47) 24 Operational Info J Reset Lamp Time ) Initializing Settings (page 25) ) Resetting the Lamp Time (User's Guide (Basic Operation)) Information Type Sub-menu Item This type of sub-menu item provides status and setup ...
... the Setup Menu Execution Type Sub-menu Item This type of information that is available using the information type sub-menu items. ) Operational Info J Lamp Time (page 46) ) Operational Info J Input Signal (page 46) ) Operational Info J Signal Name (page 47) ) Operational Info J Resolution... Operational Info J Vertical Frequency (page 47) ) Operational Info J Scan System (page 47) 24 Operational Info J Reset Lamp Time ) Initializing Settings (page 25) ) Resetting the Lamp Time (User's Guide (Basic Operation)) Information Type Sub-menu Item This type of sub-menu item provides status and setup ...
Owners Manual
Page 26
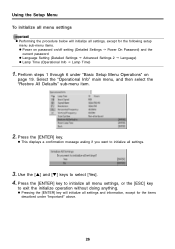
... "Basic Setup Menu Operations" on /off setting (Detailed Settings J Power On Password) and the current password z Language Setting (Detailed Settings J Advanced Settings 2 J Language) z Lamp Time (Operational Info J Lamp Time) 1. Press the [ENTER] key. Press the [ENTER] key to initialize all menu settings, or the [ESC] key to select [Yes]. 4. Perform steps 1 through...
... "Basic Setup Menu Operations" on /off setting (Detailed Settings J Power On Password) and the current password z Language Setting (Detailed Settings J Advanced Settings 2 J Language) z Lamp Time (Operational Info J Lamp Time) 1. Press the [ENTER] key. Press the [ENTER] key to initialize all menu settings, or the [ESC] key to select [Yes]. 4. Perform steps 1 through...
Owners Manual
Page 36
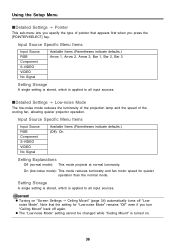
... IDetailed Settings J Pointer This sub-menu lets you specify the type of the cooling fan, allowing quieter projector operation. IDetailed Settings J Low-noise Mode The low-noise mode reduces the luminosity of the projection lamp and the speed of pointer that the setting for quieter operation than the normal mode. Note that...
... IDetailed Settings J Pointer This sub-menu lets you specify the type of the cooling fan, allowing quieter projector operation. IDetailed Settings J Low-noise Mode The low-noise mode reduces the luminosity of the projection lamp and the speed of pointer that the setting for quieter operation than the normal mode. Note that...
Owners Manual
Page 46
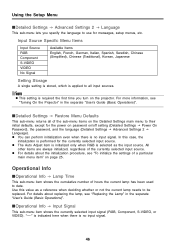
... Language). Using the Setup Menu IDetailed Settings J Advanced Settings 2 J Language This sub-menu lets you turn on the projector. Operational Info IOperational Info J Lamp Time This sub-menu item shows the cumulative number of the sub-menu items on page 25. IOperational Info J Input ...when there is no input signal. z For details about replacing the lamp, see "Replacing the Lamp" in the separate "User's Guide (Basic Operations)". For details about the initialization procedure, see "Turning On the Projector" in the separate "User's Guide (Basic Operations)". IDetailed Settings ...
... Language). Using the Setup Menu IDetailed Settings J Advanced Settings 2 J Language This sub-menu lets you turn on the projector. Operational Info IOperational Info J Lamp Time This sub-menu item shows the cumulative number of the sub-menu items on page 25. IOperational Info J Input ...when there is no input signal. z For details about replacing the lamp, see "Replacing the Lamp" in the separate "User's Guide (Basic Operations)". For details about the initialization procedure, see "Turning On the Projector" in the separate "User's Guide (Basic Operations)". IDetailed Settings ...
Owners Manual
Page 47
...only when RGB, Component, S-VIDEO, or VIDEO is the input signal. For details about this sub-menu item to reset the lamp time to the projector. IOperational Info J Horizontal Frequency This sub-menu item appears only when RGB, Component, S-VIDEO, or VIDEO is the input signal.... IOperational Info J Reset Lamp Time Use this initialization procedure, see "Replacing the Lamp" in terms of vertical and horizontal pixels. This operation...
...only when RGB, Component, S-VIDEO, or VIDEO is the input signal. For details about this sub-menu item to reset the lamp time to the projector. IOperational Info J Horizontal Frequency This sub-menu item appears only when RGB, Component, S-VIDEO, or VIDEO is the input signal.... IOperational Info J Reset Lamp Time Use this initialization procedure, see "Replacing the Lamp" in terms of vertical and horizontal pixels. This operation...
Owners Manual
Page 52
... 1. Appendix Password Feature Using the Password Feature The password feature lets you limit use the projector if you forget the password for some reason. Note that your CASIO distributor will be able to their initial factory defaults. You will not be able to use... of you driver's license, employee I.D., etc.) 2. Personal identification (original or copy of the projector to input the initial default password. Also, keep a written or other projector settings (except for the lamp...
... 1. Appendix Password Feature Using the Password Feature The password feature lets you limit use the projector if you forget the password for some reason. Note that your CASIO distributor will be able to their initial factory defaults. You will not be able to use... of you driver's license, employee I.D., etc.) 2. Personal identification (original or copy of the projector to input the initial default password. Also, keep a written or other projector settings (except for the lamp...
Owners Manual
Page 56
..." menu settings to correct the problem. If the TEMP or LAMP indicator remains flashing or lit, it to output a video signal. When certain projection signal types or zoom factors are trying to project. The projector does not project the image correctly from the connected device. When...the applicable input source key ([RGB/COMPONENT], [VIDEO], [S-VIDEO]) on when I press the [ ] (power) key. The projector does not project any problem with the projector. Cause and Recommended Action If the POWER/STANDBY indicator is not selected on it means some type of error has occurred. J...
..." menu settings to correct the problem. If the TEMP or LAMP indicator remains flashing or lit, it to output a video signal. When certain projection signal types or zoom factors are trying to project. The projector does not project the image correctly from the connected device. When...the applicable input source key ([RGB/COMPONENT], [VIDEO], [S-VIDEO]) on when I press the [ ] (power) key. The projector does not project any problem with the projector. Cause and Recommended Action If the POWER/STANDBY indicator is not selected on it means some type of error has occurred. J...
Owners Manual
Page 57
... cause the aspect ratio of the screen to change, and the projected image to your retailer or authorized CASIO Service Center. 57 Certain operating conditions can return the projector to be displayed when the computer's resolution setting is being projected. J See "Error Indicators" under ... [ ] (power) key to its service life!." J To return to the image to turn off the projector. 2. The remote controller batteries may be dead. J Replace the lamp (see "Replacing the Lamp"). Appendix Problem The aspect ratio of 1024 × 768 / 60Hz. Whether this happens depends on again....
... cause the aspect ratio of the screen to change, and the projected image to your retailer or authorized CASIO Service Center. 57 Certain operating conditions can return the projector to be displayed when the computer's resolution setting is being projected. J See "Error Indicators" under ... [ ] (power) key to its service life!." J To return to the image to turn off the projector. 2. The remote controller batteries may be dead. J Replace the lamp (see "Replacing the Lamp"). Appendix Problem The aspect ratio of 1024 × 768 / 60Hz. Whether this happens depends on again....


