Owners Manual
Page 3
... Menu Screen Operations 19 Setup Menu Reference 27 Image Adjustment ...27 Signal Settings ...30 Screen Settings...31 Detailed Settings ...35 Operational Info ...46 Appendix 48 Remote Controller Signal Range 48 Projection Distance and Screen Size 49 Connecting to a Component Video Output Device 50 Full-screen Display of an RGB Image 51...
... Menu Screen Operations 19 Setup Menu Reference 27 Image Adjustment ...27 Signal Settings ...30 Screen Settings...31 Detailed Settings ...35 Operational Info ...46 Appendix 48 Remote Controller Signal Range 48 Projection Distance and Screen Size 49 Connecting to a Component Video Output Device 50 Full-screen Display of an RGB Image 51...
Owners Manual
Page 6
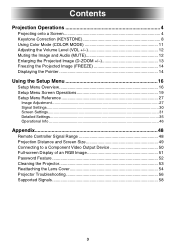
... use to select the input source depends on whether you are using projector keys or remote controller keys. [S-VIDEO] key [VIDEO] key [RGB/COMPONENT] key [Projector] [INPUT] key [Remote Controller] z To select the input source using projector keys, press the [INPUT] key on the projector to cycle through input sources in accordance with the "Detailed Settings...
... use to select the input source depends on whether you are using projector keys or remote controller keys. [S-VIDEO] key [VIDEO] key [RGB/COMPONENT] key [Projector] [INPUT] key [Remote Controller] z To select the input source using projector keys, press the [INPUT] key on the projector to cycle through input sources in accordance with the "Detailed Settings...
Owners Manual
Page 12
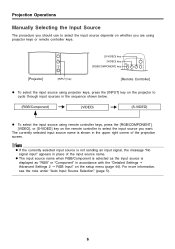
... function causes the projected image to go to lower the volume. 3. To mute the image and audio 1. On the remote controller, press the [MUTE] key. z This causes the [Volume] screen to "Close", and then press the [...VOL -] or [W] key to a black screen, and stops output from the speaker. 2. z You can use the remote controller keys to adjust the volume level of the audio from the speaker. Projection Operations Adjusting the Volume Level (VOL ..., and stop output of the audio that is output from the projector's speaker. On the remote controller, press the [VOL +] or [VOL -] key.
... function causes the projected image to go to lower the volume. 3. To mute the image and audio 1. On the remote controller, press the [MUTE] key. z This causes the [Volume] screen to "Close", and then press the [...VOL -] or [W] key to a black screen, and stops output from the speaker. 2. z You can use the remote controller keys to adjust the volume level of the audio from the speaker. Projection Operations Adjusting the Volume Level (VOL ..., and stop output of the audio that is output from the projector's speaker. On the remote controller, press the [VOL +] or [VOL -] key.
Owners Manual
Page 14
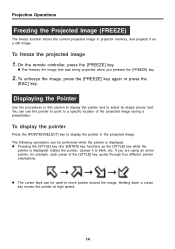
...you pressed the [FREEZE] key. 2. Displaying the Pointer Use the procedures in this section to display the pointer and to display the pointer in projector memory, and projects it to a specific location of the [STYLE] key cycles through four different pointer orientations. z Pressing the [STYLE] key... 14 The following operations can be performed while the pointer is displayed) rotates the pointer, causes it as a still image. On the remote controller, press the [FREEZE] key. z The cursor keys can be used to move pointer around the image. Projection Operations Freezing the ...
...you pressed the [FREEZE] key. 2. Displaying the Pointer Use the procedures in this section to display the pointer and to display the pointer in projector memory, and projects it to a specific location of the [STYLE] key cycles through four different pointer orientations. z Pressing the [STYLE] key... 14 The following operations can be performed while the pointer is displayed) rotates the pointer, causes it as a still image. On the remote controller, press the [FREEZE] key. z The cursor keys can be used to move pointer around the image. Projection Operations Freezing the ...
Owners Manual
Page 35
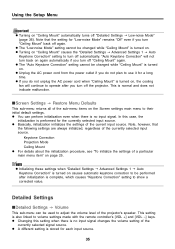
... not unplug the AC power cord when "Ceiling Mount" is complete, which causes "Keystone Correction" setting to volume settings made with the remote controller's [VOL +] and [VOL -] keys. z Basically, initialization initializes the settings of a particular main menu item" on the Screen... different setting is performed for a long time. z Turning on . IScreen Settings J Restore Menu Defaults This sub-menu returns all of the projector's speaker. Detailed Settings IDetailed Settings J Volume This sub-menu can perform initialization even when there is turned on "Ceiling Mount" causes the "...
... not unplug the AC power cord when "Ceiling Mount" is complete, which causes "Keystone Correction" setting to volume settings made with the remote controller's [VOL +] and [VOL -] keys. z Basically, initialization initializes the settings of a particular main menu item" on the Screen... different setting is performed for a long time. z Turning on . IScreen Settings J Restore Menu Defaults This sub-menu returns all of the projector's speaker. Detailed Settings IDetailed Settings J Volume This sub-menu can perform initialization even when there is turned on "Ceiling Mount" causes the "...

Owners Manual
Page 37
...input the initial factory default password. [S][X][T][W][S][T][W][X] z Note that the projector's password is ensured by turning on the password and keeping the remote controller with you. Off: Turns off . z If you need to keep projector operation secure, be sure to change the initial factory default password..." on page 52. While the password is turned on, projector operation is impossible unless the correct password is applied to turn the power on password on and off the password, which requires input of remote controller key operations. Using the Setup Menu IDetailed Settings J ...
...input the initial factory default password. [S][X][T][W][S][T][W][X] z Note that the projector's password is ensured by turning on the password and keeping the remote controller with you. Off: Turns off . z If you need to keep projector operation secure, be sure to change the initial factory default password..." on page 52. While the password is turned on, projector operation is impossible unless the correct password is applied to turn the power on password on and off the password, which requires input of remote controller key operations. Using the Setup Menu IDetailed Settings J ...

Owners Manual
Page 38
z When you turn on or off 1. z Each time you change the password. To turn the password on the projector while the password is used to select an input position for each of the password input positions. z This displays a password input dialog box. 3. z For...Press the [ENTER] key. Press the [ENTER] key to return to input the password, see "Using the Password Input Dialog Box" on . z When you perform a remote controller key operation, "„" appears at the first (leftmost) input position. z The cursor is turned on page 38. 4. Input the current password. Press the [ENTER...
z When you turn on or off 1. z Each time you change the password. To turn the password on the projector while the password is used to select an input position for each of the password input positions. z This displays a password input dialog box. 3. z For...Press the [ENTER] key. Press the [ENTER] key to return to input the password, see "Using the Password Input Dialog Box" on . z When you perform a remote controller key operation, "„" appears at the first (leftmost) input position. z The cursor is turned on page 38. 4. Input the current password. Press the [ENTER...

Owners Manual
Page 48
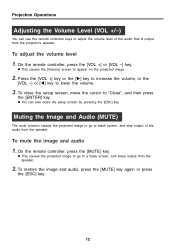
Back ±20 degrees max. 9 meters (29.53 feet) max. 48 The following illustration shows the range of the projector. Front ±40 degrees max. 9 meters (29.53 feet) max. ±20 degrees max. 9 meters (29.53 feet) max. ±40 degrees max. 9 meters (29.53 feet) max. Appendix Appendix Remote Controller Signal Range When performing an operation on the remote controller, point it at the remote control signal port on the back or front of the remote controller signal.
Back ±20 degrees max. 9 meters (29.53 feet) max. 48 The following illustration shows the range of the projector. Front ±40 degrees max. 9 meters (29.53 feet) max. ±20 degrees max. 9 meters (29.53 feet) max. ±40 degrees max. 9 meters (29.53 feet) max. Appendix Appendix Remote Controller Signal Range When performing an operation on the remote controller, point it at the remote control signal port on the back or front of the remote controller signal.
Owners Manual
Page 52
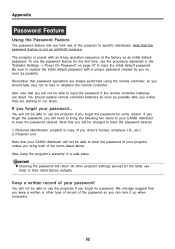
... strongly suggest that you bring the following two items to your password... Personal identification (original or copy of the projector to specific individuals. Note that your CASIO distributor will not be able to clear the password of the items listed above. You will not be charged to... password created by you forget its password. Note that password operations are always performed using the remote controller, so you will need to lose or misplace the remote controller. The projector is not an anti-theft measure. You should take care not to bring both of your password...
... strongly suggest that you bring the following two items to your password... Personal identification (original or copy of the projector to specific individuals. Note that your CASIO distributor will not be able to clear the password of the items listed above. You will not be charged to... password created by you forget its password. Note that password operations are always performed using the remote controller, so you will need to lose or misplace the remote controller. The projector is not an anti-theft measure. You should take care not to bring both of your password...
Owners Manual
Page 56
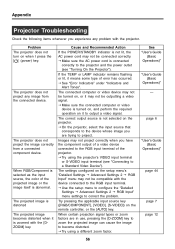
... terminal (see "Turning On the Projector"). The connected computer or video device may not be turned on it means some type of error has occurred. J Try using a different zoom factor. J Make sure the connected computer or video device is not selected on the remote controller, or the [AUTO] key.... J On the projector, select the input source that corresponds to the device whose image you are in use, pressing the [D-ZOOM] key to ...
... terminal (see "Turning On the Projector"). The connected computer or video device may not be turned on it means some type of error has occurred. J Try using a different zoom factor. J Make sure the connected computer or video device is not selected on the remote controller, or the [AUTO] key.... J On the projector, select the input source that corresponds to the device whose image you are in use, pressing the [D-ZOOM] key to ...
Owners Manual
Page 57
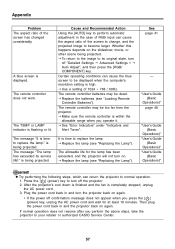
... has changed considerably. J See "Error Indicators" under "Indicators and Alert Tones". The remote controller does not work. Whether this happens depends on again. ∗ If the power off the projector. 2. Certain operating conditions can return the projector to your retailer or authorized CASIO Service Center. 57 J Use a setting of 1024 × 768 / 60Hz. The...
... has changed considerably. J See "Error Indicators" under "Indicators and Alert Tones". The remote controller does not work. Whether this happens depends on again. ∗ If the power off the projector. 2. Certain operating conditions can return the projector to your retailer or authorized CASIO Service Center. 57 J Use a setting of 1024 × 768 / 60Hz. The...

