Programming Guide
Page 3
Adding Colour to item key ...10 5. Simple Programming for QT6000 ...4 Maintenance keys...5 PGM1: PLU-DEPT-PGM...6 Basic Programming and Maintenance of Items 7 2. Block and Unblock items...8 4. Deleting item record ...14 8. Restoring item record and its programmed data 15 Report Printing...16 3 Adding Picture to item key ...12 6. Add Price to item ...8 Changing Department number...8 3. Quick Item search ...13 7.
Adding Colour to item key ...10 5. Simple Programming for QT6000 ...4 Maintenance keys...5 PGM1: PLU-DEPT-PGM...6 Basic Programming and Maintenance of Items 7 2. Block and Unblock items...8 4. Deleting item record ...14 8. Restoring item record and its programmed data 15 Report Printing...16 3 Adding Picture to item key ...12 6. Add Price to item ...8 Changing Department number...8 3. Quick Item search ...13 7.
Programming Guide
Page 4
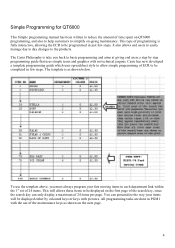
Casio has now developed a template programming guide which uses spreadsheet style to allow simple programming of ECR to be completed in just few steps. The template is as shown on the next page. 4 You can only display a maximum of programming is take you must always program your items will allows ...aims at giving end users a step by coloured keys or keys with no technical jargons. The Casio Philosophy is fully interactive, allowing the ECR to be displayed either by step programming guide that uses simple icons and graphics with pictures. It also allows end users to easily ...
Casio has now developed a template programming guide which uses spreadsheet style to allow simple programming of ECR to be completed in just few steps. The template is as shown on the next page. 4 You can only display a maximum of programming is take you must always program your items will allows ...aims at giving end users a step by coloured keys or keys with no technical jargons. The Casio Philosophy is fully interactive, allowing the ECR to be displayed either by step programming guide that uses simple icons and graphics with pictures. It also allows end users to easily ...
Programming Guide
Page 5
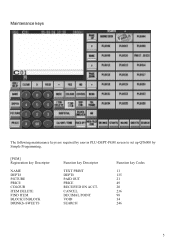
CANCEL DECIMAL POINT VOID SEARCH Function key Codes 11 135 21 49 20 236 98 34 246 5 Maintenance keys The following maintenance keys are required by user in PLU-DEPT-PGM screen to set up QT6000 by Simple Programming. [PGM] Registration key Descriptor NAME DEPT# PICTURE PRICE COLOUR ITEM DELETE FIND ITEM BLOCK\UNBLOCK DRINKS~SWEETS Function key Descriptor TEXT PRINT DEPT# PAID OUT PRICE RECEIVED ON ACCT.
CANCEL DECIMAL POINT VOID SEARCH Function key Codes 11 135 21 49 20 236 98 34 246 5 Maintenance keys The following maintenance keys are required by user in PLU-DEPT-PGM screen to set up QT6000 by Simple Programming. [PGM] Registration key Descriptor NAME DEPT# PICTURE PRICE COLOUR ITEM DELETE FIND ITEM BLOCK\UNBLOCK DRINKS~SWEETS Function key Descriptor TEXT PRINT DEPT# PAID OUT PRICE RECEIVED ON ACCT.

Programming Guide
Page 6
... screen allows users to PGM 3. Prevent the registration of PLU in PGM1. 6 Bitmap/Colour PLU Price Please turn to next page for Basic User Programming and Maintenance of PLU) & Unblock PLU • Add or Change PLU key Picture • Add or Change PLU key Colour • Quick Search for ... PLU Number DEPT-PLU-PGM Screen in PGM 1 without the need to navigate to change additional PLU settings in PGM1 Description Department Link No. The programming options that end users can perform include the following: • Add or Change PLU Name • Add or Change PLU Price • Add or ...
... screen allows users to PGM 3. Prevent the registration of PLU in PGM1. 6 Bitmap/Colour PLU Price Please turn to next page for Basic User Programming and Maintenance of PLU) & Unblock PLU • Add or Change PLU key Picture • Add or Change PLU key Colour • Quick Search for ... PLU Number DEPT-PLU-PGM Screen in PGM 1 without the need to navigate to change additional PLU settings in PGM1 Description Department Link No. The programming options that end users can perform include the following: • Add or Change PLU Name • Add or Change PLU Price • Add or ...
Programming Guide
Page 7
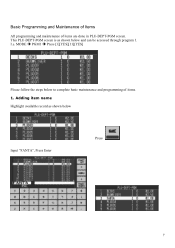
Adding item name Highlight available record as shown below and can be accessed through program 1. MODE PGM1 Press [1][YES][11][YES] Please follow the steps below Input "FANTA", Press Enter Press 7 I.e. This PLU-DEPT-PGM screen is as shown below to complete basic maintenance and programming of items are done in PLU-DEPT-PGM screen. Basic Programming and Maintenance of Items All programming and maintenance of items. 1.
Adding item name Highlight available record as shown below and can be accessed through program 1. MODE PGM1 Press [1][YES][11][YES] Please follow the steps below Input "FANTA", Press Enter Press 7 I.e. This PLU-DEPT-PGM screen is as shown below to complete basic maintenance and programming of items are done in PLU-DEPT-PGM screen. Basic Programming and Maintenance of Items All programming and maintenance of items. 1.
Programming Guide
Page 13
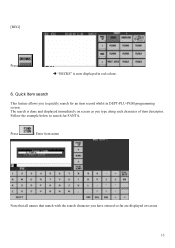
Follow the example below to quickly search for FANTA. Press | Enter item name Note that all names that match with the search character you have entered so far are displayed on screen as you to search for an item record whilst in red colour. 6. The search is now displayed in DEPT-PLU-PGM programming screen. Quick Item search This feature allows you type along each character of item descriptor. [REG] Press "BECKS" is done and displayed immediately on screen 13
Follow the example below to quickly search for FANTA. Press | Enter item name Note that all names that match with the search character you have entered so far are displayed on screen as you to search for an item record whilst in red colour. 6. The search is now displayed in DEPT-PLU-PGM programming screen. Quick Item search This feature allows you type along each character of item descriptor. [REG] Press "BECKS" is done and displayed immediately on screen 13
Programming Guide
Page 14
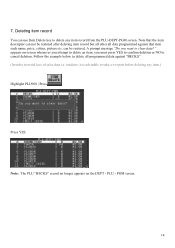
... against that item such name, price, colour, picture etc. appears on the DEPT - Follow the example below to delete all data programmed against "BECKS" (In order to cancel deletion. PGM screen. 14 A prompt message "Do you must press YES to confirm deletion or NO to avoid loss ...
... against that item such name, price, colour, picture etc. appears on the DEPT - Follow the example below to delete all data programmed against "BECKS" (In order to cancel deletion. PGM screen. 14 A prompt message "Do you must press YES to confirm deletion or NO to avoid loss ...
Programming Guide
Page 15
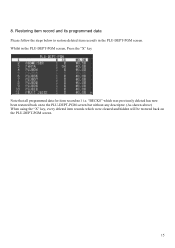
Whilst in the PLU-DEPT-PGM screen. 8. Restoring item record and its programmed data Please follow the steps below to the PLU-DEPT-PGM screen but without any descriptor. (As shown above) When using the "X" key, every deleted item records which were cleared and hidden will be restored back on to restore deleted item record/s in the PLU-DEPT-PGM screen, Press the "X" key Note that all programmed data for item record no1 i.e. "BECKS" which was previously deleted has now been restored back on the PLU-DEPT-PGM screen. 15
Whilst in the PLU-DEPT-PGM screen. 8. Restoring item record and its programmed data Please follow the steps below to the PLU-DEPT-PGM screen but without any descriptor. (As shown above) When using the "X" key, every deleted item records which were cleared and hidden will be restored back on to restore deleted item record/s in the PLU-DEPT-PGM screen, Press the "X" key Note that all programmed data for item record no1 i.e. "BECKS" which was previously deleted has now been restored back on the PLU-DEPT-PGM screen. 15
User Manual
Page 1
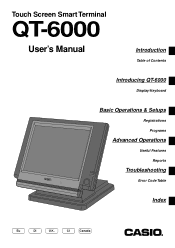
CI Canada Touch Screen Smart Terminal QT-6000 User's Manual Introduction Table of Contents Introducing QT-6000 Display/Keyboard Basic Operations & Setups Registrations Programs Advanced Operations Useful Features Reports Troubleshooting Error Code Table Index Eu Di U.K.
CI Canada Touch Screen Smart Terminal QT-6000 User's Manual Introduction Table of Contents Introducing QT-6000 Display/Keyboard Basic Operations & Setups Registrations Programs Advanced Operations Useful Features Reports Troubleshooting Error Code Table Index Eu Di U.K.
User Manual
Page 6
Introduction & Contents Introduction & Contents 6 Introducing QT-6000 10 General guide ...10 Touch screen panel ...13 Main display part ...14 Keyboard part ...16 Keyboard part with pop-up window 18 List pop-up ... status ...29 Locking out high amount limitation 29 Preparing and using discounts/reductions 30 Programming discount rate and reduction amount 30 Registering discounts ...31 Discount for items and subtotals 31 Registering reductions ...32 Reduction for items ...32 Reduction for subtotal ...32 Registering credit and check payments 33 Check ...33 Credit ...33 Mixed tender (cash...
Introduction & Contents Introduction & Contents 6 Introducing QT-6000 10 General guide ...10 Touch screen panel ...13 Main display part ...14 Keyboard part ...16 Keyboard part with pop-up window 18 List pop-up ... status ...29 Locking out high amount limitation 29 Preparing and using discounts/reductions 30 Programming discount rate and reduction amount 30 Registering discounts ...31 Discount for items and subtotals 31 Registering reductions ...32 Reduction for items ...32 Reduction for subtotal ...32 Registering credit and check payments 33 Check ...33 Credit ...33 Mixed tender (cash...
User Manual
Page 8
... Changing media in drawer ...72 Scanning PLU ...73 Item registration ...73 Unit price inquiry ...73 Programming to clerk...74 Programming procedure ...74 Programming descriptors and messages 75 Programming item descriptor (flat-PLU) procedure 75 Programming function key character procedure 76 Programming receipt/slip message procedure 77 Entering characters ...78 Entering characters ...78 Editing characters ...80 Correcting...
... Changing media in drawer ...72 Scanning PLU ...73 Item registration ...73 Unit price inquiry ...73 Programming to clerk...74 Programming procedure ...74 Programming descriptors and messages 75 Programming item descriptor (flat-PLU) procedure 75 Programming function key character procedure 76 Programming receipt/slip message procedure 77 Entering characters ...78 Entering characters ...78 Editing characters ...80 Correcting...
User Manual
Page 9
... remote printer 87 To print the monthly sales read/reset report 88 Procedure ...88 Report (by optional remote printer 88 Reading the terminal's program 89 The tree of P6 (program read) menu window 89 Procedure ...90 Report example ...90 Unit price and quantity ...90 Item descriptor ...91 Character and Message ...92 Clerk... an error occurs ...94 When the terminal does not operate at all 97 In case of power failure ...98 Options ...98 Specifications ...99 Index ...100 QT-6000 User's Manual 9E
... remote printer 87 To print the monthly sales read/reset report 88 Procedure ...88 Report (by optional remote printer 88 Reading the terminal's program 89 The tree of P6 (program read) menu window 89 Procedure ...90 Report example ...90 Unit price and quantity ...90 Item descriptor ...91 Character and Message ...92 Clerk... an error occurs ...94 When the terminal does not operate at all 97 In case of power failure ...98 Options ...98 Specifications ...99 Index ...100 QT-6000 User's Manual 9E
User Manual
Page 15
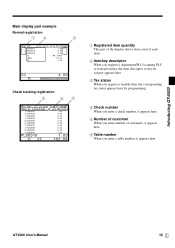
.... 3 Tax status When you register a taxable item, the corresponding tax status appears here by programming. 4 Check number When you enter a check number, it appears here. 5 Number of customer When you enter number of customers, it appears here. 6 Table number When you enter a table number, it appears here. Introducing QT-6000 QT-6000 User's Manual 15 E
.... 3 Tax status When you register a taxable item, the corresponding tax status appears here by programming. 4 Check number When you enter a check number, it appears here. 5 Number of customer When you enter number of customers, it appears here. 6 Table number When you enter a table number, it appears here. Introducing QT-6000 QT-6000 User's Manual 15 E
User Manual
Page 16
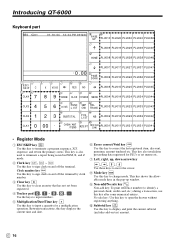
Introducing QT-6000 Keyboard part REG C01 31-10-04 12:34 PM 001234 1234567890123456789012345678901234567890 I PAGE UP P PLU010 PLU020 PLU030 PLU040 PLU050 1234567890123456789012345678901234567890 1234567890123456789012345678901234567890 7 ... the cursor. 8 Mode key ° Use this key to identify a personal check, credit card, etc.) during a transaction, use this key to terminate a program sequence, X/Z sequence, and return the primary status. Between transactions, this key displays the current time and date. 6 Error correct/Void key ~ Use this key...
Introducing QT-6000 Keyboard part REG C01 31-10-04 12:34 PM 001234 1234567890123456789012345678901234567890 I PAGE UP P PLU010 PLU020 PLU030 PLU040 PLU050 1234567890123456789012345678901234567890 1234567890123456789012345678901234567890 7 ... the cursor. 8 Mode key ° Use this key to identify a personal check, credit card, etc.) during a transaction, use this key to terminate a program sequence, X/Z sequence, and return the primary status. Between transactions, this key displays the current time and date. 6 Error correct/Void key ~ Use this key...
User Manual
Page 17
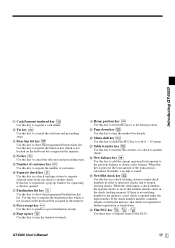
... is registered, a pop-up key g Use this key to register the number of customer key [ Use this key to turn the window backwards. QT-6000 User's Manual 17 E Use this key is opened under the input number. K Page down key w Use this key to shift Flat-PLU key ...and to reopen existing checks. C Function list key ´ Use this key to show the programmed function key list. G Finalization list key ≥ Use this key to show the programmed finalization key list. Introducing QT-6000 A Cash/Amount tendered key a Use this key to consent the selection and proceeding steps. B...
... is registered, a pop-up key g Use this key to register the number of customer key [ Use this key to turn the window backwards. QT-6000 User's Manual 17 E Use this key is opened under the input number. K Page down key w Use this key to shift Flat-PLU key ...and to reopen existing checks. C Function list key ´ Use this key to show the programmed function key list. G Finalization list key ≥ Use this key to show the programmed finalization key list. Introducing QT-6000 A Cash/Amount tendered key a Use this key to consent the selection and proceeding steps. B...
User Manual
Page 19
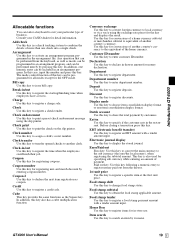
...a specific item at the first unit price. Coupon 2 Use this key to declare the next item registration as mode, can be programmed in an arrangement program, and can be performed from the drawer. 1st unit price Use this key to transfer opened checks to register a check tender. ... of business. Food stamp tender Use this key to register an EBT amount with a tender amount input. Introducing QT-6000 Allocatable functions You can tailor a keyboard to suit your CASIO dealer for detail information. Consult your particular type of payment. Add check Use this key. In addition, one ...
...a specific item at the first unit price. Coupon 2 Use this key to declare the next item registration as mode, can be programmed in an arrangement program, and can be performed from the drawer. 1st unit price Use this key to transfer opened checks to register a check tender. ... of business. Food stamp tender Use this key to register an EBT amount with a tender amount input. Introducing QT-6000 Allocatable functions You can tailor a keyboard to suit your CASIO dealer for detail information. Consult your particular type of payment. Add check Use this key. In addition, one ...
User Manual
Page 21
... enter characters to print. Next (Page up) Use this key to activate the tax table which is specified by the same tax status programmed for the tax exemption. QT-6000 User's Manual 21 E This key is performed following receipt issuance. This is also used to release the slip paper holder if numbers are... key to display the total amount for storing the check number of the registered items. When this key is not preset in check No. Introducing QT-6000 Shift PLU Use this key to assign one table to two or more customer groups.
... enter characters to print. Next (Page up) Use this key to activate the tax table which is specified by the same tax status programmed for the tax exemption. QT-6000 User's Manual 21 E This key is performed following receipt issuance. This is also used to release the slip paper holder if numbers are... key to display the total amount for storing the check number of the registered items. When this key is not preset in check No. Introducing QT-6000 Shift PLU Use this key to assign one table to two or more customer groups.
User Manual
Page 23
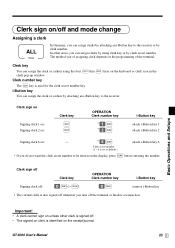
... assign the clerk or cashier using clerk key or by attaching an i-Button key to be shown on the display, press o before entering the number. QT-6000 User's Manual 23 E Basic Operations and Setups Important! • A clerk cannot sign on unless other areas, you do not want the clerk secret number to... identified on the receipt/journal. Clerk sign on/off and mode change Assigning a clerk ALL Mode In Germany, you of assigning clerk depends on the programming of the terminal.
... assign the clerk or cashier using clerk key or by attaching an i-Button key to be shown on the display, press o before entering the number. QT-6000 User's Manual 23 E Basic Operations and Setups Important! • A clerk cannot sign on unless other areas, you do not want the clerk secret number to... identified on the receipt/journal. Clerk sign on/off and mode change Assigning a clerk ALL Mode In Germany, you of assigning clerk depends on the programming of the terminal.
User Manual
Page 27
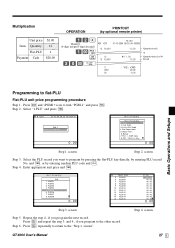
...3.PLU & PLU 2nd@ 4.Sub-Department 5.Department 6.Range 7.PLU -> 2nd@ Copy 8.AMT / Rate to flat-PLU Flat-PLU unit price programming procedure Step 1. Step 6. screen QT-6000 User's Manual 27 E Quantity/unit q'ty/@ •12.00 - Result TL CASH CG •12.00 •20.00 •8.00... Basic Operations and Setups Programming to key ´ 0.00 Step 1. screen Step 2. and `, or by entering PLU record No. screen Step ...
...3.PLU & PLU 2nd@ 4.Sub-Department 5.Department 6.Range 7.PLU -> 2nd@ Copy 8.AMT / Rate to flat-PLU Flat-PLU unit price programming procedure Step 1. Step 6. screen QT-6000 User's Manual 27 E Quantity/unit q'ty/@ •12.00 - Result TL CASH CG •12.00 •20.00 •8.00... Basic Operations and Setups Programming to key ´ 0.00 Step 1. screen Step 2. and `, or by entering PLU record No. screen Step ...
User Manual
Page 28
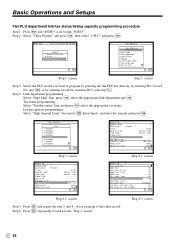
... "High Amount Limit" line (press w three times), and enter the amount and press`. screen Step 5. screen E 28 Select the PLU record you program to program by pressing the flat-PLU key directly, by entering record No./random PLU code and +. Press \ and repeat the step 3. Press \ repeatedly to return to ...
... "High Amount Limit" line (press w three times), and enter the amount and press`. screen Step 5. screen E 28 Select the PLU record you program to program by pressing the flat-PLU key directly, by entering record No./random PLU code and +. Press \ and repeat the step 3. Press \ repeatedly to return to ...
