

User Manual
Page 3
... for detailed information. Manuals for the Machine The manuals for Basic Operations Easy Operation Guide • Legal Notices • Setup Instructions • Basic Operations • Troubleshooting • Copying Instructions User's Guide (This Document) Reference Guide CD-ROM Copying Guide CD-ROM • Sending and Fax Instructions Sending and Facsimile Guide CD...
... for detailed information. Manuals for the Machine The manuals for Basic Operations Easy Operation Guide • Legal Notices • Setup Instructions • Basic Operations • Troubleshooting • Copying Instructions User's Guide (This Document) Reference Guide CD-ROM Copying Guide CD-ROM • Sending and Fax Instructions Sending and Facsimile Guide CD...

User Manual
Page 4
How This Manual Is Organized Chapter 1 Machine Installation Chapter 2 Before You Start Using the Machine Chapter 3 Accompanying CD-ROMs Chapter 4 Using the Basic Functions Chapter 5 Routine Maintenance Chapter 6 Troubleshooting Chapter 7 Appendix Includes the descriptions of inaccuracies and omissions. However, as we are constantly improving our products, if you need an exact specification, please contact Canon. Considerable effort has been made to ensure that this manual is free of available paper stock and Index.
How This Manual Is Organized Chapter 1 Machine Installation Chapter 2 Before You Start Using the Machine Chapter 3 Accompanying CD-ROMs Chapter 4 Using the Basic Functions Chapter 5 Routine Maintenance Chapter 6 Troubleshooting Chapter 7 Appendix Includes the descriptions of inaccuracies and omissions. However, as we are constantly improving our products, if you need an exact specification, please contact Canon. Considerable effort has been made to ensure that this manual is free of available paper stock and Index.

User Manual
Page 7
... 5-13 Consumables 5-17 Paper Stock 5-17 Toner 5-18 Be careful of counterfeit toners 5-18 Stamp Ink Cartridge 5-19 Staple Cartridge 5-19 Genuine Supplies 5-19 Chapter 6 Troubleshooting Clearing Paper Jams 6-2 Fixing Unit 6-3 Paper Drawers 1 and 2 6-5 Feeder (DADF-AA1/-AB1 6-8 Service Call Message 6-11 Restarting the Machine 6-11 Using the Machine with Limited...
... 5-13 Consumables 5-17 Paper Stock 5-17 Toner 5-18 Be careful of counterfeit toners 5-18 Stamp Ink Cartridge 5-19 Staple Cartridge 5-19 Genuine Supplies 5-19 Chapter 6 Troubleshooting Clearing Paper Jams 6-2 Fixing Unit 6-3 Paper Drawers 1 and 2 6-5 Feeder (DADF-AA1/-AB1 6-8 Service Call Message 6-11 Restarting the Machine 6-11 Using the Machine with Limited...

User Manual
Page 94
Troubleshooting 6 CHAPTER This chapter describes how to solve problems you may face when operating the machine. Clearing Paper Jams 6-2 Fixing Unit 6-3 Paper Drawers 1 and 2 6-5 Feeder (DADF-AA1/-AB1 6-8 Service Call Message 6-11 Restarting the Machine 6-11 Requesting Repairs 6-13 Contacting Your Local Authorized Canon Dealer 6-15 6-1
Troubleshooting 6 CHAPTER This chapter describes how to solve problems you may face when operating the machine. Clearing Paper Jams 6-2 Fixing Unit 6-3 Paper Drawers 1 and 2 6-5 Feeder (DADF-AA1/-AB1 6-8 Service Call Message 6-11 Restarting the Machine 6-11 Requesting Repairs 6-13 Contacting Your Local Authorized Canon Dealer 6-15 6-1

User Manual
Page 95
... when inspecting the inside of the machine, do not allow the toner on the jammed paper to immediately locate and clear the paper jam. Troubleshooting 6 WARNING There are some areas inside the machine which has become jammed inside the machine, take care not to cut your hands or injure...the inside of the machine, as this may result in burns or electrical shock. If you cannot remove the paper, please contact your local authorized Canon dealer. • When removing paper which has become hot during use. Use this will dirty your eyes or mouth. If they become jammed ...
... when inspecting the inside of the machine, do not allow the toner on the jammed paper to immediately locate and clear the paper jam. Troubleshooting 6 WARNING There are some areas inside the machine which has become jammed inside the machine, take care not to cut your hands or injure...the inside of the machine, as this may result in burns or electrical shock. If you cannot remove the paper, please contact your local authorized Canon dealer. • When removing paper which has become hot during use. Use this will dirty your eyes or mouth. If they become jammed ...

User Manual
Page 96
... positions. IMPORTANT After you have cleared all the paper jams, make . Fixing Unit If paper is not in operation, your hands from the machine immediately. Troubleshooting Clearing Paper Jams 6-3 You do not touch anything in this area except the jammed paper or the upper cover. 1 Press the button on the right...
... positions. IMPORTANT After you have cleared all the paper jams, make . Fixing Unit If paper is not in operation, your hands from the machine immediately. Troubleshooting Clearing Paper Jams 6-3 You do not touch anything in this area except the jammed paper or the upper cover. 1 Press the button on the right...

User Manual
Page 97
IMPORTANT After you have cleared all the paper jams, make sure to return all of the jammed paper, printing resumes. 6-4 Clearing Paper Jams Troubleshooting CAUTION When closing the cover, be careful not to get your hand where the hand symbol ( ) is located on the right cover of the main ...
IMPORTANT After you have cleared all the paper jams, make sure to return all of the jammed paper, printing resumes. 6-4 Clearing Paper Jams Troubleshooting CAUTION When closing the cover, be careful not to get your hand where the hand symbol ( ) is located on the right cover of the main ...

User Manual
Page 98
Clearing Paper Jams 6-5 The number of available paper drawers may vary depending on the machine configuration. 6 1 Press the button on the right cover of the main unit, and open the right cover. 2 Remove any jammed paper. Troubleshooting IMPORTANT The procedure described in this section assumes that the machine is jammed inside Paper Drawers 1 and 2, remove the jammed paper as described below. Paper Drawers 1 and 2 If paper is equipped with four paper drawers.
Clearing Paper Jams 6-5 The number of available paper drawers may vary depending on the machine configuration. 6 1 Press the button on the right cover of the main unit, and open the right cover. 2 Remove any jammed paper. Troubleshooting IMPORTANT The procedure described in this section assumes that the machine is jammed inside Paper Drawers 1 and 2, remove the jammed paper as described below. Paper Drawers 1 and 2 If paper is equipped with four paper drawers.

User Manual
Page 99
Troubleshooting 6 6-6 Clearing Paper Jams Gently push the drawer back into place. CAUTION When returning the paper drawer to its original position, be careful not to get your fingers caught, as this may result in personal injury. 3 Open the paper drawer's right cover, and remove any jammed paper. 4 Press the button on Paper Drawer 1, and pull out the drawer until it clicks into the machine until it stops. 6 5 Remove any jammed paper.
Troubleshooting 6 6-6 Clearing Paper Jams Gently push the drawer back into place. CAUTION When returning the paper drawer to its original position, be careful not to get your fingers caught, as this may result in personal injury. 3 Open the paper drawer's right cover, and remove any jammed paper. 4 Press the button on Paper Drawer 1, and pull out the drawer until it clicks into the machine until it stops. 6 5 Remove any jammed paper.

User Manual
Page 100
CAUTION When closing the cover, be careful not to get your fingers caught, as this may result in personal injury. 7 Press the button on the Paper Drawer 2, and pull out the drawer until it stops. 8 Remove any jammed paper. 9 Gently push the drawer back into 6 the machine until it clicks into place. Troubleshooting Clearing Paper Jams 6-7 CAUTION When returning the paper drawer to its original position, be careful not to get your fingers caught, as this may result in personal injury. 10 Close the paper drawer's right cover.
CAUTION When closing the cover, be careful not to get your fingers caught, as this may result in personal injury. 7 Press the button on the Paper Drawer 2, and pull out the drawer until it stops. 8 Remove any jammed paper. 9 Gently push the drawer back into 6 the machine until it clicks into place. Troubleshooting Clearing Paper Jams 6-7 CAUTION When returning the paper drawer to its original position, be careful not to get your fingers caught, as this may result in personal injury. 10 Close the paper drawer's right cover.
User Manual
Page 101
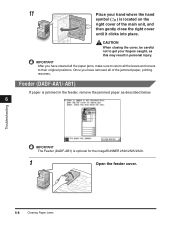
Once you have removed all the levers and covers to their original positions. 11 Place your fingers caught, as described below. 6 Troubleshooting IMPORTANT The Feeder (DADF-AB1) is optional for the imageRUNNER 2530/2525/2520. 1 Open the feeder cover. 6-8 Clearing Paper Jams Feeder (DADF-AA1/-AB1) If paper is located on the right cover...
Once you have removed all the levers and covers to their original positions. 11 Place your fingers caught, as described below. 6 Troubleshooting IMPORTANT The Feeder (DADF-AB1) is optional for the imageRUNNER 2530/2525/2520. 1 Open the feeder cover. 6-8 Clearing Paper Jams Feeder (DADF-AA1/-AB1) If paper is located on the right cover...

User Manual
Page 102
2 Open the inner cover, holding it may result in personal injury. Troubleshooting Clearing Paper Jams 6-9 Tab 3 Turn the feed dial and remove any jammed originals. CAUTION When closing the covers, be careful not to get your fingers caught, as this may tear. Feed Dial 6 4 Close the inner cover, and then the feeder cover. Do not pull the original forcibly, because it by the front tab.
2 Open the inner cover, holding it may result in personal injury. Troubleshooting Clearing Paper Jams 6-9 Tab 3 Turn the feed dial and remove any jammed originals. CAUTION When closing the covers, be careful not to get your fingers caught, as this may tear. Feed Dial 6 4 Close the inner cover, and then the feeder cover. Do not pull the original forcibly, because it by the front tab.

User Manual
Page 103
... the platen glass may tear. IMPORTANT After you have cleared all the paper jams, make sure to return all of the jammed paper, printing resumes. Troubleshooting 6-10 Clearing Paper Jams 5 Lift the feeder and check for any jammed originals left inside. If you find any jammed originals left in personal injury...
... the platen glass may tear. IMPORTANT After you have cleared all the paper jams, make sure to return all of the jammed paper, printing resumes. Troubleshooting 6-10 Clearing Paper Jams 5 Lift the feeder and check for any jammed originals left inside. If you find any jammed originals left in personal injury...

User Manual
Page 104
IMPORTANT If the main power is displayed, restart the machine. If the screen similar to the one shown below is displayed, follow the procedures described below. 6 Restarting the Machine If a service call message is displayed on the screen. Troubleshooting Service Call Message 6-11 Service Call Message If any critical error occurs that prevents normal operations, a service call message is turned OFF, all the jobs in the machine's memory will be erased. 1 Turn OFF the machine's main power. 2 Wait at least 10 seconds and turn the main power back ON.
IMPORTANT If the main power is displayed, restart the machine. If the screen similar to the one shown below is displayed, follow the procedures described below. 6 Restarting the Machine If a service call message is displayed on the screen. Troubleshooting Service Call Message 6-11 Service Call Message If any critical error occurs that prevents normal operations, a service call message is turned OFF, all the jobs in the machine's memory will be erased. 1 Turn OFF the machine's main power. 2 Wait at least 10 seconds and turn the main power back ON.

User Manual
Page 105
... disabling the finisher functions. In this mode, you can continue operating the machine by setting the machine to turn it ON. 6-12 Service Call Message Troubleshooting 2 Press [Yes]. Turn OFF the machine, wait at least 10 seconds, and then turn OFF the machine, press [Shutdown]. To quit, press [No]. 3 Restart the...
... disabling the finisher functions. In this mode, you can continue operating the machine by setting the machine to turn it ON. 6-12 Service Call Message Troubleshooting 2 Press [Yes]. Turn OFF the machine, wait at least 10 seconds, and then turn OFF the machine, press [Shutdown]. To quit, press [No]. 3 Restart the...

User Manual
Page 106
... in the Limited Functions Mode. Pulling on the control panel. IMPORTANT To make repair requests from the touch panel display. Troubleshooting Service Call Message 6-13 CAUTION 6 Always grasp the power plug portion when disconnecting the power cord. For more information, contact your local... authorized Canon dealer. 1 Press [Counter Check] on the cord may result in electrical shock. The machine starts up in a fire or electrical...
... in the Limited Functions Mode. Pulling on the control panel. IMPORTANT To make repair requests from the touch panel display. Troubleshooting Service Call Message 6-13 CAUTION 6 Always grasp the power plug portion when disconnecting the power cord. For more information, contact your local... authorized Canon dealer. 1 Press [Counter Check] on the cord may result in electrical shock. The machine starts up in a fire or electrical...

User Manual
Page 107
Troubleshooting 3 6 4 6-14 Service Call Message Press [Select/Request]. NOTE You can cancel the request by pressing [Cancel] ➞ [Yes]. The screen on the left appears when your request has successfully been sent. Press [Corrupt Image], [Paper Jams], or [Other Problems] to select the type of the problem you want to fix ➞ press [Request]. 2 Press [Service Call]. NOTE You can cancel the request by pressing [Cancel] ➞ [Yes].
Troubleshooting 3 6 4 6-14 Service Call Message Press [Select/Request]. NOTE You can cancel the request by pressing [Cancel] ➞ [Yes]. The screen on the left appears when your request has successfully been sent. Press [Corrupt Image], [Paper Jams], or [Other Problems] to select the type of the problem you want to fix ➞ press [Request]. 2 Press [Service Call]. NOTE You can cancel the request by pressing [Cancel] ➞ [Yes].

User Manual
Page 108
... error code displayed on the screen Contacting Your Local Authorized Canon Dealer If you cannot send repair requests despite several attempts, turn OFF the main power and disconnect the power cord from the wall outlet. Contact your request has failed. Product name - Troubleshooting Service Call Message 6-15 WARNING Do not connect or...
... error code displayed on the screen Contacting Your Local Authorized Canon Dealer If you cannot send repair requests despite several attempts, turn OFF the main power and disconnect the power cord from the wall outlet. Contact your request has failed. Product name - Troubleshooting Service Call Message 6-15 WARNING Do not connect or...

User Manual
Page 109
Troubleshooting 6 6-16 Service Call Message
Troubleshooting 6 6-16 Service Call Message

User Manual
Page 115
Appendix T Telephone connection, 1-11 Toner cartridge, 5-8, 5-18 Transparency, 7-2 Troubleshooting Limited functions, 6-12 Service call message, 6-11 TWAIN, 3-2 U UFRII LT Printer Driver, 3-2 UFRII LT User Software, 3-2 USB connection, 1-8 7 7-6
Appendix T Telephone connection, 1-11 Toner cartridge, 5-8, 5-18 Transparency, 7-2 Troubleshooting Limited functions, 6-12 Service call message, 6-11 TWAIN, 3-2 U UFRII LT Printer Driver, 3-2 UFRII LT User Software, 3-2 USB connection, 1-8 7 7-6


