HDI-E.pdf
Page 1
imagePROGRAF HDI Driver Guide Contents Before You Begin ...ii ■ Compatible Printers ...ii ■ Applicable AutoCAD Versions ii How to Use This Guide ...ii ...Our Customers ii Chapter 1 HDI Driver Installation 1-1 Operating Environment...1-1 Installation Procedure ...1-1 ■ Installing with the Canon Installer 1-1 ■ Installing with the Add-A-Plotter Wizard 1-6 Chapter 2 Printing 2-1 Printing Procedure ...2-1 Chapter 3 Setting Up a Print Job 3-1 Opening the Plotter Configuration Editor Dialog Box 3-1 ■ Opening from the AutoCAD File Menu 3-1 ■ Opening from the...
imagePROGRAF HDI Driver Guide Contents Before You Begin ...ii ■ Compatible Printers ...ii ■ Applicable AutoCAD Versions ii How to Use This Guide ...ii ...Our Customers ii Chapter 1 HDI Driver Installation 1-1 Operating Environment...1-1 Installation Procedure ...1-1 ■ Installing with the Canon Installer 1-1 ■ Installing with the Add-A-Plotter Wizard 1-6 Chapter 2 Printing 2-1 Printing Procedure ...2-1 Chapter 3 Setting Up a Print Job 3-1 Opening the Plotter Configuration Editor Dialog Box 3-1 ■ Opening from the AutoCAD File Menu 3-1 ■ Opening from the...
HDI-E.pdf
Page 3
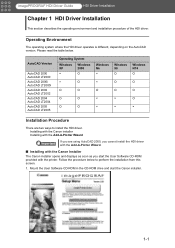
... × Installation Procedure There are using AutoCAD 2000, you cannot install the HDI driver Important with the Add-A-Plotter Wizard. ■ Installing with the Canon Installer The Canon installer opens and displays as soon as you are two ways to perform the installation from this screen. 1. ... Software CD-ROM provided with the Add-A-Plotter Wizard If you start the Canon installer. 1-1 Installing with the Canon installer Installing with the printer. Please read the table below to install the HDI driver. imagePROGRAF HDI Driver Guide HDI Driver Installation Chapter...
... × Installation Procedure There are using AutoCAD 2000, you cannot install the HDI driver Important with the Add-A-Plotter Wizard. ■ Installing with the Canon Installer The Canon installer opens and displays as soon as you are two ways to perform the installation from this screen. 1. ... Software CD-ROM provided with the Add-A-Plotter Wizard If you start the Canon installer. 1-1 Installing with the Canon installer Installing with the printer. Please read the table below to install the HDI driver. imagePROGRAF HDI Driver Guide HDI Driver Installation Chapter...
HDI-E.pdf
Page 5
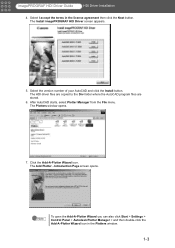
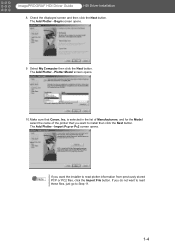
... The Install imagePROGRAF HDI Driver screen appears. 5. Select the version number of your AutoCAD and click the Install button. The HDI driver files are copied to the Drv folder where the AutoCAD program files are stored. 6. The Plotters window opens. 7. The Add Plotter - Introduction ...Page screen opens. Note To open the Add-A-Plotter Wizard you can also click Start > Settings > Control Panel > Autodesk Plotter Manager > and then double-click the Add-A-Plotter Wizard icon in the license agreement...
... The Install imagePROGRAF HDI Driver screen appears. 5. Select the version number of your AutoCAD and click the Install button. The HDI driver files are copied to the Drv folder where the AutoCAD program files are stored. 6. The Plotters window opens. 7. The Add Plotter - Introduction ...Page screen opens. Note To open the Add-A-Plotter Wizard you can also click Start > Settings > Control Panel > Autodesk Plotter Manager > and then double-click the Add-A-Plotter Wizard icon in the license agreement...
HDI-E.pdf
Page 6
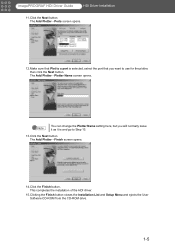
... stored PCP or PC2 files, click the Import File button. The Add Plotter - is selected in the list of Manufacturers, and for the Model select the name of the printer that Canon, Inc. imagePROGRAF HDI Driver Guide HDI Driver Installation 8. Check the displayed screen and then click... the Next button. The Add Plotter - Begin screen opens. 9. Select My Computer then click the Next button. ...
... stored PCP or PC2 files, click the Import File button. The Add Plotter - is selected in the list of Manufacturers, and for the Model select the name of the printer that Canon, Inc. imagePROGRAF HDI Driver Guide HDI Driver Installation 8. Check the displayed screen and then click... the Next button. The Add Plotter - Begin screen opens. 9. Select My Computer then click the Next button. ...
HDI-E.pdf
Page 7
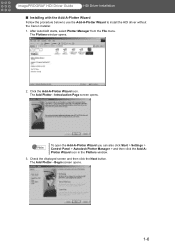
... the port that you will normally leave it as it is and go to use for the plotter, then click the Next button. The Add Plotter - The Add Plotter - The Add Plotter - Note You can change the Plotter Name setting here, but you want to Step 13. 13.Click the Next button. This completes... the installation of the HDI driver. 15.Clicking the Finish button closes the Installation List and Setup Menu and ejects the User Software CD-ROM from the CD-ROM drive. 1-5 imagePROGRAF HDI Driver...
... the port that you will normally leave it as it is and go to use for the plotter, then click the Next button. The Add Plotter - The Add Plotter - The Add Plotter - Note You can change the Plotter Name setting here, but you want to Step 13. 13.Click the Next button. This completes... the installation of the HDI driver. 15.Clicking the Finish button closes the Installation List and Setup Menu and ejects the User Software CD-ROM from the CD-ROM drive. 1-5 imagePROGRAF HDI Driver...
HDI-E.pdf
Page 8
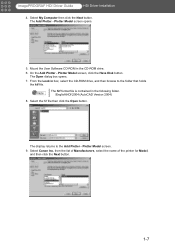
... starts, select Plotter Manager from the File menu. Note To open the Add-A-Plotter Wizard you can also click Start > Settings > Control Panel > Autodesk Plotter Manager > and then click the Add-APlotter Wizard icon in the Plotters window. 3. The Add Plotter - imagePROGRAF HDI Driver Guide... HDI Driver Installation ■ Installing with the Add-A-Plotter Wizard Follow the procedure below to use the Add-A-Plotter Wizard to ...
... starts, select Plotter Manager from the File menu. Note To open the Add-A-Plotter Wizard you can also click Start > Settings > Control Panel > Autodesk Plotter Manager > and then click the Add-APlotter Wizard icon in the Plotters window. 3. The Add Plotter - imagePROGRAF HDI Driver Guide... HDI Driver Installation ■ Installing with the Add-A-Plotter Wizard Follow the procedure below to use the Add-A-Plotter Wizard to ...
HDI-E.pdf
Page 9
...2004 (AutoCAD Version 2004) 8. Select Canon Inc. From the Look in box, select the CD-ROM drive, and then browse to the Add Plotter - The display returns to the folder that holds the hif file. Plotter Model screen opens. 5. On the Add Plotter - Plotter Model screen, click the Have Disk..., select the name of the printer for Model, and then click the Next button. 1-7 imagePROGRAF HDI Driver Guide HDI Driver Installation 4. Select the hif file then click the Open button. Plotter Model screen. 9. The Open dialog box opens. 7. Note The hif format file is contained...
...2004 (AutoCAD Version 2004) 8. Select Canon Inc. From the Look in box, select the CD-ROM drive, and then browse to the Add Plotter - The display returns to the folder that holds the hif file. Plotter Model screen opens. 5. On the Add Plotter - Plotter Model screen, click the Have Disk..., select the name of the printer for Model, and then click the Next button. 1-7 imagePROGRAF HDI Driver Guide HDI Driver Installation 4. Select the hif file then click the Open button. Plotter Model screen. 9. The Open dialog box opens. 7. Note The hif format file is contained...
HDI-E.pdf
Page 10
imagePROGRAF HDI Driver Guide HDI Driver Installation The Add Plotter - Note If you do not want to Step 10. 10.Click the Next button. The Add Plotter - The Add Plotter - If you want to Step 12. 1-8 Ports screen opens. 11. Plotter Name screen opens. Note You can change the Plotter Name setting here, but you want the... installer to read these files, just go to use for the plotter, then click the Next button. Import Pcp or Pc2 screen opens. Make sure that Plot to a port is selected, select the port that you will ...
imagePROGRAF HDI Driver Guide HDI Driver Installation The Add Plotter - Note If you do not want to Step 10. 10.Click the Next button. The Add Plotter - The Add Plotter - If you want to Step 12. 1-8 Ports screen opens. 11. Plotter Name screen opens. Note You can change the Plotter Name setting here, but you want the... installer to read these files, just go to use for the plotter, then click the Next button. Import Pcp or Pc2 screen opens. Make sure that Plot to a port is selected, select the port that you will ...

HDI-E.pdf
Page 11
Finish screen opens. 13.Click the Finish button. This completes the installation of the HDI driver. 14.Remove the User Software CD-ROM from the CD-ROM drive. 1-9 The HDI driver files are copied to the Drv folder where the AutoCAD program files are stored, then the Add Plotter - imagePROGRAF HDI Driver Guide HDI Driver Installation 12.Click the Next button.
Finish screen opens. 13.Click the Finish button. This completes the installation of the HDI driver. 14.Remove the User Software CD-ROM from the CD-ROM drive. 1-9 The HDI driver files are copied to the Drv folder where the AutoCAD program files are stored, then the Add Plotter - imagePROGRAF HDI Driver Guide HDI Driver Installation 12.Click the Next button.

HDI-E.pdf
Page 12
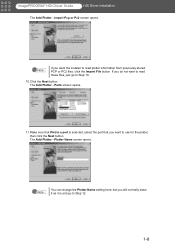
... you use from the File menu. The Plotter Configuration Editor dialog box opens. 2-1 The Plot dialog box opens. 3. Note • If any other printer name is displayed. Start AutoCAD and open the image file. 2. Printing Procedure 1. The description below uses printing with the HDI driver. imagePROGRAF HDI Driver Guide Printing Chapter 2 Printing...
... you use from the File menu. The Plotter Configuration Editor dialog box opens. 2-1 The Plot dialog box opens. 3. Note • If any other printer name is displayed. Start AutoCAD and open the image file. 2. Printing Procedure 1. The description below uses printing with the HDI driver. imagePROGRAF HDI Driver Guide Printing Chapter 2 Printing...
HDI-E.pdf
Page 13
...AutoCAD manual. 7. Click the OK button to the AutoCAD manual. 2-2 Note • The content of the settings done in the Plotter Configuration Editor dialog box are reflected in order to change the resolution. For more details about how to perform the settings in the AutoCAD... you want to Chapter 3, "Setting Up a Print Job" (p.3-1). 6. If this occurs, click the OK button to execute the print job. imagePROGRAF HDI Driver Guide Printing 5. Perform the settings that cannot be disabled with certain resolution settings. The print job begins. If this occurs, click the...
...AutoCAD manual. 7. Click the OK button to the AutoCAD manual. 2-2 Note • The content of the settings done in the Plotter Configuration Editor dialog box are reflected in order to change the resolution. For more details about how to perform the settings in the AutoCAD... you want to Chapter 3, "Setting Up a Print Job" (p.3-1). 6. If this occurs, click the OK button to execute the print job. imagePROGRAF HDI Driver Guide Printing 5. Perform the settings that cannot be disabled with certain resolution settings. The print job begins. If this occurs, click the...
HDI-E.pdf
Page 14
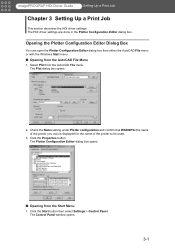
... Opening from the AutoCAD File Menu 1. Opening the Plotter Configuration Editor Dialog Box You can open the Plotter Configuration Editor dialog box from either the AutoCAD File menu or with the Windows Start menu. ■ Opening from the Start Menu 1. imagePROGRAF HDI Driver Guide Setting Up a Print Job Chapter ...then select Settings > Control Panel. Select Plot from the AutoCAD File menu. Click the Properties button. Check the Name setting under Plotter configuration and confirm that W6400PG (the name of the printer you use) is displayed for the name of the printer to be used. 3....
... Opening from the AutoCAD File Menu 1. Opening the Plotter Configuration Editor Dialog Box You can open the Plotter Configuration Editor dialog box from either the AutoCAD File menu or with the Windows Start menu. ■ Opening from the Start Menu 1. imagePROGRAF HDI Driver Guide Setting Up a Print Job Chapter ...then select Settings > Control Panel. Select Plot from the AutoCAD File menu. Click the Properties button. Check the Name setting under Plotter configuration and confirm that W6400PG (the name of the printer you use) is displayed for the name of the printer to be used. 3....

HDI-E.pdf
Page 15
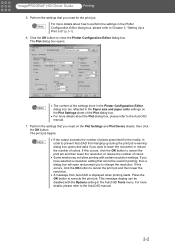
...selecting the items on these sheets or in a tree structure on this sheet to perform the settings in the Plotter Configuration Editor dialog box. The Plotters window opens. 3. The Plotter Configuration Editor dialog box opens. This section describes how to perform the main printing settings. Double-click the W6400PG..., the Drying Time and Roll Paper Margin for each item are shown in the Explorer tree. Double-click the Autodesk Plotter Manager icon. When you select an item the screen display changes so you use) to open. imagePROGRAF HDI Driver Guide Setting Up a Print Job 2.
...selecting the items on these sheets or in a tree structure on this sheet to perform the settings in the Plotter Configuration Editor dialog box. The Plotters window opens. 3. The Plotter Configuration Editor dialog box opens. This section describes how to perform the main printing settings. Double-click the W6400PG..., the Drying Time and Roll Paper Margin for each item are shown in the Explorer tree. Double-click the Autodesk Plotter Manager icon. When you select an item the screen display changes so you use) to open. imagePROGRAF HDI Driver Guide Setting Up a Print Job 2.

HDI-E.pdf
Page 18
... Properties button. Custom Properties Dialog Box Functions This section describes how to the display that presents the custom properties settings. 3. imagePROGRAF HDI Driver Guide Setting Up a Print Job Opening the Custom Properties Dialog Box In the Custom Properties dialog box you can ..., Brightness, and other settings. Follow the procedure below to Chapter 3, "Opening the Plotter Configuration Editor Dialog Box" (p.3-1). 2. Note For more details about how to open the Plotter Configuration Editor dialog box, please refer to open the Device and Document Settings sheet. In...
... Properties button. Custom Properties Dialog Box Functions This section describes how to the display that presents the custom properties settings. 3. imagePROGRAF HDI Driver Guide Setting Up a Print Job Opening the Custom Properties Dialog Box In the Custom Properties dialog box you can ..., Brightness, and other settings. Follow the procedure below to Chapter 3, "Opening the Plotter Configuration Editor Dialog Box" (p.3-1). 2. Note For more details about how to open the Plotter Configuration Editor dialog box, please refer to open the Device and Document Settings sheet. In...
HDI-E.pdf
Page 24
... 1-6 Add Plotter - Plotter Model, 1-4, 1-7 Add Plotter - Plotter Name, 1-5, 1-8 Add Plotter - Ports, 1-5, 1-8 Add-A-Plotter Wizard, 1-3, 1-6 Autodesk Plotter Manager, 1-3, 1-6 B Between Pages, 3-7 Between Scans, 3-8 Brightness, 3-6 C Canon installer, 1-1 Color, 3-4 Color Depth, 3-4 Color Matching, 3-6 Colorimetric, 3-6 Custom Properties dialog box, 3-5 Cut Speed, 3-10 O Operating Environment, 1-1 P Paper size and Paper units, 2-2 Perceptual, 3-6 Photo Black (Bk), 3-6 Plot, 2-1 Plot Device sheets, 2-2 Plot Settings sheet, 2-2 Plotter configuration, 2-1, 3-1 Plotter Configuration Editor...
... 1-6 Add Plotter - Plotter Model, 1-4, 1-7 Add Plotter - Plotter Name, 1-5, 1-8 Add Plotter - Ports, 1-5, 1-8 Add-A-Plotter Wizard, 1-3, 1-6 Autodesk Plotter Manager, 1-3, 1-6 B Between Pages, 3-7 Between Scans, 3-8 Brightness, 3-6 C Canon installer, 1-1 Color, 3-4 Color Depth, 3-4 Color Matching, 3-6 Colorimetric, 3-6 Custom Properties dialog box, 3-5 Cut Speed, 3-10 O Operating Environment, 1-1 P Paper size and Paper units, 2-2 Perceptual, 3-6 Photo Black (Bk), 3-6 Plot, 2-1 Plot Device sheets, 2-2 Plot Settings sheet, 2-2 Plotter configuration, 2-1, 3-1 Plotter Configuration Editor...