Guide for Media Configuration Tool
Page 36
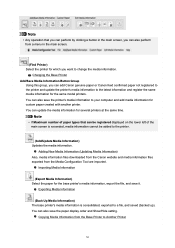
...computer and add media information for custom paper created with another printer. You can be added to Another Printer 36 You can add Canon genuine paper or Canon feed confirmed paper not registered to the printer and update the printer's media information to change the media ... paper display order and Show/Hide setting. Adding New Media Information (Updating Media Information) Also, media information files downloaded from the Canon website and media information files exported from the Base Printer to the printer. (Add/Update Media Information) Updates the media information. ...
...computer and add media information for custom paper created with another printer. You can be added to Another Printer 36 You can add Canon genuine paper or Canon feed confirmed paper not registered to the printer and update the printer's media information to change the media ... paper display order and Show/Hide setting. Adding New Media Information (Updating Media Information) Also, media information files downloaded from the Canon website and media information files exported from the Base Printer to the printer. (Add/Update Media Information) Updates the media information. ...
Guide for Accounting Manage
Page 36
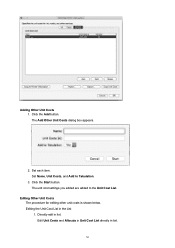
Directly edit in the List 1. Adding Other Unit Costs 1. Click the Add button. The Add Other Unit Costs dialog box appears. 2. Editing the Unit Cost List in list. Edit Unit Costs and Allocate in Unit Cost List directly in list. 36 Set Name, Unit Costs, and Add to the Unit Cost List. The unit cost settings you added are added to Tabulation. 3. Set each item. Click the Start button. Editing Other Unit Costs The procedure for editing other unit costs is shown below.
Directly edit in the List 1. Adding Other Unit Costs 1. Click the Add button. The Add Other Unit Costs dialog box appears. 2. Editing the Unit Cost List in list. Edit Unit Costs and Allocate in Unit Cost List directly in list. 36 Set Name, Unit Costs, and Add to the Unit Cost List. The unit cost settings you added are added to Tabulation. 3. Set each item. Click the Start button. Editing Other Unit Costs The procedure for editing other unit costs is shown below.
Guide for Device Management Console
Page 36
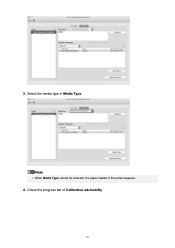
Check the progress bar of Calibration advisability. 36 Note • When Media Type cannot be selected, the paper loaded in Media Type. 3. Select the media type in the printer appears. 4.
Check the progress bar of Calibration advisability. 36 Note • When Media Type cannot be selected, the paper loaded in Media Type. 3. Select the media type in the printer appears. 4.
Guide for Free Layout
Page 2
... 32 Laying out a Document Created with Multiple Application Programs on One Page 33 Selecting an Object 34 Changing the Object Size 35 Moving an Object 36 Rotating an Object 37 Laying out Objects Automatically 38 Aligning Objects 39 Changing the Object Overlapping Order 41 Pasting a Copied or Cut Object 43
... 32 Laying out a Document Created with Multiple Application Programs on One Page 33 Selecting an Object 34 Changing the Object Size 35 Moving an Object 36 Rotating an Object 37 Laying out Objects Automatically 38 Aligning Objects 39 Changing the Object Overlapping Order 41 Pasting a Copied or Cut Object 43
Guide for Free Layout
Page 36
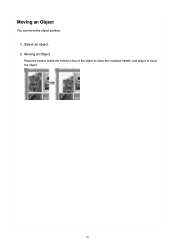
Moving an Object You can move the object. 36 Moving an Object Place the pointer inside the selection box of the object to show the crosshair handle, and drag it to move the object position. 1. Select an object. 2.
Moving an Object You can move the object. 36 Moving an Object Place the pointer inside the selection box of the object to show the crosshair handle, and drag it to move the object position. 1. Select an object. 2.
Guide for Previe
Page 2
Contents Symbols Used in This Document 3 Touch-enabled Device Users (Windows 4 Trademarks and Licenses 5 General Notes (Preview 21 The Features of Preview 22 Starting Preview 23 Description of Preview Screen 26 Preview Main Window 27 Print Settings Change and Control Panel 31 Preferences Dialog Box 34 Zoom Dialog Box 35 Various Preview Features 36 Print on the Center 37 Not Print Spaces at the Top/Bottom 38 Printing with Selecting the Layout 39 Display with Fitting to the Width of the Paper 41 Display with All 42
Contents Symbols Used in This Document 3 Touch-enabled Device Users (Windows 4 Trademarks and Licenses 5 General Notes (Preview 21 The Features of Preview 22 Starting Preview 23 Description of Preview Screen 26 Preview Main Window 27 Print Settings Change and Control Panel 31 Preferences Dialog Box 34 Zoom Dialog Box 35 Various Preview Features 36 Print on the Center 37 Not Print Spaces at the Top/Bottom 38 Printing with Selecting the Layout 39 Display with Fitting to the Width of the Paper 41 Display with All 42

Guide for Previe
Page 36
Various Preview Features Print on the Center Not Print Spaces at the Top/Bottom Printing with Selecting the Layout Display with Fitting to the Width of the Paper Display with All 36
Various Preview Features Print on the Center Not Print Spaces at the Top/Bottom Printing with Selecting the Layout Display with Fitting to the Width of the Paper Display with All 36
series User Manual
Page 36
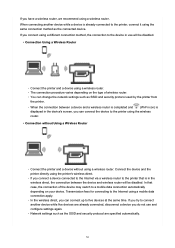
... printer directly using the printer's wireless direct. ◦ If you can change the network settings such as the SSID and security protocol are specified automatically. 36 In that is in the wireless direct, the connection between a device and a wireless router is completed and (Wi-Fi icon) is already connected to the...
... printer directly using the printer's wireless direct. ◦ If you can change the network settings such as the SSID and security protocol are specified automatically. 36 In that is in the wireless direct, the connection between a device and a wireless router is completed and (Wi-Fi icon) is already connected to the...
series User Manual
Page 42
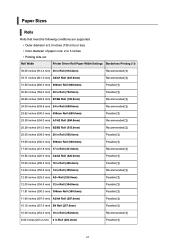
... • Inner diameter of paper core: 2 or 3 inches • Printing side out Roll Width Printer Driver Roll Paper Width Settings Borderless Printing (*1) 36.00 inches (914.4 mm) 36 in Roll (914.4mm) Recommended(*2) 33.11 inches (841.0 mm) A0/A1 Roll (841.0mm) Recommended(*2) 31.50 inches (800.0 mm) 800mm...95 inches (329.0 mm) A3+ Roll (329.0mm) Possible(*3) 12.00 inches (304.8 mm) 12 in Roll (304.8mm) Possible(*3) 11.81 inches (300.0 mm) 300mm Roll (300.0mm) Possible(*3) 11.69 inches (297.0 mm) A3/A4 Roll (297.0mm) Possible(*3) 10.12 inches (257.0 mm) B4 Roll (257.0mm) Possible...
... • Inner diameter of paper core: 2 or 3 inches • Printing side out Roll Width Printer Driver Roll Paper Width Settings Borderless Printing (*1) 36.00 inches (914.4 mm) 36 in Roll (914.4mm) Recommended(*2) 33.11 inches (841.0 mm) A0/A1 Roll (841.0mm) Recommended(*2) 31.50 inches (800.0 mm) 800mm...95 inches (329.0 mm) A3+ Roll (329.0mm) Possible(*3) 12.00 inches (304.8 mm) 12 in Roll (304.8mm) Possible(*3) 11.81 inches (300.0 mm) 300mm Roll (300.0mm) Possible(*3) 11.69 inches (297.0 mm) A3/A4 Roll (297.0mm) Possible(*3) 10.12 inches (257.0 mm) B4 Roll (257.0mm) Possible...
series User Manual
Page 44
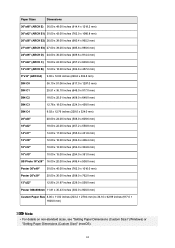
...) 26.00 x 38.00 inches (660.4 x 965.2 mm) 27"x39" (ARCH E3) 27.00 x 39.00 inches (685.8 x 990.6 mm) 24"x36" (ARCH D) 24.00 x 36.00 inches (609.6 x 914.4 mm) 18"x24" (ARCH C) 18.00 x 24.00 inches (457.2 x 609.6 mm) 12"x18" (ARCH B) 12.00 x 18.00 inches (304....0 mm) 13"x22" 12.95 x 21.97 inches (329.0 x 558.0 mm) Poster 300x900mm 11.81 x 35.43 inches (300.0 x 900.0 mm) Custom Paper Size 8.00 x 11.00 inches (203.2 × 279.4 mm) to 36.10 x 62.99 inches (917.0 × 1600.0 mm) Note • For details on non-standard sizes, see "Setting...
...) 26.00 x 38.00 inches (660.4 x 965.2 mm) 27"x39" (ARCH E3) 27.00 x 39.00 inches (685.8 x 990.6 mm) 24"x36" (ARCH D) 24.00 x 36.00 inches (609.6 x 914.4 mm) 18"x24" (ARCH C) 18.00 x 24.00 inches (457.2 x 609.6 mm) 12"x18" (ARCH B) 12.00 x 18.00 inches (304....0 mm) 13"x22" 12.95 x 21.97 inches (329.0 x 558.0 mm) Poster 300x900mm 11.81 x 35.43 inches (300.0 x 900.0 mm) Custom Paper Size 8.00 x 11.00 inches (203.2 × 279.4 mm) to 36.10 x 62.99 inches (917.0 × 1600.0 mm) Note • For details on non-standard sizes, see "Setting...
series User Manual
Page 183
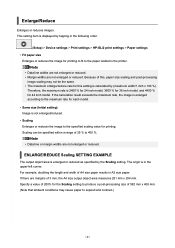
.... ENLARGE/REDUCE Scaling SETTING EXAMPLE The output object area is calculated by the Scaling setting. The origin is 2400 % for 24 inch model, 3600 % for 36 inch model, and 4400 % for 44 inch model. Specify a value of 200% for the Scaling setting to produce a post-processing size of A4 size paper...
.... ENLARGE/REDUCE Scaling SETTING EXAMPLE The output object area is calculated by the Scaling setting. The origin is 2400 % for 24 inch model, 3600 % for 36 inch model, and 4400 % for 44 inch model. Specify a value of 200% for the Scaling setting to produce a post-processing size of A4 size paper...
series User Manual
Page 323
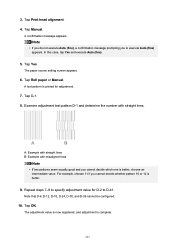
... misaligned lines Note • If two patterns seem equally good and you cannot decide which one is better. 9. Note that D-6, D-12, D-18, D-24, D-30, and D-36 cannot be configured. 10. Tap Yes. For example, choose 11 if you to specify adjustment value for adjustment. 7. The paper source setting screen appears. 6. A: Example...
... misaligned lines Note • If two patterns seem equally good and you cannot decide which one is better. 9. Note that D-6, D-12, D-18, D-24, D-30, and D-36 cannot be configured. 10. Tap Yes. For example, choose 11 if you to specify adjustment value for adjustment. 7. The paper source setting screen appears. 6. A: Example...