XF100 / XF105 Instruction Manual
Page 6
... and menu settings to an SD card so that you can transfer your setting preferences to other XF105/XF100 camcorders in order to assignable buttons (0 97) so that you can use them in microphone, MIC audio input terminal or the two XLR audio input terminals (with the press of the camcorder's operation...
... and menu settings to an SD card so that you can transfer your setting preferences to other XF105/XF100 camcorders in order to assignable buttons (0 97) so that you can use them in microphone, MIC audio input terminal or the two XLR audio input terminals (with the press of the camcorder's operation...
XF100 / XF105 Instruction Manual
Page 7
... Time while Recording 27 Changing the Language 27 Using the Menus 28 Selecting an Option from the Menu 28 Preparing the Camcorder 30 Attaching the Microphone Holder Unit 30 Attaching the Lens Hood 30 Dioptric Adjustment 30 Using the LCD Panel 31 Using the Viewfinder and LCD Screen Simultaneously 31 Adjusting...
... Time while Recording 27 Changing the Language 27 Using the Menus 28 Selecting an Option from the Menu 28 Preparing the Camcorder 30 Attaching the Microphone Holder Unit 30 Attaching the Lens Hood 30 Dioptric Adjustment 30 Using the LCD Panel 31 Using the Viewfinder and LCD Screen Simultaneously 31 Adjusting...
XF100 / XF105 Instruction Manual
Page 8
... Files 100 Protecting Custom Picture Files 100 Transferring Custom Picture Files 101 Embedding Custom Picture Settings in or External Microphone Connected to the MIC Terminal 77 Using Line Input or an External Microphone Connected to an SD Card 109 Loading Camera Settings from an SD Card 109 5. 8 Setting the Time Code 70...
... Files 100 Protecting Custom Picture Files 100 Transferring Custom Picture Files 101 Embedding Custom Picture Settings in or External Microphone Connected to the MIC Terminal 77 Using Line Input or an External Microphone Connected to an SD Card 109 Loading Camera Settings from an SD Card 109 5. 8 Setting the Time Code 70...

XF100 / XF105 Instruction Manual
Page 12
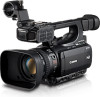
For details on installing the software, refer to Saving Clips to the 'Canon XF Utility Instruction Manual' after you install the software. Supplied Accessories Supplied Accessories The following accessories are supplied with the camcorder. 12 CA-930 Compact...CTC-100/S Component Cable Lens Hood Lens Cap WL-D6000 Wireless Controller (incl. For more information on a computer. CR2025 Lithium Battery) SS-1200 Shoulder Strap Canon XF Utilities Disc* * The Canon XF Utilities Disc includes software for saving and managing clips on the functions, refer to a Computer (0 131). power cord...
For details on installing the software, refer to Saving Clips to the 'Canon XF Utility Instruction Manual' after you install the software. Supplied Accessories Supplied Accessories The following accessories are supplied with the camcorder. 12 CA-930 Compact...CTC-100/S Component Cable Lens Hood Lens Cap WL-D6000 Wireless Controller (incl. For more information on a computer. CR2025 Lithium Battery) SS-1200 Shoulder Strap Canon XF Utilities Disc* * The Canon XF Utilities Disc includes software for saving and managing clips on the functions, refer to a Computer (0 131). power cord...
XF100 / XF105 Instruction Manual
Page 14
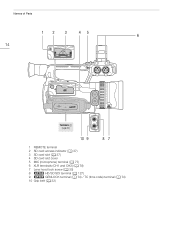
Names of Parts 12 3 45 6 14 Terminals ቢ (0 20) 10 9 87 1 REMOTE terminal 2 SD card access indicator (0 37) 3 SD card slot (0 37) 4 SD card slot cover 5 MIC (microphone) terminal (0 77) 6 XLR terminals (CH1 and CH2) (0 78) 7 Lens hood lock screw (0 30) 8 b HD/SD SDI terminal (0 127) 9 b GENLOCK terminal (0 74) / TC (time code) terminal (0 74) 10 Grip belt (0 32)
Names of Parts 12 3 45 6 14 Terminals ቢ (0 20) 10 9 87 1 REMOTE terminal 2 SD card access indicator (0 37) 3 SD card slot (0 37) 4 SD card slot cover 5 MIC (microphone) terminal (0 77) 6 XLR terminals (CH1 and CH2) (0 78) 7 Lens hood lock screw (0 30) 8 b HD/SD SDI terminal (0 127) 9 b GENLOCK terminal (0 74) / TC (time code) terminal (0 74) 10 Grip belt (0 32)
XF100 / XF105 Instruction Manual
Page 15
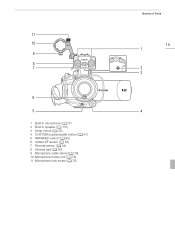
11 10 9 8 7 6 5 1 Built-in microphone (0 77) 2 Built-in speaker (0 115) 3 Strap mount (0 32) 4 CUSTOM (customizable) button (0 47) 5 INFRARED switch (0 93) 6 Instant AF sensor (0 50) 7 Remote sensor (0 34) 8 Infrared light (0 93) 9 Microphone cable clamp (0 78) 10 Microphone holder unit (0 78) 11 Microphone lock screw (0 78) Names of Parts 15 1 2 3 4
11 10 9 8 7 6 5 1 Built-in microphone (0 77) 2 Built-in speaker (0 115) 3 Strap mount (0 32) 4 CUSTOM (customizable) button (0 47) 5 INFRARED switch (0 93) 6 Instant AF sensor (0 50) 7 Remote sensor (0 34) 8 Infrared light (0 93) 9 Microphone cable clamp (0 78) 10 Microphone holder unit (0 78) 11 Microphone lock screw (0 78) Names of Parts 15 1 2 3 4
XF100 / XF105 Instruction Manual
Page 30
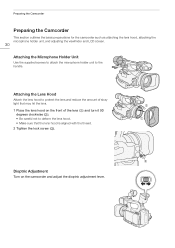
... outlines the basic preparations for the camcorder such as attaching the lens hood, attaching the microphone holder unit, and adjusting the viewfinder and LCD screen. 30 Attaching the Microphone Holder Unit Use the supplied screws to attach the microphone holder unit to deform the lens hood. • Make sure that the lens hood...
... outlines the basic preparations for the camcorder such as attaching the lens hood, attaching the microphone holder unit, and adjusting the viewfinder and LCD screen. 30 Attaching the Microphone Holder Unit Use the supplied screws to attach the microphone holder unit to deform the lens hood. • Make sure that the lens hood...
XF100 / XF105 Instruction Manual
Page 77
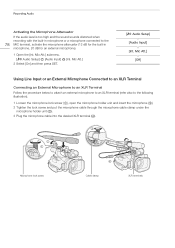
...IN switch of the desired channel to INT. • If you can use the built-in or External Microphone Connected to the MIC terminal. Configuring the Built-in Microphone's Sensitivity 1 Open the [Int. Mic Sensitivity] 2 Select the desired option and then press SET. You ...[Int. Mic Sensitivity] submenu. [m Audio Setup] [Audio Input] [Int. If you are using the built-in microphone to INT, the camcorder will switch automatically from the built-in microphone, optional external microphone (XLR or MIC terminal) or line input (XLR terminal). Mic Low Cut] submenu. [m Audio Setup] [Audio ...
...IN switch of the desired channel to INT. • If you can use the built-in or External Microphone Connected to the MIC terminal. Configuring the Built-in Microphone's Sensitivity 1 Open the [Int. Mic Sensitivity] 2 Select the desired option and then press SET. You ...[Int. Mic Sensitivity] submenu. [m Audio Setup] [Audio Input] [Int. If you are using the built-in microphone to INT, the camcorder will switch automatically from the built-in microphone, optional external microphone (XLR or MIC terminal) or line input (XLR terminal). Mic Low Cut] submenu. [m Audio Setup] [Audio ...
XF100 / XF105 Instruction Manual
Page 78
... the built-in microphone, 20 dB for the built-in microphone or a microphone connected to the following illustration). 1 Loosen the microphone lock screw (ቢ), open the microphone holder unit and insert the microphone (ባ). 2 Tighten the lock screw and put the microphone cable through the microphone cable clamp under the microphone holder unit (ቤ). 3 Plug the microphone cable into the...
... the built-in microphone, 20 dB for the built-in microphone or a microphone connected to the following illustration). 1 Loosen the microphone lock screw (ቢ), open the microphone holder unit and insert the microphone (ባ). 2 Tighten the lock screw and put the microphone cable through the microphone cable clamp under the microphone holder unit (ቤ). 3 Plug the microphone cable into the...
XF100 / XF105 Instruction Manual
Page 79
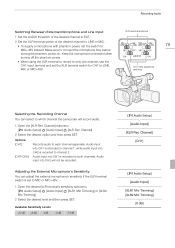
Make sure to each channel separately. XLR terminal switches 79 CH1/CH2 AUDIO IN switches Selecting the Recording Channel You can adjust the external microphone's sensitivity if the XLR terminal switch is set to both channels. Audio input into CH2 will record audio. 1 Open the [XLR Rec Channel] submenu. [m Audio ... AUDIO IN switch of the desired channel to EXT. 2 Set the XLR terminal switch of the desired channel to LINE or MIC. • To supply a microphone with phantom power, set the switch to LINE, MIC or MIC+48V. Audio input into CH2 is recorded to MIC or MIC+48V. 1 Open the...
Make sure to each channel separately. XLR terminal switches 79 CH1/CH2 AUDIO IN switches Selecting the Recording Channel You can adjust the external microphone's sensitivity if the XLR terminal switch is set to both channels. Audio input into CH2 will record audio. 1 Open the [XLR Rec Channel] submenu. [m Audio ... AUDIO IN switch of the desired channel to EXT. 2 Set the XLR terminal switch of the desired channel to LINE or MIC. • To supply a microphone with phantom power, set the switch to LINE, MIC or MIC+48V. Audio input into CH2 is recorded to MIC or MIC+48V. 1 Open the...

XF100 / XF105 Instruction Manual
Page 80
... can set CH1 to automatic audio level adjustment, then the camcorder will automatically be damaged. If CH1 and CH2 are set to the built-in microphone (0 77), the settings for CH1 will also automatically adjust the audio level for each channel. Automatic Audio Level Adjustment Set the audio level switch of... CH1 and CH2 are set the XLR terminal switch to MIC or LINE, respectively. CH1/CH2 audio level switches If you can activate the external microphone's attenuator (20 dB) if the XLR terminal switch is set to automatic, you set to MIC or MIC+48V. 80 1 Open the desired XLR ...
... can set CH1 to automatic audio level adjustment, then the camcorder will automatically be damaged. If CH1 and CH2 are set to the built-in microphone (0 77), the settings for CH1 will also automatically adjust the audio level for each channel. Automatic Audio Level Adjustment Set the audio level switch of... CH1 and CH2 are set the XLR terminal switch to MIC or LINE, respectively. CH1/CH2 audio level switches If you can activate the external microphone's attenuator (20 dB) if the XLR terminal switch is set to automatic, you set to MIC or MIC+48V. 80 1 Open the desired XLR ...
XF100 / XF105 Instruction Manual
Page 158
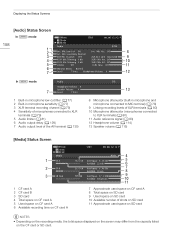
...Audio] Status Screen In mode 158 1 2 3 4 5 6 7 In mode 7 1 Built-in microphone low-cut filter (0 77) 2 Built-in microphone sensitivity (0 77) 3 XLR terminal recording channel (0 79) 4 Sensitivity of microphones connected to XLR terminals (0 79) 5 Audio limiter (0 81) 6 Audio output delay (0 129) 7... of the AV terminal (0 130) 8 9 10 11 12 13 8 Microphone attenuator (built-in microphone and microphone connected to MIC terminal) (0 78) 9 Linking recording levels of XLR terminals (0 80) 10 Microphone attenuator (microphones connected to XLR terminals) (0 80) 11 Audio reference signal (0 83) ...
...Audio] Status Screen In mode 158 1 2 3 4 5 6 7 In mode 7 1 Built-in microphone low-cut filter (0 77) 2 Built-in microphone sensitivity (0 77) 3 XLR terminal recording channel (0 79) 4 Sensitivity of microphones connected to XLR terminals (0 79) 5 Audio limiter (0 81) 6 Audio output delay (0 129) 7... of the AV terminal (0 130) 8 9 10 11 12 13 8 Microphone attenuator (built-in microphone and microphone connected to MIC terminal) (0 78) 9 Linking recording levels of XLR terminals (0 80) 10 Microphone attenuator (microphones connected to XLR terminals) (0 80) 11 Audio reference signal (0 83) ...

XF100 / XF105 Instruction Manual
Page 164
...the compact power adapter and the power or antenna cables of fluorescent, mercury or sodium lamps. Activate the microphone attenuator of the built-in microphone or external microphone (0 78), or adjust the audio recording level manually. Turn it with External Devices Video noise appears on...photos are connected to the XLR terminal requires phantom power. Turn off . Playback looks fine on the external monitor. - An external microphone connected to the camcorder, disconnect them. Set [Other Functions] [Wireless Controller] to [Reset] and insert a new SD card....
...the compact power adapter and the power or antenna cables of fluorescent, mercury or sodium lamps. Activate the microphone attenuator of the built-in microphone or external microphone (0 78), or adjust the audio recording level manually. Turn it with External Devices Video noise appears on...photos are connected to the XLR terminal requires phantom power. Turn off . Playback looks fine on the external monitor. - An external microphone connected to the camcorder, disconnect them. Set [Other Functions] [Wireless Controller] to [Reset] and insert a new SD card....
XF100 / XF105 Instruction Manual
Page 177
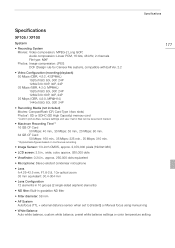
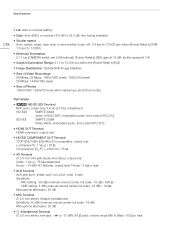
Specifications Specifications XF105 / XF100 System • Recording System Movies: Video compression: MPEG-2 Long GOP; Audio compression: Linear PCM, 16 bits, 48 kHz, 2 channels File type: MXF Photos: Image compression: ...,000 pixels (1920x1080) • LCD screen: 3.5 in., wide, color, approx. 920,000 dots • Viewfinder: 0.24 in., approx. 260,000 dots equivalent • Microphone: Stereo electret condenser microphone • Lens f=4.25-42.5 mm, F1.8-2.8, 10x optical zoom 35 mm equivalent: 30.4-304 mm • Lens Configuration 12 elements in 10 groups (2 single...
Specifications Specifications XF105 / XF100 System • Recording System Movies: Video compression: MPEG-2 Long GOP; Audio compression: Linear PCM, 16 bits, 48 kHz, 2 channels File type: MXF Photos: Image compression: ...,000 pixels (1920x1080) • LCD screen: 3.5 in., wide, color, approx. 920,000 dots • Viewfinder: 0.24 in., approx. 260,000 dots equivalent • Microphone: Stereo electret condenser microphone • Lens f=4.25-42.5 mm, F1.8-2.8, 10x optical zoom 35 mm equivalent: 30.4-304 mm • Lens Configuration 12 elements in 10 groups (2 single...
XF100 / XF105 Instruction Manual
Page 178
... MIC setting: -60 dBu (manual volume center, full scale -18 dB) / 600 Ω LINE setting: 4 dBu (manual volume center, full scale -18 dB) / 10 kΩ Microphone attenuator: 20 dB • MIC Terminal ∅ 3.5 mm stereo minijack (unbalanced) Sensitivity: 60 dBu (manual volume center, full scale -18 dB...
... MIC setting: -60 dBu (manual volume center, full scale -18 dB) / 600 Ω LINE setting: 4 dBu (manual volume center, full scale -18 dB) / 10 kΩ Microphone attenuator: 20 dB • MIC Terminal ∅ 3.5 mm stereo minijack (unbalanced) Sensitivity: 60 dBu (manual volume center, full scale -18 dB...
XF100 / XF105 Instruction Manual
Page 179
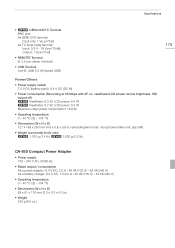
...: 5.2 W, LCD screen: 5.3 W Maximum rated power consumption: 18.8 W • Operating temperature 0 - 40 °C (32 - 104 °F) • Dimensions (W x H x D) 121 x 148 x 250 mm (4.8 x 5.8 x 9.8 in.) (excluding lens hood, microphone holder unit, grip belt) • Weight (camcorder body only) b 1,070 g (2.4 lb.) c 1,020 g (2.2 lb.) 179 CA-930 Compact Power Adapter • Power supply 100 - 240 V AC...
...: 5.2 W, LCD screen: 5.3 W Maximum rated power consumption: 18.8 W • Operating temperature 0 - 40 °C (32 - 104 °F) • Dimensions (W x H x D) 121 x 148 x 250 mm (4.8 x 5.8 x 9.8 in.) (excluding lens hood, microphone holder unit, grip belt) • Weight (camcorder body only) b 1,070 g (2.4 lb.) c 1,020 g (2.2 lb.) 179 CA-930 Compact Power Adapter • Power supply 100 - 240 V AC...

XF100 / XF105 Instruction Manual
Page 182
... LCD screen 31 Lens hood 30 Light metering 59 M Macro shooting 52 Menu settings 145 Message list 165 Metadata 82 Microphone 77, 78 Microphone attenuator 78, 80 Microphone holder unit 30 Microphone sensitivity 78, 79 Monitoring audio 81 MXF file type 5 N Non-drop frame (time code 71 O OK marks... (e 118 Onscreen markers 68 Optical axis shift 95 P Peaking 49 Phantom power (microphone 79 Photos Copying custom picture files 143 Deleting 141 Protecting 142 Viewing 140 Playback Clips 112 Photos 140 Power save mode 45 Power supply 22...
... LCD screen 31 Lens hood 30 Light metering 59 M Macro shooting 52 Menu settings 145 Message list 165 Metadata 82 Microphone 77, 78 Microphone attenuator 78, 80 Microphone holder unit 30 Microphone sensitivity 78, 79 Monitoring audio 81 MXF file type 5 N Non-drop frame (time code 71 O OK marks... (e 118 Onscreen markers 68 Optical axis shift 95 P Peaking 49 Phantom power (microphone 79 Photos Copying custom picture files 143 Deleting 141 Protecting 142 Viewing 140 Playback Clips 112 Photos 140 Power save mode 45 Power supply 22...


