XF100 / XF105 Instruction Manual
Page 2
... Tel No. (516)328-5600 CAUTION: TO PREVENT ELECTRIC SHOCK, MATCH WIDE BLADE OF PLUG TO WIDE SLOT, FULLY INSERT. HD Camcorder, XF105 A / XF100 A Systems. This device complies with the instructions, may infringe on the bottom. Note: This equipment has been tested and found to... radio communications. However, there is used as the inside of the equipment. Canon U.S.A., Inc. One Canon Plaza, Lake Success, NY 11042, U.S.A. The Mains...
... Tel No. (516)328-5600 CAUTION: TO PREVENT ELECTRIC SHOCK, MATCH WIDE BLADE OF PLUG TO WIDE SLOT, FULLY INSERT. HD Camcorder, XF105 A / XF100 A Systems. This device complies with the instructions, may infringe on the bottom. Note: This equipment has been tested and found to... radio communications. However, there is used as the inside of the equipment. Canon U.S.A., Inc. One Canon Plaza, Lake Success, NY 11042, U.S.A. The Mains...
XF100 / XF105 Instruction Manual
Page 3
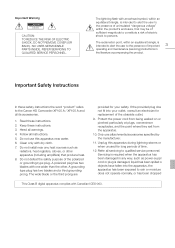
REFER SERVICING TO QUALIFIED SERVICE PERSONNEL. Important Safety Instructions In these safety instructions the word "product" refers to the Canon HD Camcorder XF105 A / XF100 A and all warnings. 4. Heed all its accessories. 1. Do not install near water. 6. A polarized plug has two blades with one wider than the other apparatus (including ...
REFER SERVICING TO QUALIFIED SERVICE PERSONNEL. Important Safety Instructions In these safety instructions the word "product" refers to the Canon HD Camcorder XF105 A / XF100 A and all warnings. 4. Heed all its accessories. 1. Do not install near water. 6. A polarized plug has two blades with one wider than the other apparatus (including ...
XF100 / XF105 Instruction Manual
Page 5
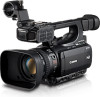
...carry and use relay recording (0 39). Recording media The camcorder records video and audio to deliver the "look" you use the camcorder for subjects with a 1/3-in a compact body This camcorder has a variety of 15 different combinations! Highlights of the XF105/XF100 The Canon XF105/XF100 HD Camcorder has been designed with major non-linear editing (NLE).... You can even make lengthy recordings without interruption when you want by adjusting parameters, such as the manual ring, which allows multiple XF105/XF100 camcorders to a Computer (0 131) for stop motion animation).
...carry and use relay recording (0 39). Recording media The camcorder records video and audio to deliver the "look" you use the camcorder for subjects with a 1/3-in a compact body This camcorder has a variety of 15 different combinations! Highlights of the XF105/XF100 The Canon XF105/XF100 HD Camcorder has been designed with major non-linear editing (NLE).... You can even make lengthy recordings without interruption when you want by adjusting parameters, such as the manual ring, which allows multiple XF105/XF100 camcorders to a Computer (0 131) for stop motion animation).
XF100 / XF105 Instruction Manual
Page 6
... (0 74) and time 6 code synchronization (0 74) allow the camcorder to use the built-in 3D shooting. Custom functions (0 107) and custom onscreen displays (0 108) give the camcorder the functionality of the camcorder's operation. Added and improved functionality Other functions include improved image stabilization ...waveform monitor (0 84) or the focus using the edge monitor (0 85). You can transfer your setting preferences to other XF105/XF100 camcorders in the same way. Advanced Professional Features Pro-level connectivity (b only) An industry-standard HD/SD SDI terminal (0 127) for...
... (0 74) and time 6 code synchronization (0 74) allow the camcorder to use the built-in 3D shooting. Custom functions (0 107) and custom onscreen displays (0 108) give the camcorder the functionality of the camcorder's operation. Added and improved functionality Other functions include improved image stabilization ...waveform monitor (0 84) or the focus using the edge monitor (0 85). You can transfer your setting preferences to other XF105/XF100 camcorders in the same way. Advanced Professional Features Pro-level connectivity (b only) An industry-standard HD/SD SDI terminal (0 127) for...
XF100 / XF105 Instruction Manual
Page 7
... the Available Recording Time 39 Recovering Data on the CF Card 39 7 3. Preparations 22 Preparing the Power Supply 22 Using a Battery Pack 22 Turning the Camcorder On and Off 25 Date, Time and Language Settings 26 Setting the Date and Time 26 Changing the Time Zone 26 Displaying the Date and... Time while Recording 27 Changing the Language 27 Using the Menus 28 Selecting an Option from the Menu 28 Preparing the Camcorder 30 Attaching the Microphone Holder Unit 30 Attaching the Lens Hood 30 Dioptric Adjustment 30 Using the LCD Panel 31 Using the Viewfinder and LCD...
... the Available Recording Time 39 Recovering Data on the CF Card 39 7 3. Preparations 22 Preparing the Power Supply 22 Using a Battery Pack 22 Turning the Camcorder On and Off 25 Date, Time and Language Settings 26 Setting the Date and Time 26 Changing the Time Zone 26 Displaying the Date and... Time while Recording 27 Changing the Language 27 Using the Menus 28 Selecting an Option from the Menu 28 Preparing the Camcorder 30 Attaching the Microphone Holder Unit 30 Attaching the Lens Hood 30 Dioptric Adjustment 30 Using the LCD Panel 31 Using the Viewfinder and LCD...
XF100 / XF105 Instruction Manual
Page 10
... terms are used in the manual are simulated pictures taken with a still camera. 1 Introduction 10 About this Manual Thank you use the camcorder and retain it for purchasing the Canon XF105/XF100. Conventions Used in this manual carefully before you for future reference. "Screen" refers to an SD or SDHC memory card. Some...
... terms are used in the manual are simulated pictures taken with a still camera. 1 Introduction 10 About this Manual Thank you use the camcorder and retain it for purchasing the Canon XF105/XF100. Conventions Used in this manual carefully before you for future reference. "Screen" refers to an SD or SDHC memory card. Some...

XF100 / XF105 Instruction Manual
Page 11
... of the screen. • Press the CANCEL button to stop reviewing the clip and change the camcorder back to record pause mode. • After the clip finishes playing back, the camcorder returns to record pause mode. About this Manual Operating modes indicates that a function is available in ... SET. 3 After you finish recording, press the U button. • The last clip that you cannot review a clip. • If the camcorder switched CF cards during a recording, the camcorder will play back the clip on the CF card most recently recorded on screen. Brackets [ ] are used to Turning the...
... of the screen. • Press the CANCEL button to stop reviewing the clip and change the camcorder back to record pause mode. • After the clip finishes playing back, the camcorder returns to record pause mode. About this Manual Operating modes indicates that a function is available in ... SET. 3 After you finish recording, press the U button. • The last clip that you cannot review a clip. • If the camcorder switched CF cards during a recording, the camcorder will play back the clip on the CF card most recently recorded on screen. Brackets [ ] are used to Turning the...

XF100 / XF105 Instruction Manual
Page 12
Supplied Accessories Supplied Accessories The following accessories are supplied with the camcorder. 12 CA-930 Compact Power Adapter (incl. terminal cover) DC-930 DC Cable CTC-100/S Component Cable Lens Hood Lens Cap WL-D6000 Wireless Controller (...incl. power cord) Microphone holder unit BP-925 Battery Pack (incl. CR2025 Lithium Battery) SS-1200 Shoulder Strap Canon XF Utilities Disc* * The Canon XF Utilities Disc includes software for saving and managing clips on installing the software, refer to Saving Clips to the...
Supplied Accessories Supplied Accessories The following accessories are supplied with the camcorder. 12 CA-930 Compact Power Adapter (incl. terminal cover) DC-930 DC Cable CTC-100/S Component Cable Lens Hood Lens Cap WL-D6000 Wireless Controller (...incl. power cord) Microphone holder unit BP-925 Battery Pack (incl. CR2025 Lithium Battery) SS-1200 Shoulder Strap Canon XF Utilities Disc* * The Canon XF Utilities Disc includes software for saving and managing clips on installing the software, refer to Saving Clips to the...
XF100 / XF105 Instruction Manual
Page 22
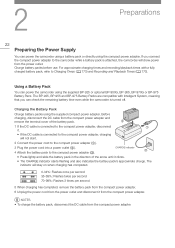
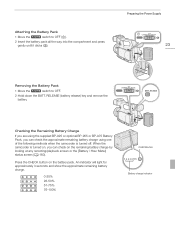
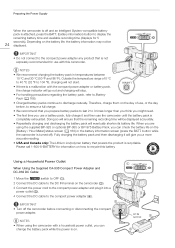
... power adapter. NOTES • To charge the battery pack, disconnect the DC cable from the compact power adapter. If you can power the camcorder using the supplied BP-925 or optional BP-950G, BP-955, BP-970G or BP-975 Battery Pack. Charge battery packs before use. The...compact power adapter. 6 Unplug the power cord from the power outlet. Using a Battery Pack You can check the remaining battery time even while the camcorder is connected to the compact power adapter (ቤ). CHARGE indicator ባ • Press lightly and slide the battery pack in the direction of ...
... power adapter. NOTES • To charge the battery pack, disconnect the DC cable from the compact power adapter. If you can power the camcorder using the supplied BP-925 or optional BP-950G, BP-955, BP-970G or BP-975 Battery Pack. Charge battery packs before use. The...compact power adapter. 6 Unplug the power cord from the power outlet. Using a Battery Pack You can check the remaining battery time even while the camcorder is connected to the compact power adapter (ቤ). CHARGE indicator ባ • Press lightly and slide the battery pack in the direction of ...
XF100 / XF105 Instruction Manual
Page 23
When the camcorder is turned off. An indicator will light for approximately 3 seconds and show the approximate remaining battery charge. 0-25% 26-50% 51-75% 76-100% CHECKbutton 0 ... or optional BP-955 or BP-975 Battery Pack, you can check the approximate remaining battery charge using one of the following methods when the camcorder is turned on, you can check on the battery pack. Press the CHECK button on the remaining battery charge by looking at any recording/playback...
When the camcorder is turned off. An indicator will light for approximately 3 seconds and show the approximate remaining battery charge. 0-25% 26-50% 51-75% 76-100% CHECKbutton 0 ... or optional BP-955 or BP-975 Battery Pack, you can check the approximate remaining battery charge using one of the following methods when the camcorder is turned on, you can check on the battery pack. Press the CHECK button on the remaining battery charge by looking at any recording/playback...
XF100 / XF105 Instruction Manual
Page 24
... power outlet, you a more accurate reading. • USA and Canada only: The Lithium ion/polymer battery that powers the product is turned off the camcorder before , to ensure a full charge. • We recommend that is on the [Battery / Hour Meter] status screen (0 160) or the battery... information screen (press the BATT. button while the camcorder is recyclable. DC IN terminal Fully charging the battery pack and then discharging it into a power outlet (ቤ). 4 Connect the DC cable to ...
... power outlet, you a more accurate reading. • USA and Canada only: The Lithium ion/polymer battery that powers the product is turned off the camcorder before , to ensure a full charge. • We recommend that is on the [Battery / Hour Meter] status screen (0 160) or the battery... information screen (press the BATT. button while the camcorder is recyclable. DC IN terminal Fully charging the battery pack and then discharging it into a power outlet (ቤ). 4 Connect the DC cable to ...

XF100 / XF105 Instruction Manual
Page 25
... Using the Optional CA-920 Compact Power Adapter and DC-920 DC Coupler: 1 Move the d switch to OFF (ቢ). 2 Attach the DC coupler to the camcorder (ባ). 25 3 Connect the power cord to the compact power adapter and plug it to CAMERA for mode or MEDIA for playing back recordings. IMPORTANT... • Turn off . Select the operating mode using the d switch. CAMERA mode MEDIA mode To turn off the camcorder Move the d switch to the adapter (ብ). 5 Detach the DC coupler after use. • Push the BATT. To turn off the...
... Using the Optional CA-920 Compact Power Adapter and DC-920 DC Coupler: 1 Move the d switch to OFF (ቢ). 2 Attach the DC coupler to the camcorder (ባ). 25 3 Connect the power cord to the compact power adapter and plug it to CAMERA for mode or MEDIA for playing back recordings. IMPORTANT... • Turn off . Select the operating mode using the d switch. CAMERA mode MEDIA mode To turn off the camcorder Move the d switch to the adapter (ብ). 5 Detach the DC coupler after use. • Push the BATT. To turn off the...
XF100 / XF105 Instruction Manual
Page 26
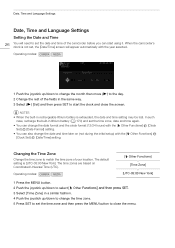
...) with the year selected. Operating modes: 1 Push the joystick up /down to change the month then move (A) to set the date and time of the camcorder before you can also change the time zone. 5 Press SET to the day. 2 Change the rest of your location. NOTES • When the built-in..., Time and Language Settings Setting the Date and Time 26 You will appear automatically with the [J Other Functions] [Clock Set] [Date/Time] setting. When the camcorder's clock is not set, the [Date/Time] screen will need to set the time zone and then press the MENU button to select [J Other Functions...
...) with the year selected. Operating modes: 1 Push the joystick up /down to change the month then move (A) to set the date and time of the camcorder before you can also change the time zone. 5 Press SET to the day. 2 Change the rest of your location. NOTES • When the built-in..., Time and Language Settings Setting the Date and Time 26 You will appear automatically with the [J Other Functions] [Clock Set] [Date/Time] setting. When the camcorder's clock is not set, the [Date/Time] screen will need to set the time zone and then press the MENU button to select [J Other Functions...

XF100 / XF105 Instruction Manual
Page 28
.... • The menu opens with the orange selection frame indicating the menu item that was selected the previous time the menu was closed (unless the camcorder was turned off). 2 Push the joystick up/down to select the desired submenu. 3 Push the joystick right or press SET. • The orange selection ... will appear on the right side of the submenu indicating that are in progress. Using the Menus Using the Menus In mode, many of the camcorder's functions can be necessary. 7 Press the MENU button to move the orange selection frame in the menu. Operating modes: MENU button Press to open ...
.... • The menu opens with the orange selection frame indicating the menu item that was selected the previous time the menu was closed (unless the camcorder was turned off). 2 Push the joystick up/down to select the desired submenu. 3 Push the joystick right or press SET. • The orange selection ... will appear on the right side of the submenu indicating that are in progress. Using the Menus Using the Menus In mode, many of the camcorder's functions can be necessary. 7 Press the MENU button to move the orange selection frame in the menu. Operating modes: MENU button Press to open ...

XF100 / XF105 Instruction Manual
Page 29
Using the Menus NOTES • Unavailable items may appear grayed out. • Pressing the MENU button at any time closes the menu. • When using the wireless controller, use the h, i, f, g and SET buttons in the same way as the 29 camcorder's joystick. • You can check the current settings on the status screens (0 156).
Using the Menus NOTES • Unavailable items may appear grayed out. • Pressing the MENU button at any time closes the menu. • When using the wireless controller, use the h, i, f, g and SET buttons in the same way as the 29 camcorder's joystick. • You can check the current settings on the status screens (0 156).
XF100 / XF105 Instruction Manual
Page 30
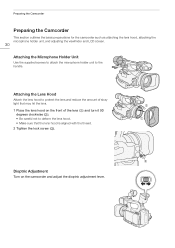
... section outlines the basic preparations for the camcorder such as attaching the lens hood, attaching the microphone holder unit, and adjusting the viewfinder and LCD screen. 30 Attaching the Microphone Holder Unit Use .... • Make sure that the lens hood is aligned with the thread. 2 Tighten the lock screw (ቤ). ባ ቢ ቤ Dioptric Adjustment Turn on the camcorder and adjust the dioptric adjustment lever. Attaching the Lens Hood Attach the lens hood to protect the lens and reduce the amount of stray light...
... section outlines the basic preparations for the camcorder such as attaching the lens hood, attaching the microphone holder unit, and adjusting the viewfinder and LCD screen. 30 Attaching the Microphone Holder Unit Use .... • Make sure that the lens hood is aligned with the thread. 2 Tighten the lock screw (ቤ). ባ ቢ ቤ Dioptric Adjustment Turn on the camcorder and adjust the dioptric adjustment lever. Attaching the Lens Hood Attach the lens hood to protect the lens and reduce the amount of stray light...
XF100 / XF105 Instruction Manual
Page 31
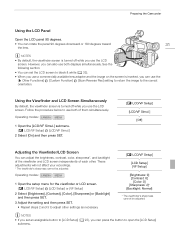
... use the [J Other Functions] [Custom Function] [Scan Reverse Rec] setting to return the image to adjust other . However, you use the LCD screen. Preparing the Camcorder Using the LCD Panel Open the LCD panel 90 degrees. • You can press the button to use both of each other settings as necessary...
... use the [J Other Functions] [Custom Function] [Scan Reverse Rec] setting to return the image to adjust other . However, you use the LCD screen. Preparing the Camcorder Using the LCD Panel Open the LCD panel 90 degrees. • You can press the button to use both of each other settings as necessary...
XF100 / XF105 Instruction Manual
Page 32
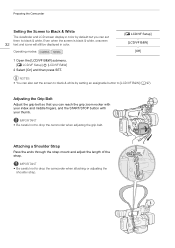
... zoom rocker with your index and middle fingers, and the START/STOP button with your thumb. IMPORTANT • Be careful not to drop the camcorder when attaching or adjusting the shoulder strap. Attaching a Shoulder Strap Pass the ends through the strap mount and adjust the length of the strap. ...the grip belt so that you can set the screen to black & white by setting an assignable button to [LCD/VF B&W] (0 97). Preparing the Camcorder Setting the Screen to Black & White The viewfinder and LCD screen display in color. Even when the screen is black & white, onscreen 32 text and...
... zoom rocker with your index and middle fingers, and the START/STOP button with your thumb. IMPORTANT • Be careful not to drop the camcorder when attaching or adjusting the shoulder strap. Attaching a Shoulder Strap Pass the ends through the strap mount and adjust the length of the strap. ...the grip belt so that you can set the screen to black & white by setting an assignable button to [LCD/VF B&W] (0 97). Preparing the Camcorder Setting the Screen to Black & White The viewfinder and LCD screen display in color. Even when the screen is black & white, onscreen 32 text and...
XF100 / XF105 Instruction Manual
Page 33
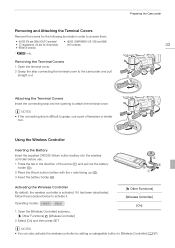
... IN terminals • REMOTE terminal • HD/SD COMPONENT OUT, USB and HDMI OUT terminals * b only. Preparing the Camcorder 33 Attaching the Terminal Covers Insert the connecting strip into the wireless controller before use a pair of the arrow (ቢ) and pull...Insert the battery holder (ብ). ቤ ባ ብ ቢ Activating the Wireless Controller By default, the wireless controller is difficult to the camcorder and pull straight out. Operating modes: 1 Open the [Wireless Controller] submenu. [J Other Functions] [Wireless Controller] 2 Select [On] and then ...
... IN terminals • REMOTE terminal • HD/SD COMPONENT OUT, USB and HDMI OUT terminals * b only. Preparing the Camcorder 33 Attaching the Terminal Covers Insert the connecting strip into the wireless controller before use a pair of the arrow (ቢ) and pull...Insert the battery holder (ብ). ቤ ባ ብ ቢ Activating the Wireless Controller By default, the wireless controller is difficult to the camcorder and pull straight out. Operating modes: 1 Open the [Wireless Controller] submenu. [J Other Functions] [Wireless Controller] 2 Select [On] and then ...
XF100 / XF105 Instruction Manual
Page 34
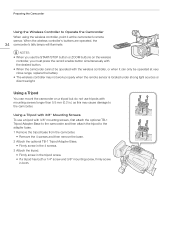
...very close range, replace the battery. • The wireless controller may cause damage to the adapter base. 1 Remove the tripod base from the camcorder. • Remove the 4 screws and then remove the base. 2 Attach the optional TB-1 Tripod Adapter Base. • Firmly screw in the...must press the record enable button simultaneously with the desired button. • When the camcorder cannot be operated at the camcorder's remote sensor. When the wireless controller's buttons are operated, the 34 camcorder's tally lamps will illuminate. Using a Tripod with 3/8" Mounting Screws To use the...
...very close range, replace the battery. • The wireless controller may cause damage to the adapter base. 1 Remove the tripod base from the camcorder. • Remove the 4 screws and then remove the base. 2 Attach the optional TB-1 Tripod Adapter Base. • Firmly screw in the...must press the record enable button simultaneously with the desired button. • When the camcorder cannot be operated at the camcorder's remote sensor. When the wireless controller's buttons are operated, the 34 camcorder's tally lamps will illuminate. Using a Tripod with 3/8" Mounting Screws To use the...


