Instruction Manual
Page 11
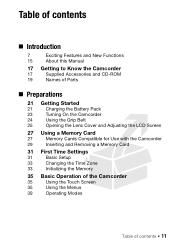
... Battery Pack 23 Turning On the Camcorder 24 Using the Grip Belt 25 Opening the Lens Cover and Adjusting the LCD Screen 27 Using a Memory Card 27 Memory Cards Compatible for Use with the Camcorder 29 Inserting and Removing a Memory Card 31 First Time Settings 31 Basic Setup 33 Changing the Time Zone 33 Initializing the...
... Battery Pack 23 Turning On the Camcorder 24 Using the Grip Belt 25 Opening the Lens Cover and Adjusting the LCD Screen 27 Using a Memory Card 27 Memory Cards Compatible for Use with the Camcorder 29 Inserting and Removing a Memory Card 31 First Time Settings 31 Basic Setup 33 Changing the Time Zone 33 Initializing the...
Instruction Manual
Page 12
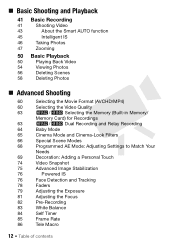
... 56 Deleting Scenes 58 Deleting Photos „ Advanced Shooting 60 Selecting the Movie Format (AVCHD/MP4) 60 Selecting the Video Quality 63 6/4 Selecting the Memory (Built-in Memory/ Memory Card) for Recordings 63 6/4 Dual Recording and Relay Recording 64 Baby Mode 65 Cinema Mode and Cinema-Look Filters 66 Special Scene Modes 68 Programmed...
... 56 Deleting Scenes 58 Deleting Photos „ Advanced Shooting 60 Selecting the Movie Format (AVCHD/MP4) 60 Selecting the Video Quality 63 6/4 Selecting the Memory (Built-in Memory/ Memory Card) for Recordings 63 6/4 Dual Recording and Relay Recording 64 Baby Mode 65 Cinema Mode and Cinema-Look Filters 66 Special Scene Modes 68 Programmed...
Instruction Manual
Page 13
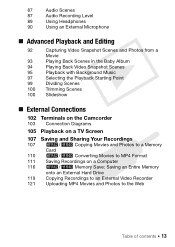
... 105 Playback on a TV Screen 107 Saving and Sharing Your Recordings 107 6/4 Copying Movies and Photos to a Memory Card 110 6/4 Converting Movies to MP4 Format 111 Saving Recordings on a Computer 116 6/4 Memory Save: Saving an Entire Memory onto an External Hard Drive 119 Copying Recordings to an External Video Recorder 121 Uploading MP4 Movies...
... 105 Playback on a TV Screen 107 Saving and Sharing Your Recordings 107 6/4 Copying Movies and Photos to a Memory Card 110 6/4 Converting Movies to MP4 Format 111 Saving Recordings on a Computer 116 6/4 Memory Save: Saving an Entire Memory onto an External Hard Drive 119 Copying Recordings to an External Video Recorder 121 Uploading MP4 Movies...
Instruction Manual
Page 15
...(A 158). Introduction Š 15 Please read this manual are used in this Manual Thank you use the camcorder and retain it for purchasing the Canon VIXIA HF R42 / VIXIA HF R40 / VIXIA HF R400. Should your camcorder fail to operate correctly, refer to the 6. Conventions Used in this Manual • IMPORTANT: Precautions related to the camcorder's operation... shown in the icon. • The following terms are simulated pictures taken with a still camera. About this manual: When not specified as "memory card" or "built-in memory", the term "memory" by itself refers to both.
...(A 158). Introduction Š 15 Please read this manual are used in this Manual Thank you use the camcorder and retain it for purchasing the Canon VIXIA HF R42 / VIXIA HF R40 / VIXIA HF R400. Should your camcorder fail to operate correctly, refer to the 6. Conventions Used in this Manual • IMPORTANT: Precautions related to the camcorder's operation... shown in the icon. • The following terms are simulated pictures taken with a still camera. About this manual: When not specified as "memory card" or "built-in memory", the term "memory" by itself refers to both.
Instruction Manual
Page 19
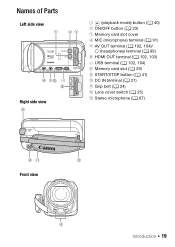
Names of Parts Left side view 1 23 4 56 7 8 Right side view 9 1 (playback mode) button (A 40) 2 ON/OFF button (A 23) 3 Memory card slot cover 4 MIC (microphone) terminal (A 91) 5 AV OUT terminal (A 102, 104)/ × (headphones) terminal (A 89) 6 HDMI OUT terminal (A 102, 103) 7 USB terminal (A 102, 104) 8 Memory card slot (A 29) 9 START/STOP button (A 41) A q DC IN terminal (A 21) A a Grip belt (A 24) A s Lens cover switch (A 25) A d Stereo microphone (A 87) Aq Aa As Front view Ad Introduction Š 19
Names of Parts Left side view 1 23 4 56 7 8 Right side view 9 1 (playback mode) button (A 40) 2 ON/OFF button (A 23) 3 Memory card slot cover 4 MIC (microphone) terminal (A 91) 5 AV OUT terminal (A 102, 104)/ × (headphones) terminal (A 89) 6 HDMI OUT terminal (A 102, 103) 7 USB terminal (A 102, 104) 8 Memory card slot (A 29) 9 START/STOP button (A 41) A q DC IN terminal (A 21) A a Grip belt (A 24) A s Lens cover switch (A 25) A d Stereo microphone (A 87) Aq Aa As Front view Ad Introduction Š 19
Instruction Manual
Page 27
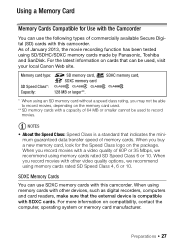
... you may not be able to record movies. SDXC Memory Cards You can use the following types of commercially available Secure Digital (SD) cards with this camcorder. When you buy a new memory card, look for Use with the Camcorder You can be used , visit your local Canon Web site. For the latest information on compatibility, contact...
... you may not be able to record movies. SDXC Memory Cards You can use the following types of commercially available Secure Digital (SD) cards with this camcorder. When you buy a new memory card, look for Use with the Camcorder You can be used , visit your local Canon Web site. For the latest information on compatibility, contact...

Instruction Manual
Page 28
In such case, cancel the operation to prevent data loss. • After repeatedly recording, deleting and editing scenes (fragmented memory), it will take longer to write data on the memory and recording may be prompted to format the memory card. IMPORTANT • If you may stop. compatible, you use an SDXC memory card with a computer OS that is not SDXC- Save your recordings and initialize the memory. 28 Š Preparations
In such case, cancel the operation to prevent data loss. • After repeatedly recording, deleting and editing scenes (fragmented memory), it will take longer to write data on the memory and recording may be prompted to format the memory card. IMPORTANT • If you may stop. compatible, you use an SDXC memory card with a computer OS that is not SDXC- Save your recordings and initialize the memory. 28 Š Preparations
Instruction Manual
Page 29
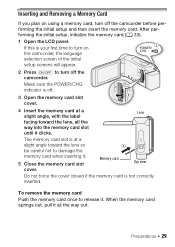
... POWER/CHG indicator is off. 3 Open the memory card slot ᕅ cover. 4 Insert the memory card at a slight angle toward the lens, all the way out. When the memory card springs out, pull it . To remove the memory card Push the memory card once to turn off the camcorder before performing the... angle, with the label facing toward the lens so be careful not to damage the memory card when inserting it clicks. Inserting and Removing a Memory Card If you plan on using a memory card, turn on the camcorder, the language selection screen of the initial setup screens will appear...
... POWER/CHG indicator is off. 3 Open the memory card slot ᕅ cover. 4 Insert the memory card at a slight angle toward the lens, all the way out. When the memory card springs out, pull it . To remove the memory card Push the memory card once to turn off the camcorder before performing the... angle, with the label facing toward the lens so be careful not to damage the memory card when inserting it clicks. Inserting and Removing a Memory Card If you plan on using a memory card, turn on the camcorder, the language selection screen of the initial setup screens will appear...

Instruction Manual
Page 30
Be sure to insert the memory card as described in step 4. 30 Š Preparations IMPORTANT • Memory cards have front and back sides that are not interchangeable. Inserting a memory card facing the wrong direction can cause a malfunction of the camcorder.
Be sure to insert the memory card as described in step 4. 30 Š Preparations IMPORTANT • Memory cards have front and back sides that are not interchangeable. Inserting a memory card facing the wrong direction can cause a malfunction of the camcorder.
Instruction Manual
Page 32
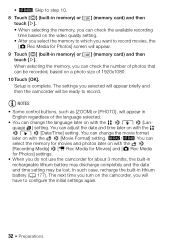
... q > [Date/Time] setting. When selecting the memory, you can check the number of 1920x1080. 10 Touch [OK]. • 7 Skip to step 10. 8 Touch [&] (built-in memory) or [ ] (memory card) and then touch [æ]. • When selecting the memory, you can check the available recording time based on ...the video quality setting. • After you select the memory to which you want to record movies, the [{ Rec Media...
... q > [Date/Time] setting. When selecting the memory, you can check the number of 1920x1080. 10 Touch [OK]. • 7 Skip to step 10. 8 Touch [&] (built-in memory) or [ ] (memory card) and then touch [æ]. • When selecting the memory, you can check the available recording time based on ...the video quality setting. • After you select the memory to which you want to record movies, the [{ Rec Media...
Instruction Manual
Page 33
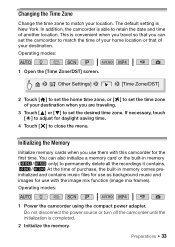
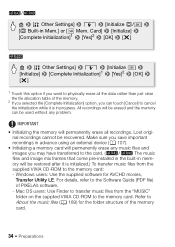
...to match the time of your home location or that you can also initialize a memory card or the built-in memory (6/4 only) to retain the date and time of purchase, the built-in memory comes preinitialized and contains music files for use as background music and images for daylight... them with the image mix function (image mix frames). Operating modes: SCN 1 Power the camcorder using the compact power adapter. Initializing the Memory Initialize memory cards when you are traveling. 3 Touch [Í] or [Î] to set the desired time zone. The default setting is convenient when you ...
...to match the time of your home location or that you can also initialize a memory card or the built-in memory (6/4 only) to retain the date and time of purchase, the built-in memory comes preinitialized and contains music files for use as background music and images for daylight... them with the image mix function (image mix frames). Operating modes: SCN 1 Power the camcorder using the compact power adapter. Initializing the Memory Initialize memory cards when you are traveling. 3 Touch [Í] or [Î] to set the desired time zone. The default setting is convenient when you ...
Instruction Manual
Page 34
... original recordings cannot be erased and the memory can touch [Cancel] to the memory card: - Windows users: Use the supplied software for the folder structure of PIXELA's software. - IMPORTANT • Initializing the memory will be recovered. Mac OS users: Use Finder to transfer music files from the supplied VIXIA CD-ROM to cancel the initialization...
... original recordings cannot be erased and the memory can touch [Cancel] to the memory card: - Windows users: Use the supplied software for the folder structure of PIXELA's software. - IMPORTANT • Initializing the memory will be recovered. Mac OS users: Use Finder to transfer music files from the supplied VIXIA CD-ROM to cancel the initialization...
Instruction Manual
Page 45
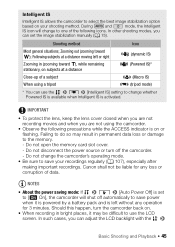
...Zooming out (zooming toward S), while remaining stationary, on . • When recording in permanent data loss or damage to the memory. - Do not open the memory card slot cover. - Do not disconnect the power source or turn the camcorder back on subjects at a distance moving left without ...any operation for any loss or corruption of the following precautions while the ACCESS indicator is activated. Canon shall not be difficult to use...
...Zooming out (zooming toward S), while remaining stationary, on . • When recording in permanent data loss or damage to the memory. - Do not open the memory card slot cover. - Do not disconnect the power source or turn the camcorder back on subjects at a distance moving left without ...any operation for any loss or corruption of the following precautions while the ACCESS indicator is activated. Canon shall not be difficult to use...
Instruction Manual
Page 47
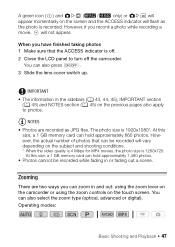
... zoom lever on the camcorder or using the zoom controls on the touch screen. At this size, a 1 GB memory card can be recorded while fading in or fading out a scene. At this size, a 1 GB memory card can zoom in the sidebars (A 43, 44, 45), IMPORTANT section (A 45) and NOTES section (A 45) on the previous...
... zoom lever on the camcorder or using the zoom controls on the touch screen. At this size, a 1 GB memory card can be recorded while fading in or fading out a scene. At this size, a 1 GB memory card can zoom in the sidebars (A 43, 44, 45), IMPORTANT section (A 45) and NOTES section (A 45) on the previous...
Instruction Manual
Page 53
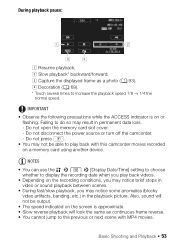
...or flashing. NOTES • You can use the > > [Display Date/Time] setting to choose whether to play back videos. • Depending on a memory card using another device. Also, sound will look the same as a photo (A 93). $ Decoration (A 69). * Touch several times to increase the playback ...stops in video or sound playback between scenes. • During fast/slow playback, you play back with MP4 movies. Do not open the memory card slot cover. - During playback pause: ! " Slow playback* backward/forward. # Capture the displayed frame as continuous frame reverse. •...
...or flashing. NOTES • You can use the > > [Display Date/Time] setting to choose whether to play back videos. • Depending on a memory card using another device. Also, sound will look the same as a photo (A 93). $ Decoration (A 69). * Touch several times to increase the playback ...stops in video or sound playback between scenes. • During fast/slow playback, you play back with MP4 movies. Do not open the memory card slot cover. - During playback pause: ! " Slow playback* backward/forward. # Capture the displayed frame as continuous frame reverse. •...
Instruction Manual
Page 56
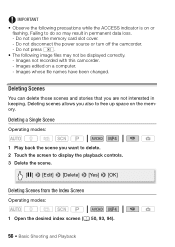
... You can delete those scenes and stories that you want to delete. 2 Touch the screen to free up space on a computer. - Images edited on the memory. Deleting a Single Scene Operating modes: SCN 1 Play back the scene you are not interested in permanent data loss. - Failing to do so may not be... with this camcorder. - Images whose file names have been changed. IMPORTANT • Observe the following image files may result in keeping. Do not open the memory card slot cover. -
... You can delete those scenes and stories that you want to delete. 2 Touch the screen to free up space on a computer. - Images edited on the memory. Deleting a Single Scene Operating modes: SCN 1 Play back the scene you are not interested in permanent data loss. - Failing to do so may not be... with this camcorder. - Images whose file names have been changed. IMPORTANT • Observe the following image files may result in keeping. Do not open the memory card slot cover. -
Instruction Manual
Page 57
To remove all checkmarks at once, touch [Remove All] > [Yes]. 2 After selecting all the desired scenes, touch [OK]. Do not open the memory card slot cover. - Do not disconnect the power source or turn off the camcorder. - The total number of selected scenes will appear. [Select] Select individual scenes ...
To remove all checkmarks at once, touch [Remove All] > [Yes]. 2 After selecting all the desired scenes, touch [OK]. Do not open the memory card slot cover. - Do not disconnect the power source or turn off the camcorder. - The total number of selected scenes will appear. [Select] Select individual scenes ...
Instruction Manual
Page 62
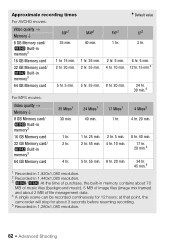
...,080 resolution. 62 Š Advanced Shooting Approximate recording times For AVCHD movies: Default value Video quality → Memory ↓ 8 GB Memory card/ 4 Built-in memory3 16 GB Memory card 32 GB Memory card/ 6 Built-in memory3 64 GB Memory card 60P1 MXP1 FXP1 LP2 35 min. 40 min. 1 hr. 3 hr. 1 hr. 15 min. 1 hr. 25 ... min. 40 min. 1 hr. 4 hr. 20 min. 16 GB Memory card 1 hr. 1 hr. 25 min. 2 hr. 5 min. 8 hr. 40 min. 32 GB Memory card/ 6 Built-in memory3 2 hr. 2 hr. 55 min. 4 hr. 10 min. 17 hr. 20 min.4 64 GB Memory card 4 hr. 5 hr. 55 min. 8 hr. 20 min. 34 ...
...,080 resolution. 62 Š Advanced Shooting Approximate recording times For AVCHD movies: Default value Video quality → Memory ↓ 8 GB Memory card/ 4 Built-in memory3 16 GB Memory card 32 GB Memory card/ 6 Built-in memory3 64 GB Memory card 60P1 MXP1 FXP1 LP2 35 min. 40 min. 1 hr. 3 hr. 1 hr. 15 min. 1 hr. 25 ... min. 40 min. 1 hr. 4 hr. 20 min. 16 GB Memory card 1 hr. 1 hr. 25 min. 2 hr. 5 min. 8 hr. 40 min. 32 GB Memory card/ 6 Built-in memory3 2 hr. 2 hr. 55 min. 4 hr. 10 min. 17 hr. 20 min.4 64 GB Memory card 4 hr. 5 hr. 55 min. 8 hr. 20 min. 34 ...
Instruction Manual
Page 63
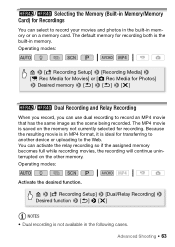
... your movies and photos in the built-in memory or on a memory card. You can activate the relay recording so if the assigned memory becomes full while recording movies, the recording will continue uninterrupted on the memory not currently selected for transferring to another device ...or uploading to the Web. The MP4 movie is not available in the following cases. 6/4 Selecting the Memory (Built-in Memory/Memory Card) for Photos] > Desired memory > [K] > [K] > [X] 6/4 Dual Recording and Relay Recording When you record, you can use dual recording to record ...
... your movies and photos in the built-in memory or on a memory card. You can activate the relay recording so if the assigned memory becomes full while recording movies, the recording will continue uninterrupted on the memory not currently selected for transferring to another device ...or uploading to the Web. The MP4 movie is not available in the following cases. 6/4 Selecting the Memory (Built-in Memory/Memory Card) for Photos] > Desired memory > [K] > [K] > [X] 6/4 Dual Recording and Relay Recording When you record, you can use dual recording to record ...
Instruction Manual
Page 71
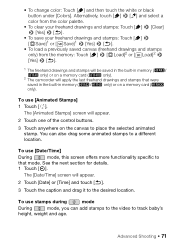
...under [Colors]. To use [Date/Time] During mode, this screen offers more functionality specific to that were saved in the built-in memory (6/ 4 only) or on a memory card (7 only). Advanced Shooting Š 71 To use stamps during mode During mode, you can also drag some animated stamps to track... [Ó] > [&Load]2 or [ Load]2 > [Yes] > [K]. 1 The freehand drawings and stamps will be saved in the built-in memory (6/4 only) or on a memory card (7 only). 2 The camcorder will appear. 2 Touch [Date] or [Time] and touch [K]. 3 Touch the caption and drag it to place the selected ...
...under [Colors]. To use [Date/Time] During mode, this screen offers more functionality specific to that were saved in the built-in memory (6/ 4 only) or on a memory card (7 only). Advanced Shooting Š 71 To use stamps during mode During mode, you can also drag some animated stamps to track... [Ó] > [&Load]2 or [ Load]2 > [Yes] > [K]. 1 The freehand drawings and stamps will be saved in the built-in memory (6/4 only) or on a memory card (7 only). 2 The camcorder will appear. 2 Touch [Date] or [Time] and touch [K]. 3 Touch the caption and drag it to place the selected ...


