User Manual
Page 2
...or implied for any other use for a personal and noncommercial purpose or (2) by a video provider licensed under the AT&T patents to Canon camcorders compliant with high-definition video composed of Panasonic Corporation and Sony Corporation. • Manufactured under AT&T patents for the MPEG-4 standard and ... or subsidiaries in the United States and other countries. • Other names and products not mentioned above may be used on the camcorder's settings, onscreen displays and in this manual signifies Wi-Fi Protected Setup. • The Wi-Fi Protected Setup Identifier Mark is ...
...or implied for any other use for a personal and noncommercial purpose or (2) by a video provider licensed under the AT&T patents to Canon camcorders compliant with high-definition video composed of Panasonic Corporation and Sony Corporation. • Manufactured under AT&T patents for the MPEG-4 standard and ... or subsidiaries in the United States and other countries. • Other names and products not mentioned above may be used on the camcorder's settings, onscreen displays and in this manual signifies Wi-Fi Protected Setup. • The Wi-Fi Protected Setup Identifier Mark is ...
User Manual
Page 3
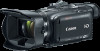
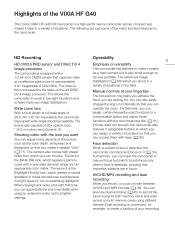
... and reduces overexposure in bright areas by the state-of-the-art DIGIC DV 4 image processor. Highlights of the VIXIA HF G40 The Canon VIXIA HF G40 HD Camcorder is a high-performance camcorder whose compact size makes it ideal in the camcorder. The lens is also capable of 20x optical zoom. * 28.8 mm when using different formats. The following are...
... and reduces overexposure in bright areas by the state-of-the-art DIGIC DV 4 image processor. Highlights of the VIXIA HF G40 The Canon VIXIA HF G40 HD Camcorder is a high-performance camcorder whose compact size makes it ideal in the camcorder. The lens is also capable of 20x optical zoom. * 28.8 mm when using different formats. The following are...

User Manual
Page 4
... Audio scene select With the audio scene select function (A 79), you want to -catch opportunities. Wi-Fi functions Because the camcorder is compatible with the desired exposure. This operation is indispensible in the scene during playback. The OLED screen has incredible clarity,...slow motion effect. Your audience will ensure that you can accurately check that matches your videos on a smartphone or tablet to view the camcorder's recordings (A 126), and using the Web browser on the Internet (A 128). You get spectacular recordings every time without worrying about settings...
... Audio scene select With the audio scene select function (A 79), you want to -catch opportunities. Wi-Fi functions Because the camcorder is compatible with the desired exposure. This operation is indispensible in the scene during playback. The OLED screen has incredible clarity,...slow motion effect. Your audience will ensure that you can accurately check that matches your videos on a smartphone or tablet to view the camcorder's recordings (A 126), and using the Web browser on the Internet (A 128). You get spectacular recordings every time without worrying about settings...

User Manual
Page 5
Enjoying your iOS or Android device to view the recordings on the camcorder (A 126). Use the Web browser on your Recordings on Other Devices Connect the camcorder to an external monitor (A 103). Copy your recordings to an external video recorder (A 115). 5 Save your recordings to upload your ...recordings (A 109). Use an iOS device to the Internet (A 128). Connect the camcorder to remotely control the camcorder and view the image on a Wi-Fi network. After doing so, you can save your recordings on a computer (A 131) or ...
Enjoying your iOS or Android device to view the recordings on the camcorder (A 126). Use the Web browser on your Recordings on Other Devices Connect the camcorder to an external monitor (A 103). Copy your recordings to an external video recorder (A 115). 5 Save your recordings to upload your ...recordings (A 109). Use an iOS device to the Internet (A 128). Connect the camcorder to remotely control the camcorder and view the image on a Wi-Fi network. After doing so, you can save your recordings on a computer (A 131) or ...

User Manual
Page 6
...9 About this Manual 9 Supplied Accessories 11 Names of Parts 12 6 2 Preparations 18 Attaching the Ferrite Core 18 Charging the Battery Pack 18 Preparing the Camcorder 21 Using the Lens Hood and Lens Cap 21 Using the Viewfinder 21 Adjusting the OLED Screen 22 Grip Belt and Straps 23 Wireless Controller...the Date and Time 30 Changing the Language 31 Changing the Time Zone 31 Using a Memory Card 32 Memory Cards Compatible for Use with the Camcorder 32 Inserting and Removing a Memory Card 32 Initializing a Memory Card 33 Selecting the Memory Card for Recordings 34 Selecting the Movie Format (AVCHD/...
...9 About this Manual 9 Supplied Accessories 11 Names of Parts 12 6 2 Preparations 18 Attaching the Ferrite Core 18 Charging the Battery Pack 18 Preparing the Camcorder 21 Using the Lens Hood and Lens Cap 21 Using the Viewfinder 21 Adjusting the OLED Screen 22 Grip Belt and Straps 23 Wireless Controller...the Date and Time 30 Changing the Language 31 Changing the Time Zone 31 Using a Memory Card 32 Memory Cards Compatible for Use with the Camcorder 32 Inserting and Removing a Memory Card 32 Initializing a Memory Card 33 Selecting the Memory Card for Recordings 34 Selecting the Movie Format (AVCHD/...

User Manual
Page 7
...In Standard Definition 115 9 Wi-Fi Functions 117 Introduction to Wi-Fi 117 Remote Operation Via the Browser Remote Application 120 Setting the Camcorder's Password 120 Operating the Camcorder Remotely 121 Browser Remote Onscreen Controls and Displays 121 Remote Operation Using Browser Remote 123 Playback via Browser: Viewing Recordings Using a Web ...Android Device 126 Uploading Recordings Using an iOS Device 128 Playback on a Computer 130 Transferring Files to a Computer or FTP Server 131 Sharing Recordings with CANON iMAGE GATEWAY 133 Setting the Desired Web Services in the Camcorder 133
...In Standard Definition 115 9 Wi-Fi Functions 117 Introduction to Wi-Fi 117 Remote Operation Via the Browser Remote Application 120 Setting the Camcorder's Password 120 Operating the Camcorder Remotely 121 Browser Remote Onscreen Controls and Displays 121 Remote Operation Using Browser Remote 123 Playback via Browser: Viewing Recordings Using a Web ...Android Device 126 Uploading Recordings Using an iOS Device 128 Playback on a Computer 130 Transferring Files to a Computer or FTP Server 131 Sharing Recordings with CANON iMAGE GATEWAY 133 Setting the Desired Web Services in the Camcorder 133

User Manual
Page 8
... Web Services 134 Wi-Fi Connection Using an Access Point 136 Wi-Fi Protected Setup (WPS) 136 Searching for Web Services 165 Handling Precautions 167 Camcorder 167 Battery Pack 168 Memory Card 169 Built-in Rechargeable Lithium Battery 169 Lithium Button Battery 170 Disposal 170 Maintenance/Others 171 Cleaning 171 Condensation...
... Web Services 134 Wi-Fi Connection Using an Access Point 136 Wi-Fi Protected Setup (WPS) 136 Searching for Web Services 165 Handling Precautions 167 Camcorder 167 Battery Pack 168 Memory Card 169 Built-in Rechargeable Lithium Battery 169 Lithium Button Battery 170 Disposal 170 Maintenance/Others 171 Cleaning 171 Condensation...
User Manual
Page 9
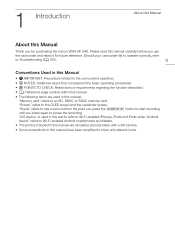
... to operate correctly, refer to Troubleshooting (A 155). 9 Conventions Used in this Manual • IMPORTANT: Precautions related to the camcorder's operation. • NOTES: Additional topics that complement the basic operating procedures. • POINTS TO CHECK: Restrictions or requirements regarding... until you for future reference. 1 Introduction Introduction About this Manual About this manual carefully before you use the camcorder and retain it for purchasing the Canon VIXIA HF G40. Please read this Manual Thank you press again to an SD, SDHC or SDXC memory card. "Scene" ...
... to operate correctly, refer to Troubleshooting (A 155). 9 Conventions Used in this Manual • IMPORTANT: Precautions related to the camcorder's operation. • NOTES: Additional topics that complement the basic operating procedures. • POINTS TO CHECK: Restrictions or requirements regarding... until you for future reference. 1 Introduction Introduction About this Manual About this manual carefully before you use the camcorder and retain it for purchasing the Canon VIXIA HF G40. Please read this Manual Thank you press again to an SD, SDHC or SDXC memory card. "Scene" ...

User Manual
Page 10
... frame. The names of the lens barrel) to Selecting the Movie Format (AVCHD/MP4) (A 35). : Indicates whether the : Indicates the shooting camcorder is useful even when recording in very bright or low-light surroundings. About this example, the Shooting Mode (A 26). 10 function is available in that... at full wide-angle, measured from the front of available menu options and settings, refer to G. The focus is activated, the camcorder continuously adjusts the focus on the subject in shooting (CAMERA) or mode. For example B. For details, refer to other onscreen messages...
... frame. The names of the lens barrel) to Selecting the Movie Format (AVCHD/MP4) (A 35). : Indicates whether the : Indicates the shooting camcorder is useful even when recording in very bright or low-light surroundings. About this example, the Shooting Mode (A 26). 10 function is available in that... at full wide-angle, measured from the front of available menu options and settings, refer to G. The focus is activated, the camcorder continuously adjusts the focus on the subject in shooting (CAMERA) or mode. For example B. For details, refer to other onscreen messages...

User Manual
Page 11
CR2025 lithium button battery) HTC-100/S High Speed HDMI Cable STV-250N Stereo Video Cable IFC-300PCU/S USB Cable Lens hood with the camcorder: Supplied Accessories CA-570 Compact Power Adapter (incl. Supplied Accessories The following accessories are supplied with lens barrier Lens cap Quick Guide Wi-Fi Basic Setup Guide power cord and ferrite core) BP-820 Battery Pack 11 WL-D89 Wireless Controller (incl.
CR2025 lithium button battery) HTC-100/S High Speed HDMI Cable STV-250N Stereo Video Cable IFC-300PCU/S USB Cable Lens hood with the camcorder: Supplied Accessories CA-570 Compact Power Adapter (incl. Supplied Accessories The following accessories are supplied with lens barrier Lens cap Quick Guide Wi-Fi Basic Setup Guide power cord and ferrite core) BP-820 Battery Pack 11 WL-D89 Wireless Controller (incl.

User Manual
Page 18
... until it clicks shut. DC IN terminal 4 Attach the battery pack to the camcorder. • Press the battery pack softly into a power outlet. 3 Connect the compact power adapter to the camcorder) of the core and wrap it clicks in place. Attaching the ferrite core to... the compact power adapter cable is necessary to the camcorder. Charging the Battery Pack The camcorder can be connected to the camcorder's DC IN terminal. 2Attaching the FPerrritee pCoarerations Preparations Attaching the Ferrite Core Attach the enclosed ferrite ...
... until it clicks shut. DC IN terminal 4 Attach the battery pack to the camcorder. • Press the battery pack softly into a power outlet. 3 Connect the compact power adapter to the camcorder) of the core and wrap it clicks in place. Attaching the ferrite core to... the compact power adapter cable is necessary to the camcorder. Charging the Battery Pack The camcorder can be connected to the camcorder's DC IN terminal. 2Attaching the FPerrritee pCoarerations Preparations Attaching the Ferrite Core Attach the enclosed ferrite ...

User Manual
Page 19
BATTERY RELEASE switch Charging the Battery Pack 5 Charging will start when the camcorder is fully charged. • If the indicator flashes, refer to Troubleshooting (A 157). 19 6 Disconnect the compact power adapter in the order shown in the illustration. &#... d in red (battery pack charging). The red POWER/CHG indicator will go out when the battery pack is turned off the camcorder. POWER/CHG (battery charging) indicator • If the camcorder was on in the direction of the arrow and hold it pressed down. 2 Slide the battery pack and then pull it...
BATTERY RELEASE switch Charging the Battery Pack 5 Charging will start when the camcorder is fully charged. • If the indicator flashes, refer to Troubleshooting (A 157). 19 6 Disconnect the compact power adapter in the order shown in the illustration. &#... d in red (battery pack charging). The red POWER/CHG indicator will go out when the battery pack is turned off the camcorder. POWER/CHG (battery charging) indicator • If the camcorder was on in the direction of the arrow and hold it pressed down. 2 Slide the battery pack and then pull it...

User Manual
Page 20
...temperatures between 10 °C and 30 °C (50 °F and 86 °F). Charging the Battery Pack IMPORTANT • Turn off the camcorder, important data is updated on the memory card. If either the ambient temperature or the battery pack's temperature is outside the range of use ...connecting or disconnecting the compact power adapter. Therefore, charge them on aircraft and ships, DC-AC inverters, etc. After you turn off the camcorder before restoring the power supply. • If remaining battery time is an issue, you prepare battery packs to last 2 to voltage converters ...
...temperatures between 10 °C and 30 °C (50 °F and 86 °F). Charging the Battery Pack IMPORTANT • Turn off the camcorder, important data is updated on the memory card. If either the ambient temperature or the battery pack's temperature is outside the range of use ...connecting or disconnecting the compact power adapter. Therefore, charge them on aircraft and ships, DC-AC inverters, etc. After you turn off the camcorder before restoring the power supply. • If remaining battery time is an issue, you prepare battery packs to last 2 to voltage converters ...

User Manual
Page 21
... bottom of lens flare and ghost images. Dioptric adjustment lever You can also use the viewfinder, which can be careful not to drop the camcorder by placing it on the lens. Additionally, closing the lens barrier can use the viewfinder when you rotate the OLED panel 180 degrees to... Using the Lens Hood and Lens Cap While recording, the supplied lens hood with lens barrier is difficult to turn it is effective for the camcorder such as you prefer. • You can tilt the viewfinder 45 degrees upward. Using the Viewfinder If it counterclockwise. When attaching the lens ...
... bottom of lens flare and ghost images. Dioptric adjustment lever You can also use the viewfinder, which can be careful not to drop the camcorder by placing it on the lens. Additionally, closing the lens barrier can use the viewfinder when you rotate the OLED panel 180 degrees to... Using the Lens Hood and Lens Cap While recording, the supplied lens hood with lens barrier is difficult to turn it is effective for the camcorder such as you prefer. • You can tilt the viewfinder 45 degrees upward. Using the Viewfinder If it counterclockwise. When attaching the lens ...

User Manual
Page 22
...panel 90 degrees. • You can rotate the panel 90 degrees downward. • You can rotate the panel 180 degrees toward the camcorder body. 22 NOTES • Make sure you rotate the OLED panel, video noise may appear on the screen momentarily. To allow the subject... to Handling Precautions (A 167), Cleaning (A 171). Pressing D will change the brightness between bright and normal. • Adjusting the brightness or using the camcorder. • For details about how to take care of the viewfinder, refer to Handling Precautions (A 167), Cleaning (A 171). Rotating the OLED panel 180...
...panel 90 degrees. • You can rotate the panel 90 degrees downward. • You can rotate the panel 180 degrees toward the camcorder body. 22 NOTES • Make sure you rotate the OLED panel, video noise may appear on the screen momentarily. To allow the subject... to Handling Precautions (A 167), Cleaning (A 171). Pressing D will change the brightness between bright and normal. • Adjusting the brightness or using the camcorder. • For details about how to take care of the viewfinder, refer to Handling Precautions (A 167), Cleaning (A 171). Rotating the OLED panel 180...

User Manual
Page 23
... shoulder strap through the strap mount on the grip belt and adjust the length of the pixels may appear instead as black dots. Preparing the Camcorder • About the OLED and viewfinder screens: The screens are produced using extremely highprecision manufacturing techniques, with your index finger, and the Y button with more...
... shoulder strap through the strap mount on the grip belt and adjust the length of the pixels may appear instead as black dots. Preparing the Camcorder • About the OLED and viewfinder screens: The screens are produced using extremely highprecision manufacturing techniques, with your index finger, and the Y button with more...

User Manual
Page 24
... the lithium button battery with the wireless controller, or when it can only be operated at the camcorder's remote sensor when you press the buttons. • You can mount the camcorder on a tripod but do not use the wireless controller Point the wireless controller at very close range...sensor is situated under strong light sources or direct sunlight. Using a Tripod You can rotate the OLED panel 180 degrees to the camcorder. NOTES • When the camcorder cannot be operated with the + side facing up. 24 3 Insert the battery holder. Tab To use tripods with mounting screws...
... the lithium button battery with the wireless controller, or when it can only be operated at the camcorder's remote sensor when you press the buttons. • You can mount the camcorder on a tripod but do not use the wireless controller Point the wireless controller at very close range...sensor is situated under strong light sources or direct sunlight. Using a Tripod You can rotate the OLED panel 180 degrees to the camcorder. NOTES • When the camcorder cannot be operated with the + side facing up. 24 3 Insert the battery holder. Tab To use tripods with mounting screws...

User Manual
Page 25
Select the mode using the power switch. 25 To turn off the camcorder Set the power switch to CAMERA for mode (A 36) or MEDIA for playing back recordings. mode mode To turn on in CAMERA ( ) mode for making recordings or MEDIA ( ) mode for mode (A 95). Basic Operation of the Camcorder Basic Operation of the Camcorder Turning the Camcorder On and Off You can choose to turn the camcorder on the camcorder Set the power switch to OFF.
Select the mode using the power switch. 25 To turn off the camcorder Set the power switch to CAMERA for mode (A 36) or MEDIA for playing back recordings. mode mode To turn on in CAMERA ( ) mode for making recordings or MEDIA ( ) mode for mode (A 95). Basic Operation of the Camcorder Basic Operation of the Camcorder Turning the Camcorder On and Off You can choose to turn the camcorder on the camcorder Set the power switch to OFF.

User Manual
Page 26
Basic Operation of all the controls at your fingertips. With this mode, the camcorder takes care of the Camcorder Setting the Shooting Mode In mode, you just prefer not to bother with detailed camcorder settings. (Manual) mode Set the mode switch to select a setting from the menus, etc. This operating mode is suitable if...
Basic Operation of all the controls at your fingertips. With this mode, the camcorder takes care of the Camcorder Setting the Shooting Mode In mode, you just prefer not to bother with detailed camcorder settings. (Manual) mode Set the mode switch to select a setting from the menus, etc. This operating mode is suitable if...

User Manual
Page 27
... scratching the touch screen. - Button and Joystick You can achieve the same effect by the orange selection frame. FUNC. Basic Operation of the Camcorder Drag Swipe your fingernails or hard-tipped objects, such as ballpoint pens. - On some of using the FUNC. Then, press the joystick itself... making a menu selection, push the joystick to select the menu item indicated by touching the triangle control buttons. 27 IMPORTANT • The camcorder features a capacitive touch screen. Using your finger up and down or left and right across the screen. Operating the touch screen with wet...
... scratching the touch screen. - Button and Joystick You can achieve the same effect by the orange selection frame. FUNC. Basic Operation of the Camcorder Drag Swipe your fingernails or hard-tipped objects, such as ballpoint pens. - On some of using the FUNC. Then, press the joystick itself... making a menu selection, push the joystick to select the menu item indicated by touching the triangle control buttons. 27 IMPORTANT • The camcorder features a capacitive touch screen. Using your finger up and down or left and right across the screen. Operating the touch screen with wet...


