
Mobile Camera Viewer Operation Guide
Page 4
Connecting to the Camera Use the device's web browser to connect to the camera and launch Mobile Camera Viewer. 1 Launch browser and enter the camera's IP address. One of the following screens appears. To log into an account that requires user authentication (left screen), enter the user name and password. 4
Connecting to the Camera Use the device's web browser to connect to the camera and launch Mobile Camera Viewer. 1 Launch browser and enter the camera's IP address. One of the following screens appears. To log into an account that requires user authentication (left screen), enter the user name and password. 4
Network Camera Operation Guide
Page 12
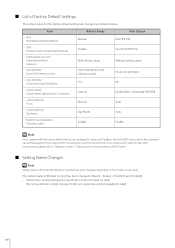
...factory default settings are configured to obtain an IP address from the DHCP server, detect the camera by Camera Management Tool using a DHCP environment or an IPv6 environment. Item • IPv4 IPv4 Address Settings Method • DNS Set Name Server Address Automatically • Administrator Account Administrator Name ...Manual Day Mode Disable After Change Auto (DHCP) Use DHCP/DHCPv6 Without setting values No access privileges No Model Name (Example) VB-M50B Auto Auto Enable Note Since cameras with the factory default settings are changed , depending on the model you configure the ...
...factory default settings are configured to obtain an IP address from the DHCP server, detect the camera by Camera Management Tool using a DHCP environment or an IPv6 environment. Item • IPv4 IPv4 Address Settings Method • DNS Set Name Server Address Automatically • Administrator Account Administrator Name ...Manual Day Mode Disable After Change Auto (DHCP) Use DHCP/DHCPv6 Without setting values No access privileges No Model Name (Example) VB-M50B Auto Auto Enable Note Since cameras with the factory default settings are changed , depending on the model you configure the ...
Network Camera Operation Guide
Page 17
... system functions cannot be accessed from the Canon download site on a connectable computer and install it in the target environment, when in an environment not connectable to the internet. • Follow the procedure in "Adding the Camera IP Address as a Trusted Site" in the "...the camera, or the software where the problem occurred, in your LAN] checkbox in [Proxy server] > select [Advanced] > specify the camera IP address in an internet connection environment. - Message ActiveX is no audio.* The viewer gets disconnected. Countermeasures • Configure to add this message is ...
... system functions cannot be accessed from the Canon download site on a connectable computer and install it in the target environment, when in an environment not connectable to the internet. • Follow the procedure in "Adding the Camera IP Address as a Trusted Site" in the "...the camera, or the software where the problem occurred, in your LAN] checkbox in [Proxy server] > select [Advanced] > specify the camera IP address in an internet connection environment. - Message ActiveX is no audio.* The viewer gets disconnected. Countermeasures • Configure to add this message is ...

Network Camera Operation Guide
Page 50
Settings When Using Windows Server Adding the Camera IP Address as a Trusted Site When the security level for internet sites and intranet sites is set to [High], it is necessary to add the IP address of trusted sites. 3 Click [Change settings] > [Allow another app]. 4 Select the software to the list of the camera to use, such as [Camera Management Tool], and click [Add]. For details, please refer to "Camera Management Tool User Manual". 1 Click [Network and Internet] > [Internet Options] in [Control Panel]. 32 Note Set the camera IP address with the Camera Management Tool.
Settings When Using Windows Server Adding the Camera IP Address as a Trusted Site When the security level for internet sites and intranet sites is set to [High], it is necessary to add the IP address of trusted sites. 3 Click [Change settings] > [Allow another app]. 4 Select the software to the list of the camera to use, such as [Camera Management Tool], and click [Add]. For details, please refer to "Camera Management Tool User Manual". 1 Click [Network and Internet] > [Internet Options] in [Control Panel]. 32 Note Set the camera IP address with the Camera Management Tool.

Network Camera Operation Guide
Page 51
... cameras by default. For example, if you enter "192.160.1.*", all sites in this website to the zone], then click [Add]. The camera's IP address will be added to enable the sound function. 33 2 Click the [Security] tab. 3 Click [Trusted sites] > [Sites]. 2 Camera Setup The... [Trusted sites] dialog box is displayed. 4 Enter the IP address of the address will be added as trusted sites. Sound Settings for Using the Audio Functions In Windows Server, the sound function is selected. Note •...
... cameras by default. For example, if you enter "192.160.1.*", all sites in this website to the zone], then click [Add]. The camera's IP address will be added to enable the sound function. 33 2 Click the [Security] tab. 3 Click [Trusted sites] > [Sites]. 2 Camera Setup The... [Trusted sites] dialog box is displayed. 4 Enter the IP address of the address will be added as trusted sites. Sound Settings for Using the Audio Functions In Windows Server, the sound function is selected. Note •...

Network Camera Operation Guide
Page 53
...DHCP environment or an IPv6 environment. Configuring Initial Camera Settings 2 To use a camera, it is necessary to first set the computer to an IP address with the same subnet (255.255.255.0). • If multiple cameras with the factory default settings exist on how to use the Camera ...browser. Use the Camera Management Tool to a network environment without a DHCP server Cameras with the factory default settings are configured to obtain an IP address from the DHCP server by entering 192.168.100.1 in which the Camera Management Tool is displayed and you can configure the settings. 35...
...DHCP environment or an IPv6 environment. Configuring Initial Camera Settings 2 To use a camera, it is necessary to first set the computer to an IP address with the same subnet (255.255.255.0). • If multiple cameras with the factory default settings exist on how to use the Camera ...browser. Use the Camera Management Tool to a network environment without a DHCP server Cameras with the factory default settings are configured to obtain an IP address from the DHCP server by entering 192.168.100.1 in which the Camera Management Tool is displayed and you can configure the settings. 35...

Network Camera Operation Guide
Page 58
... the Camera Management Tool, please refer to "Camera Management Tool User Manual". 1 Launch the web browser. 2 Enter the IP address, and press the Enter key. Launching the Camera Viewer You can enter the IP address set the Viewer as the video display. Viewing Video with the Camera Management Tool directly into a web browser to...
... the Camera Management Tool, please refer to "Camera Management Tool User Manual". 1 Launch the web browser. 2 Enter the IP address, and press the Enter key. Launching the Camera Viewer You can enter the IP address set the Viewer as the video display. Viewing Video with the Camera Management Tool directly into a web browser to...
Network Camera Operation Guide
Page 60
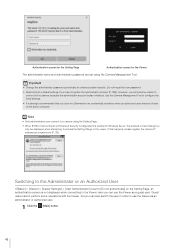
... credentials] checkbox when an authorized user shares a Viewer on the Setting Page, an authentication screen is also initialized. If this happens, please register the camera IP address as a guest user.
... credentials] checkbox when an authorized user shares a Viewer on the Setting Page, an authentication screen is also initialized. If this happens, please register the camera IP address as a guest user.

Network Camera Operation Guide
Page 94
Accessing the Setting Page Directly enter the IP address set to [Display Viewer] in the setting menu (P. 94). Settings Menu (1) (2) (3) (1) [Viewer] Button Start the Camera Viewer (P. 41). (2) Language Switch Button Set the language ... Page] menus). How to Use the Setting Page This section explains operations up to "Camera Management Tool User Manual". 1 Launch the web browser. 2 Enter the IP address, and press the Enter key.
Accessing the Setting Page Directly enter the IP address set to [Display Viewer] in the setting menu (P. 94). Settings Menu (1) (2) (3) (1) [Viewer] Button Start the Camera Viewer (P. 41). (2) Language Switch Button Set the language ... Page] menus). How to Use the Setting Page This section explains operations up to "Camera Management Tool User Manual". 1 Launch the web browser. 2 Enter the IP address, and press the Enter key.
Network Camera Operation Guide
Page 102
...to set an address automatically. [IPv6 Address (Manual)] Enter a fixed IPv6 address if you set the IPv4 address manually. • If any of the Viewer. [AutoIP] Select this to enable or disable AutoIP. [IPv4 Address (AutoIP)] When [AutoIP] is set to [Manual], enter a default gateway IP address. Be sure... to set this when connecting the camera to a different subnet from that of the [IPv4 Address], [Subnet Mask] or [IPv4 Default Gateway Address] settings are wrong, the ...
...to set an address automatically. [IPv6 Address (Manual)] Enter a fixed IPv6 address if you set the IPv4 address manually. • If any of the Viewer. [AutoIP] Select this to enable or disable AutoIP. [IPv4 Address (AutoIP)] When [AutoIP] is set to [Manual], enter a default gateway IP address. Be sure... to set this when connecting the camera to a different subnet from that of the [IPv4 Address], [Subnet Mask] or [IPv4 Default Gateway Address] settings are wrong, the ...

Network Camera Operation Guide
Page 104
If you use mDNS, the IP address and host name of the camera will configure settings for using multicast DNS. mDNS This will be broadcast to other hosts on the network. [Use mDNS] Select this to enable or disable mDNS. 86
If you use mDNS, the IP address and host name of the camera will configure settings for using multicast DNS. mDNS This will be broadcast to other hosts on the network. [Use mDNS] Select this to enable or disable mDNS. 86

Network Camera Operation Guide
Page 107
...manually] Set the desired date and time in the camera are displayed. In order to set [Use DHCPv6], you must change [Network] > [IPv4] > [IPv4 Address Settings Method] to [Enable] (P. 84). [Use DHCP/DHCPv6] The camera time is displayed in [NTP Server (DHCPv6)]. Settings Set the date and time setting ...method, time zone and daylight saving time for the specified NTP server. 89 The following setting methods. [Disable] Enter the IP address or host name of the NTP server in [NTP Server]. [Use DHCP] The camera time is synchronized with the time of the NTP server...
...manually] Set the desired date and time in the camera are displayed. In order to set [Use DHCPv6], you must change [Network] > [IPv4] > [IPv4 Address Settings Method] to [Enable] (P. 84). [Use DHCP/DHCPv6] The camera time is displayed in [NTP Server (DHCPv6)]. Settings Set the date and time setting ...method, time zone and daylight saving time for the specified NTP server. 89 The following setting methods. [Disable] Enter the IP address or host name of the NTP server in [NTP Server]. [Use DHCP] The camera time is synchronized with the time of the NTP server...

Network Camera Operation Guide
Page 108
... saving time to [Set manually]. [Time Zone] is incorrect or a connection with that of the computer currently accessing the camera. Note If the NTP server IP address is not automatically selected, so set it if necessary.
... saving time to [Set manually]. [Time Zone] is incorrect or a connection with that of the computer currently accessing the camera. Note If the NTP server IP address is not automatically selected, so set it if necessary.

Network Camera Operation Guide
Page 161
...settings in [Video] (P. 92). The TTL (Time To Live), representing the effective range for RTP streaming. Note • RTP Streaming URL rtsp://IP Address:Port Number/rtpstream/config1(to 5)=r|u|m [=r|u|m] is streaming using RTP over UDP m: Requests multicast Example: RTP Stream 1 request using a proxy server or ...for RTP streaming as follows. IPv4: Range from the Camera] setting, RTP streaming audio will be used . [Multicast Address] Enter the multicast address for H.264 will be viewable on systems using RTP over TCP rtsp://192.168.100.1:554/rtpstream/config1=r Caution: Note ...
...settings in [Video] (P. 92). The TTL (Time To Live), representing the effective range for RTP streaming. Note • RTP Streaming URL rtsp://IP Address:Port Number/rtpstream/config1(to 5)=r|u|m [=r|u|m] is streaming using RTP over UDP m: Requests multicast Example: RTP Stream 1 request using a proxy server or ...for RTP streaming as follows. IPv4: Range from the Camera] setting, RTP streaming audio will be used . [Multicast Address] Enter the multicast address for H.264 will be viewable on systems using RTP over TCP rtsp://192.168.100.1:554/rtpstream/config1=r Caution: Note ...

Network Camera Operation Guide
Page 163
... (P. 155). The HTTP upload function sends notifications via HTTP or via HTTP with attached videos when using a proxy server, enter the host name or IP address of frames or seconds in [Pre-event Buffer] or [Post-event Buffer]. • If [Volume Detection Event] is enabled, disable [ON Event ...reduce the size and frequency of video to the log (P. 203). For information about the HTTP upload function and settings, contact your nearest Canon Customer Service Center. [Notification] Select whether to the upload settings, the video frame rate may not be achieved as specified. If buffering ...
... (P. 155). The HTTP upload function sends notifications via HTTP or via HTTP with attached videos when using a proxy server, enter the host name or IP address of frames or seconds in [Pre-event Buffer] or [Post-event Buffer]. • If [Volume Detection Event] is enabled, disable [ON Event ...reduce the size and frequency of video to the log (P. 203). For information about the HTTP upload function and settings, contact your nearest Canon Customer Service Center. [Notification] Select whether to the upload settings, the video frame rate may not be achieved as specified. If buffering ...

Network Camera Operation Guide
Page 164
... specifications before configuring this setting. • Overwrite the existing file name • Automatically save the file with FTP]. [FTP Server] Enter the host name or IP address of FTP server. [User Name], [Password] Enter the user name and password required for the proxy server. Since the way FTP servers manage the upload...
... specifications before configuring this setting. • Overwrite the existing file name • Automatically save the file with FTP]. [FTP Server] Enter the host name or IP address of FTP server. [User Name], [Password] Enter the user name and password required for the proxy server. Since the way FTP servers manage the upload...

Network Camera Operation Guide
Page 166
...[Mail Server Name] Enter the host name or IP address of the SMTP server. [Mail Server Port] Enter the port number for the SMTP server. [Sender (From)] Enter the e-mail address of the sender. [Recipient (To)] Enter the e-mail address of the recipient. [Authentication] Select an authentication method... server. [User Name], [Password], [POP Server] Enter the user name and password needed for authentication, and the POP server host name or IP address when e-mail authentication is set to a specified recipient when an event is triggered. After entering a password, first click [Exec], then click [...
...[Mail Server Name] Enter the host name or IP address of the SMTP server. [Mail Server Port] Enter the port number for the SMTP server. [Sender (From)] Enter the e-mail address of the sender. [Recipient (To)] Enter the e-mail address of the recipient. [Authentication] Select an authentication method... server. [User Name], [Password], [POP Server] Enter the user name and password needed for authentication, and the POP server host name or IP address when e-mail authentication is set to a specified recipient when an event is triggered. After entering a password, first click [Exec], then click [...

Network Camera Operation Guide
Page 210
...is used, video transmission performance drops. If you reboot the camera and cannot connect to [Manual] in a message. For IPv4 addresses, use addresses set the camera IP address manually. Click [OK] to the camera will be displayed. The following settings can be displayed in [Basic] > [Network] ...> [IPv4]. For IPv6 addresses, use addresses with [IPv4 Address Settings Method] set beforehand. Note If IPsec is changed and the camera may...
...is used, video transmission performance drops. If you reboot the camera and cannot connect to [Manual] in a message. For IPv4 addresses, use addresses set the camera IP address manually. Click [OK] to the camera will be displayed. The following settings can be displayed in [Basic] > [Network] ...> [IPv4]. For IPv6 addresses, use addresses with [IPv4 Address Settings Method] set beforehand. Note If IPsec is changed and the camera may...

Network Camera Operation Guide
Page 211
...SA encryption algorithm. If you select [ESP and AH], enter all setting items. [Security Gateway IPv4 Address], [Security Gateway IPv6 Address] Enter the IP address of the source. [IPsec Protocol] Select the IPsec protocol. The specified algorithm will be specified through ...Mode] Select the IPsec mode. [Destination IPv4 Address], [Destination IPv6 Address] Enter the IP address of the connection destination. [Source IPv4 Address], [Source IPv6 Address] Enter the IP address of the security gateway if [IPsec Mode] is set to 5 IP security can be checked for an applicable authentication ...
...SA encryption algorithm. If you select [ESP and AH], enter all setting items. [Security Gateway IPv4 Address], [Security Gateway IPv6 Address] Enter the IP address of the source. [IPsec Protocol] Select the IPsec protocol. The specified algorithm will be specified through ...Mode] Select the IPsec mode. [Destination IPv4 Address], [Destination IPv6 Address] Enter the IP address of the connection destination. [Source IPv4 Address], [Source IPv6 Address] Enter the IP address of the security gateway if [IPsec Mode] is set to 5 IP security can be checked for an applicable authentication ...

Network Camera Operation Guide
Page 212
If you select [ESP and AH], enter all setting items. [Security Gateway IPv4 Address], [Security Gateway IPv6 Address] Enter the IP address of 256 to 4294967295. 194 If the Setting in [IPsec Protocol] Includes "ESP" [SA ESP Encryption Algorithm]... respectively. IPv4, IPv6, or neither. [IPsec Mode] Select the IPsec mode. [Destination IPv4 Address], [Destination IPv6 Address] Enter the IP address of the connection destination. [Source IPv4 Address], [Source IPv6 Address] Enter the IP address of 256 to 4294967295. [SA ESP Encryption Key (inbound)] Enter the SA encryption key for ...
If you select [ESP and AH], enter all setting items. [Security Gateway IPv4 Address], [Security Gateway IPv6 Address] Enter the IP address of 256 to 4294967295. 194 If the Setting in [IPsec Protocol] Includes "ESP" [SA ESP Encryption Algorithm]... respectively. IPv4, IPv6, or neither. [IPsec Mode] Select the IPsec mode. [Destination IPv4 Address], [Destination IPv6 Address] Enter the IP address of the connection destination. [Source IPv4 Address], [Source IPv6 Address] Enter the IP address of 256 to 4294967295. [SA ESP Encryption Key (inbound)] Enter the SA encryption key for ...