

Instruction Manual
Page 6
...Introduction 2 Chapters 3 Nomenclature 6 Conventions Used in this Manual 10 1 Getting Started 11 Installing the Batteries 12 Attaching and Detaching the Transmitter 13 Turning on the Power 13 2 Wireless Flash Shooting: Radio Transmission 15 ' Wireless Flash Shooting 16 Wireless Settings 20 a: Fully ... q: Wireless Multiple Flash Shooting with Manual Flash Output 34 [: Shooting with a Different Flash Mode for Each Group 38 Clearing Transmitter Settings 40 Test Flash from a Slave Unit 40 Modeling Flash 41 Remote Release from a Slave Unit 42 Linked Shooting 43 3 Setting...
...Introduction 2 Chapters 3 Nomenclature 6 Conventions Used in this Manual 10 1 Getting Started 11 Installing the Batteries 12 Attaching and Detaching the Transmitter 13 Turning on the Power 13 2 Wireless Flash Shooting: Radio Transmission 15 ' Wireless Flash Shooting 16 Wireless Settings 20 a: Fully ... q: Wireless Multiple Flash Shooting with Manual Flash Output 34 [: Shooting with a Different Flash Mode for Each Group 38 Clearing Transmitter Settings 40 Test Flash from a Slave Unit 40 Modeling Flash 41 Remote Release from a Slave Unit 42 Linked Shooting 43 3 Setting...

Instruction Manual
Page 8
Nomenclature LCD panel Function button 2 Function button 1 Linked shooting button (p.44) Flash mode button (p.24, 34, 35, 38) Charge lamp/ Test flash button (p.13, 25, 56) Select/Set button Select dial Dust- and water-resistant adapter Radio transmission confirmation lamp (p.21, 23, 25, 30, 45) Function button 3 Function button 4 Battery compartment cover (p.12) Power switch (p.13) : Power on : Button/dial lock (Power on) : Power off Flash exposure confirmation lamp (p.25) Lock-release button (p.13) Mounting foot lock lever (p.13) 6
Nomenclature LCD panel Function button 2 Function button 1 Linked shooting button (p.44) Flash mode button (p.24, 34, 35, 38) Charge lamp/ Test flash button (p.13, 25, 56) Select/Set button Select dial Dust- and water-resistant adapter Radio transmission confirmation lamp (p.21, 23, 25, 30, 45) Function button 3 Function button 4 Battery compartment cover (p.12) Power switch (p.13) : Power on : Button/dial lock (Power on) : Power off Flash exposure confirmation lamp (p.25) Lock-release button (p.13) Mounting foot lock lever (p.13) 6
Instruction Manual
Page 12
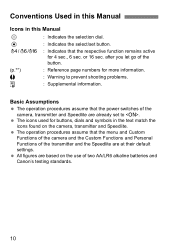
.... Basic Assumptions The operation procedures assume that the power switches of two AA/LR6 alkaline batteries and Canon's testing standards. 10 All figures are based on the camera, transmitter and Speedlite. The icons used for buttons, dials and symbols in this Manual Icons in the text match the... icons found on the use of the camera, transmitter and Speedlite are at their default settings. after you let go of the transmitter and the Speedlite are already set button. 3/1/2 : Indicates that the menu and Custom Functions of the ...
.... Basic Assumptions The operation procedures assume that the power switches of two AA/LR6 alkaline batteries and Canon's testing standards. 10 All figures are based on the camera, transmitter and Speedlite. The icons used for buttons, dials and symbols in this Manual Icons in the text match the... icons found on the use of the camera, transmitter and Speedlite are at their default settings. after you let go of the transmitter and the Speedlite are already set button. 3/1/2 : Indicates that the menu and Custom Functions of the ...

Instruction Manual
Page 14
... compartment cover and slide it clicks in " and open the battery compartment cover. 2 Install the batteries. The grooves on new AA/LR6 alkaline batteries and Canon's testing standards.
... compartment cover and slide it clicks in " and open the battery compartment cover. 2 Install the batteries. The grooves on new AA/LR6 alkaline batteries and Canon's testing standards.
Instruction Manual
Page 15
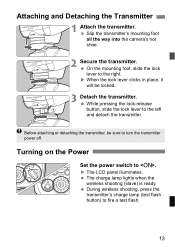
... (slave) is ready. During wireless shooting, press the transmitter's charge lamp (test flash button) to the left and detach the transmitter. Attaching and Detaching the Transmitter 1 Attach the transmitter. X When the lock lever clicks in place, it will be sure to turn the transmitter power off. Slip the transmitter's mounting foot all the way into the camera...
... (slave) is ready. During wireless shooting, press the transmitter's charge lamp (test flash button) to the left and detach the transmitter. Attaching and Detaching the Transmitter 1 Attach the transmitter. X When the lock lever clicks in place, it will be sure to turn the transmitter power off. Slip the transmitter's mounting foot all the way into the camera...
Instruction Manual
Page 16
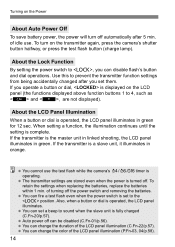
...functions displayed above function buttons 1 to the position. If you operate a button or dial, is displayed on the transmitter again, press the camera's shutter button halfway, or press the test flash button (charge lamp). About the Lock Function By setting the power switch to , you set a beep to ...the batteries. About the LCD Panel Illumination When a button or dial is turned off can fire a test flash even when the power switch is complete. Auto power off . If the transmitter is operating. You can disable flash's button and dial operations. Use this to sound when the slave...
...functions displayed above function buttons 1 to the position. If you operate a button or dial, is displayed on the transmitter again, press the camera's shutter button halfway, or press the test flash button (charge lamp). About the Lock Function By setting the power switch to , you set a beep to ...the batteries. About the LCD Panel Illumination When a button or dial is turned off can fire a test flash even when the power switch is complete. Auto power off . If the transmitter is operating. You can disable flash's button and dial operations. Use this to sound when the slave...
Instruction Manual
Page 18
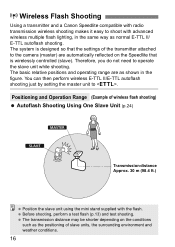
... unit using the mini stand supplied with advanced wireless multiple flash lighting, in the figure. ' Wireless Flash Shooting Using a transmitter and a Canon Speedlite compatible with radio transmission wireless shooting makes it easy to shoot with the flash. Therefore, you do not need to . ...The system is wirelessly controlled (slave). Before shooting, perform a test flash (p.13) and test shooting. The basic relative positions and...
... unit using the mini stand supplied with advanced wireless multiple flash lighting, in the figure. ' Wireless Flash Shooting Using a transmitter and a Canon Speedlite compatible with radio transmission wireless shooting makes it easy to shoot with the flash. Therefore, you do not need to . ...The system is wirelessly controlled (slave). Before shooting, perform a test flash (p.13) and test shooting. The basic relative positions and...

Instruction Manual
Page 27
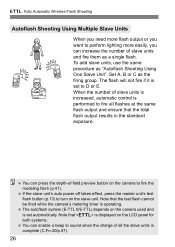
... the lamp is placed within the operation range. 7 Take the picture. When the recycling of the master unit and slave unit. Press the master unit's test flash button (charge lamp). X The slave unit flashes. X If a standard flash exposure was obtained, the flash exposure confirmation lamp lights for 3 sec. Set the camera...
... the lamp is placed within the operation range. 7 Take the picture. When the recycling of the master unit and slave unit. Press the master unit's test flash button (charge lamp). X The slave unit flashes. X If a standard flash exposure was obtained, the flash exposure confirmation lamp lights for 3 sec. Set the camera...
Instruction Manual
Page 28
... II/E-TTL) depends on the camera used and is set to D or E. If the slave unit's auto power off takes effect, press the master unit's test flash button (p.13) to turn on the LCD panel for both systems. You can enable a beep to sound when the charge of slave units is... flash (p.41). Note that is complete (C.Fn-20/p.57). 26 When the number of all flashes at the same flash output and ensure that the test flash cannot be fired while the camera's metering timer is set automatically. Note that the total flash output results in the standard exposure. You can...
... II/E-TTL) depends on the camera used and is set to D or E. If the slave unit's auto power off takes effect, press the master unit's test flash button (p.13) to turn on the LCD panel for both systems. You can enable a beep to sound when the charge of slave units is... flash (p.41). Note that is complete (C.Fn-20/p.57). 26 When the number of all flashes at the same flash output and ensure that the test flash cannot be fired while the camera's metering timer is set automatically. Note that the total flash output results in the standard exposure. You can...
Instruction Manual
Page 42
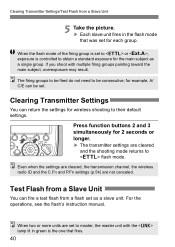
... group is set to or , exposure is the one that was set for 2 seconds or longer. X The transmitter settings are not canceled. Clearing Transmitter Settings/Test Flash from a flash set as a single group. For the operations, see the flash's instruction manual. for wireless... shooting to flash mode. Clearing Transmitter Settings You can fire a test flash from a Slave Unit 5 Take the picture. Even when the settings are cleared, the transmission channel, the wireless radio...
... group is set to or , exposure is the one that was set for 2 seconds or longer. X The transmitter settings are not canceled. Clearing Transmitter Settings/Test Flash from a flash set as a single group. For the operations, see the flash's instruction manual. for wireless... shooting to flash mode. Clearing Transmitter Settings You can fire a test flash from a Slave Unit 5 Take the picture. Even when the settings are cleared, the transmission channel, the wireless radio...
Instruction Manual
Page 43
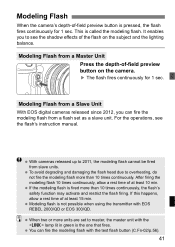
This is not possible when using the transmitter with EOS REBEL 2000/QD or EOS 300/QD. Modeling flash is called the modeling flash. X The flash fires continuously for 1 sec. For the operations, ... and the lighting balance. When two or more units are set as a slave unit. With cameras released up to master, the master unit with the test flash button (C.Fn-02/p.56). 41 To avoid degrading and damaging the flash head due to see the flash's instruction manual. It enables you can...
This is not possible when using the transmitter with EOS REBEL 2000/QD or EOS 300/QD. Modeling flash is called the modeling flash. X The flash fires continuously for 1 sec. For the operations, ... and the lighting balance. When two or more units are set as a slave unit. With cameras released up to master, the master unit with the test flash button (C.Fn-02/p.56). 41 To avoid degrading and damaging the flash head due to see the flash's instruction manual. It enables you can...

Instruction Manual
Page 57
...Custom Functions C.Fn-01 # Auto power off C.Fn-02 $ Modeling flash C.Fn-03 ( FEB auto cancel C.Fn-04 ) FEB sequence C.Fn-07 , Test firing with the operation on the Custom Function screen, the Custom Functions which have been set them with autoflash C.Fn-13 6 Flash exposure metering setting... function button 2 and then function button 1 are pressed on page 54. When you set the transmitter Custom Function from the camera's menu screen (p.52). 55 You can set and clear all transmitter Custom Functions from the camera's menu screen and C.Fn-20 and 22 are not displayed, set ...
...Custom Functions C.Fn-01 # Auto power off C.Fn-02 $ Modeling flash C.Fn-03 ( FEB auto cancel C.Fn-04 ) FEB sequence C.Fn-07 , Test firing with the operation on the Custom Function screen, the Custom Functions which have been set them with autoflash C.Fn-13 6 Flash exposure metering setting... function button 2 and then function button 1 are pressed on page 54. When you set the transmitter Custom Function from the camera's menu screen (p.52). 55 You can set and clear all transmitter Custom Functions from the camera's menu screen and C.Fn-20 and 22 are not displayed, set ...

Instruction Manual
Page 58
... (FEB auto cancel) You can change the order of -field preview button or the transmitter's test flash button to save energy. C: Setting Custom Functions C.Fn-01: # (Auto power off) When the transmitter is not operated for 5 min., the power turns off automatically to fire the modeling flash... 0: % (Enabled (Depth-of-field preview button)) Press the camera's depth-of-field preview button to fire the modeling flash. 1: & (Enabled (Test firing button)) Press the transmitter's test flash button to fire the modeling flash. 2: ' (Enabled (with FEB. 0: ON (Enabled) 1: OFF (Disabled) C.Fn-04: ) (FEB ...
... (FEB auto cancel) You can change the order of -field preview button or the transmitter's test flash button to save energy. C: Setting Custom Functions C.Fn-01: # (Auto power off) When the transmitter is not operated for 5 min., the power turns off automatically to fire the modeling flash... 0: % (Enabled (Depth-of-field preview button)) Press the camera's depth-of-field preview button to fire the modeling flash. 1: & (Enabled (Test firing button)) Press the transmitter's test flash button to fire the modeling flash. 2: ' (Enabled (with FEB. 0: ON (Enabled) 1: OFF (Disabled) C.Fn-04: ) (FEB ...

Instruction Manual
Page 59
C: Setting Custom Functions C.Fn-07: , (Test firing with autoflash) You can change this illumination setting. 0: 12sec (On for 12 sec.) 1: OFF (Disable panel illumination) 2: ON (Illumination always on) 57 C.Fn-20: 7 (... directly turning , without pressing the button. You can change the flash output when firing the test flash in E-TTL II/E-TTL autoflash mode. 0: 1/32 (1/32) 1: 1/1 (Full output) C.Fn-13: 6 (Flash exposure metering setting) 0: 4 (Speedlite button and dial) 1: 5 (Speedlite dial only) You can enable a beep to sound when the slave units are fully charged...
C: Setting Custom Functions C.Fn-07: , (Test firing with autoflash) You can change this illumination setting. 0: 12sec (On for 12 sec.) 1: OFF (Disable panel illumination) 2: ON (Illumination always on) 57 C.Fn-20: 7 (... directly turning , without pressing the button. You can change the flash output when firing the test flash in E-TTL II/E-TTL autoflash mode. 0: 1/32 (1/32) 1: 1/1 (Full output) C.Fn-13: 6 (Flash exposure metering setting) 0: 4 (Speedlite button and dial) 1: 5 (Speedlite dial only) You can enable a beep to sound when the slave units are fully charged...
Instruction Manual
Page 63
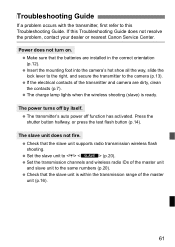
...slave unit does not fire. Check that the batteries are dirty, clean the contacts (p.7). The transmitter's auto power off by itself. Make sure that the slave unit supports radio transmission wireless flash ... hot shoe all the way, slide the lock lever to the right, and secure the transmitter to Set the slave unit to the camera (p.13). Power does not turn on. The ...) is ready. Press the shutter button halfway, or press the test flash button (p.14). Troubleshooting Guide If a problem occurs with the transmitter, first refer to this Troubleshooting Guide does not resolve the problem...
...slave unit does not fire. Check that the batteries are dirty, clean the contacts (p.7). The transmitter's auto power off by itself. Make sure that the slave unit supports radio transmission wireless flash ... hot shoe all the way, slide the lock lever to the right, and secure the transmitter to Set the slave unit to the camera (p.13). Power does not turn on. The ...) is ready. Press the shutter button halfway, or press the test flash button (p.14). Troubleshooting Guide If a problem occurs with the transmitter, first refer to this Troubleshooting Guide does not resolve the problem...

Instruction Manual
Page 67
.../LR6 alkaline batteries Power off after 5 min. and water-resistant adapter) Weight: Approx. 110 g / 3.9 oz. (transmitter only, excluding batteries) All specifications above are subject to change without notice. 65 Product specifications and external appearance are based on Canon's testing standards. of idle operation Dimensions and Weight Dimensions: Approx. 67.4 (W) x 61.5 (H) x 77.4 (D) mm / 2.7 x 2.4 x 3.0 in...
.../LR6 alkaline batteries Power off after 5 min. and water-resistant adapter) Weight: Approx. 110 g / 3.9 oz. (transmitter only, excluding batteries) All specifications above are subject to change without notice. 65 Product specifications and external appearance are based on Canon's testing standards. of idle operation Dimensions and Weight Dimensions: Approx. 67.4 (W) x 61.5 (H) x 77.4 (D) mm / 2.7 x 2.4 x 3.0 in...

Instruction Manual
Page 73
Shutter speed 19 Shutter sync 50 Slave group control 33 Slave unit setting 20 Stroboscopic flash 35 T Test flash 13, 25, 40 Transmission channel ..... 20, 21, 22 Type-A camera 2 W Wireless flash shooting 16 Fully automatic one slave unit 24 Fully automatic three groups (A:B C 32 Fully automatic two groups (A:B 31 Group firing 38 Manual flash 34 Wireless flash shooting time ....... 12 Wireless multiple flash shooting 17, 31, 34 Wireless radio ID 20, 21 Wireless settings 20 Index 71
Shutter speed 19 Shutter sync 50 Slave group control 33 Slave unit setting 20 Stroboscopic flash 35 T Test flash 13, 25, 40 Transmission channel ..... 20, 21, 22 Type-A camera 2 W Wireless flash shooting 16 Fully automatic one slave unit 24 Fully automatic three groups (A:B C 32 Fully automatic two groups (A:B 31 Group firing 38 Manual flash 34 Wireless flash shooting time ....... 12 Wireless multiple flash shooting 17, 31, 34 Wireless radio ID 20, 21 Wireless settings 20 Index 71