Instruction Manual
Page 4
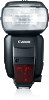
... (normal shooting), and as a master unit or slave unit during wireless shooting. Using the Speedlite with a Camera Using with TTL autoflash system (Type-B camera), see page 116. * This instruction manual assumes that uses either radio transmission or optical transmission. Introduction The Canon Speedlite 600EX-RT/600EX is a high-output, multi-feature flash unit for easy autoflash shooting in the...
... (normal shooting), and as a master unit or slave unit during wireless shooting. Using the Speedlite with a Camera Using with TTL autoflash system (Type-B camera), see page 116. * This instruction manual assumes that uses either radio transmission or optical transmission. Introduction The Canon Speedlite 600EX-RT/600EX is a high-output, multi-feature flash unit for easy autoflash shooting in the...
Instruction Manual
Page 5
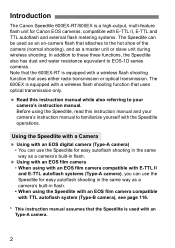
... camera When using a Speedlite 600EX, which does not have a radio transmission function, wireless shooting described in Chapter 4 is not available. Chapters Introduction 2 1 Getting Started and Basic Operations 13 Flash preparations and basic flash shooting 2 Advanced Flash Shooting 21 Advanced shooting using the flash shooting...Flash Shooting: Optical Transmission 75 Wireless flash shooting with optical transmission 6 Customizing the Speedlite 91 Customizing with Custom Functions and Personal Functions 7 Reference 103 System map, FAQ, use with wireless flash, see Chapter 5. 3
... camera When using a Speedlite 600EX, which does not have a radio transmission function, wireless shooting described in Chapter 4 is not available. Chapters Introduction 2 1 Getting Started and Basic Operations 13 Flash preparations and basic flash shooting 2 Advanced Flash Shooting 21 Advanced shooting using the flash shooting...Flash Shooting: Optical Transmission 75 Wireless flash shooting with optical transmission 6 Customizing the Speedlite 91 Customizing with Custom Functions and Personal Functions 7 Reference 103 System map, FAQ, use with wireless flash, see Chapter 5. 3

Instruction Manual
Page 6
...Basic Operations 13 Installing the Batteries 14 Attaching and Detaching the Flash 15 Turning on the Power 16 Fully Automatic Flash Shooting 18 Using E-TTL II and E-TTL Autoflash in the Shooting Modes 19 2 Advanced Flash Shooting 21 f Flash Exposure Compensation 22 g ...Bounce ...27 e: Flash Coverage Setting 29 q: Manual Flash 31 ?: Stroboscopic Flash 33 //.: Flash External Metering 36 Modeling Flash 38 Clearing Speedlite Settings 38 o Color Filter 39 3 Setting Flash Functions with Camera Operations 41 Flash Control from Camera's Menu Screen 42 4 Wireless Flash ...
...Basic Operations 13 Installing the Batteries 14 Attaching and Detaching the Flash 15 Turning on the Power 16 Fully Automatic Flash Shooting 18 Using E-TTL II and E-TTL Autoflash in the Shooting Modes 19 2 Advanced Flash Shooting 21 f Flash Exposure Compensation 22 g ...Bounce ...27 e: Flash Coverage Setting 29 q: Manual Flash 31 ?: Stroboscopic Flash 33 //.: Flash External Metering 36 Modeling Flash 38 Clearing Speedlite Settings 38 o Color Filter 39 3 Setting Flash Functions with Camera Operations 41 Flash Control from Camera's Menu Screen 42 4 Wireless Flash ...
Instruction Manual
Page 7
... 88 Manual Flash/Stroboscopic Flash Setting on a Slave Unit 89 6 Customizing the Speedlite 91 C / >: Setting Custom and Personal Functions 92 C: Setting Custom Functions 95 >: Setting Personal Functions 101 7 Reference 103 600EX-RT/600EX System 104 Flash Firing Restriction due to Temperature Increase 106 Troubleshooting Guide 107 Specifications 112 Using with a Type-B Camera 116 Index ...120 5
... 88 Manual Flash/Stroboscopic Flash Setting on a Slave Unit 89 6 Customizing the Speedlite 91 C / >: Setting Custom and Personal Functions 92 C: Setting Custom Functions 95 >: Setting Personal Functions 101 7 Reference 103 600EX-RT/600EX System 104 Flash Firing Restriction due to Temperature Increase 106 Troubleshooting Guide 107 Specifications 112 Using with a Type-B Camera 116 Index ...120 5

Instruction Manual
Page 10
...) a : E-TTL II/E-TTL autoflash b : TTL autoflash j : Standard k : Guide number priority (p.100) l : Even coverage (p.100) m : Bounce (p.27) n : 7° down bounce (p.29) o : Color filter holder attached (p.39) l : Use of commercially-available color filters warning (p.40) t : Temperature increase (flash restriction/p.106) f : Flash exposure compensation (p.22, 44) Flash exposure compensation amount Flash exposure level Focal...
...) a : E-TTL II/E-TTL autoflash b : TTL autoflash j : Standard k : Guide number priority (p.100) l : Even coverage (p.100) m : Bounce (p.27) n : 7° down bounce (p.29) o : Color filter holder attached (p.39) l : Use of commercially-available color filters warning (p.40) t : Temperature increase (flash restriction/p.106) f : Flash exposure compensation (p.22, 44) Flash exposure compensation amount Flash exposure level Focal...
Instruction Manual
Page 14
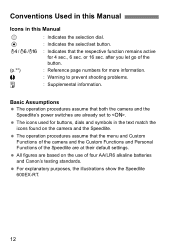
... already set to prevent shooting problems. : Supplemental information. For explanatory purposes, the illustrations show the Speedlite 600EX-RT. 12 The icons used for more information. : Warning to . after you let go of four AA/LR6 alkaline batteries and Canon's testing standards. All figures are at their default settings. or 16 sec. The operation procedures assume...
... already set to prevent shooting problems. : Supplemental information. For explanatory purposes, the illustrations show the Speedlite 600EX-RT. 12 The icons used for more information. : Warning to . after you let go of four AA/LR6 alkaline batteries and Canon's testing standards. All figures are at their default settings. or 16 sec. The operation procedures assume...
Instruction Manual
Page 16
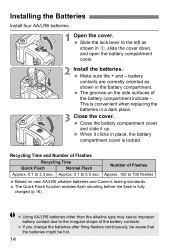
...slide it clicks in a dark place. 3 Close the cover. Make sure the + and - The grooves on new AA/LR6 alkaline batteries and Canon's testing standards. If you change the batteries after firing flashes continuously, be aware that the batteries might be hot. 14 Approx. 0.1 to 700 ...-. Number of the battery contacts. This is convenient when replacing the batteries in place, the battery compartment cover is fully charged (p.16). Using AA/LR6 batteries other than the alkaline type may cause improper battery contact due to 3.3 sec. Recycling Time and Number of Flashes Recycling ...
...slide it clicks in a dark place. 3 Close the cover. Make sure the + and - The grooves on new AA/LR6 alkaline batteries and Canon's testing standards. If you change the batteries after firing flashes continuously, be aware that the batteries might be hot. 14 Approx. 0.1 to 700 ...-. Number of the battery contacts. This is convenient when replacing the batteries in place, the battery compartment cover is fully charged (p.16). Using AA/LR6 batteries other than the alkaline type may cause improper battery contact due to 3.3 sec. Recycling Time and Number of Flashes Recycling ...

Instruction Manual
Page 17
.... When replacing the batteries, replace all the way into the camera's hot shoe. 2 Secure the Speedlite. X When the lock lever clicks in place, it will be used. Before attaching or detaching the Speedlite, be sure to the right. Attaching and Detaching the Flash When is displayed, replace the batteries with... new ones. Use a new set of four batteries of the same brand. On the mounting foot, slide the lock lever to turn off the Speedlite. 15 While pressing the lock-release button, slide the lock lever to the ...
.... When replacing the batteries, replace all the way into the camera's hot shoe. 2 Secure the Speedlite. X When the lock lever clicks in place, it will be used. Before attaching or detaching the Speedlite, be sure to the right. Attaching and Detaching the Flash When is displayed, replace the batteries with... new ones. Use a new set of four batteries of the same brand. On the mounting foot, slide the lock lever to turn off the Speedlite. 15 While pressing the lock-release button, slide the lock lever to the ...
Instruction Manual
Page 18
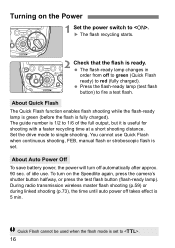
...power, the power will turn on the Power 1 Set the power switch to red (fully charged). Quick Flash cannot be used when the flash mode is 1/2 to . 16 Turning on the Speedlite again, press the camera's shutter button halfway, or press the test flash button (flash-ready lamp). The flash-ready ...lamp changes in order from off to green (Quick Flash ready) to . Set the drive mode to fire a test flash. You cannot use . To turn off takes...
...power, the power will turn on the Power 1 Set the power switch to red (fully charged). Quick Flash cannot be used when the flash mode is 1/2 to . 16 Turning on the Speedlite again, press the camera's shutter button halfway, or press the test flash button (flash-ready lamp). The flash-ready ...lamp changes in order from off to green (Quick Flash ready) to . Set the drive mode to fire a test flash. You cannot use . To turn off takes...
Instruction Manual
Page 19
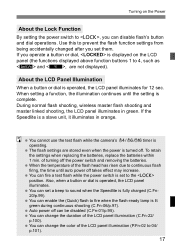
...time until the setting is fully charged (C.Fn20/p.99). You can fire a test flash while the power switch is set to sound when the Speedlite is complete. You can change the color of the flash head has risen due to 04/ p.101). 17 About the LCD Panel Illumination When ... shooting (C.Fn-06/p.97). Also, when a button or dial is a slave unit, it illuminates in green. Use this to , you can disable flash's button and dial operations. If the Speedlite is operated, the LCD panel illuminates. Auto power off . During normal flash shooting, wireless master flash shooting and ...
...time until the setting is fully charged (C.Fn20/p.99). You can fire a test flash while the power switch is set to sound when the Speedlite is complete. You can change the color of the flash head has risen due to 04/ p.101). 17 About the LCD Panel Illumination When ... shooting (C.Fn-06/p.97). Also, when a button or dial is a slave unit, it illuminates in green. Use this to , you can disable flash's button and dial operations. If the Speedlite is operated, the LCD panel illuminates. Auto power off . During normal flash shooting, wireless master flash shooting and ...
Instruction Manual
Page 20
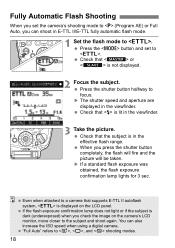
... shoot again. Press the button and set the camera's shooting mode to (Program AE) or Full Auto, you can also increase the ISO speed when using a digital camera. Press the shutter button halfway to . Even when attached to , , and shooting modes. 18 When you check the image on the LCD panel...
... shoot again. Press the button and set the camera's shooting mode to (Program AE) or Full Auto, you can also increase the ISO speed when using a digital camera. Press the shutter button halfway to . Even when attached to , , and shooting modes. 18 When you check the image on the LCD panel...

Instruction Manual
Page 21
... want to set . If the shutter speed display blinks, it means that the background exposure will be underexposed or overexposed. Flash Sync Speeds and Apertures Used Shutter Speed V Set automatically (1/X sec. - 1/60 sec.) X Set manually (1/X sec. - 30 sec.) W Set automatically (1/X sec. - 30 sec.) q Set ... of both the shutter speed and aperture manually. Aperture Automatic Automatic Manual Manual 19 Since a slow shutter speed will be used to set the shutter speed manually. Adjust the aperture until the aperture display stops blinking. Select this mode if you set...
... want to set . If the shutter speed display blinks, it means that the background exposure will be underexposed or overexposed. Flash Sync Speeds and Apertures Used Shutter Speed V Set automatically (1/X sec. - 1/60 sec.) X Set manually (1/X sec. - 30 sec.) W Set automatically (1/X sec. - 30 sec.) q Set ... of both the shutter speed and aperture manually. Aperture Automatic Automatic Manual Manual 19 Since a slow shutter speed will be used to set the shutter speed manually. Adjust the aperture until the aperture display stops blinking. Select this mode if you set...
Instruction Manual
Page 22
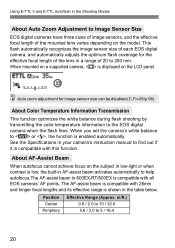
... subject in low-light or when contrast is low, the built-in AF-assist beam activates automatically to help autofocus.The AF-assist beam in 600EX-RT/600EX is compatible with 28mm and longer focal lengths and its effective range is shown in the Shooting Modes About Auto Zoom Adjustment to Image Sensor... when the flash fires. When you set the camera's white balance to find out if it is enabled automatically. Position Center Periphery Effective Range (Approx. Using E-TTL II and E-TTL Autoflash in the table below. About AF-Assist Beam When autofocus cannot achieve focus on the LCD panel.
... subject in low-light or when contrast is low, the built-in AF-assist beam activates automatically to help autofocus.The AF-assist beam in 600EX-RT/600EX is compatible with 28mm and longer focal lengths and its effective range is shown in the Shooting Modes About Auto Zoom Adjustment to Image Sensor... when the flash fires. When you set the camera's white balance to find out if it is enabled automatically. Position Center Periphery Effective Range (Approx. Using E-TTL II and E-TTL Autoflash in the table below. About AF-Assist Beam When autofocus cannot achieve focus on the LCD panel.

Instruction Manual
Page 23
Set the camera's shooting mode to V/X/W/q5 / (Creative Zone mode) to a fully automatic mode or an Image Zone mode, the operations other than "Bounce" (p.27, 29), "Wide Panel" (p.30) and "Color Filters" (p.39) in this chapter are not available. When the camera's shooting mode is set to enable all the operations in this chapter. 21 2 Advanced Flash Shooting This chapter describes advanced shooting operations using the flash functions.
Set the camera's shooting mode to V/X/W/q5 / (Creative Zone mode) to a fully automatic mode or an Image Zone mode, the operations other than "Bounce" (p.27, 29), "Wide Panel" (p.30) and "Color Filters" (p.39) in this chapter are not available. When the camera's shooting mode is set to enable all the operations in this chapter. 21 2 Advanced Flash Shooting This chapter describes advanced shooting operations using the flash functions.
Instruction Manual
Page 25
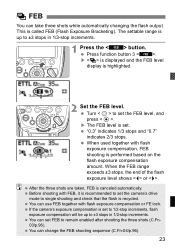
...amount. X is displayed and the FEB level display is called FEB (Flash Exposure Bracketing). "0.3" indicates 1/3 stops and "0.7" indicates 2/3 stops. When used together with flash exposure compensation or FE lock. When the FEB range exceeds ±3 stops, the end of the flash exposure level shows or ... camera's drive mode to ±3 stops in 1/2-stop increments. 1 Press the button. Turn to set FEB to set . You can use FEB together with flash exposure compensation, FEB shooting is recycled. You can take three shots while automatically changing the flash output. X The FEB...
...amount. X is displayed and the FEB level display is called FEB (Flash Exposure Bracketing). "0.3" indicates 1/3 stops and "0.7" indicates 2/3 stops. When used together with flash exposure compensation or FE lock. When the FEB range exceeds ±3 stops, the end of the flash exposure level shows or ... camera's drive mode to ±3 stops in 1/2-stop increments. 1 Press the button. Turn to set FEB to set . You can use FEB together with flash exposure compensation, FEB shooting is recycled. You can take three shots while automatically changing the flash output. X The FEB...
Instruction Manual
Page 26
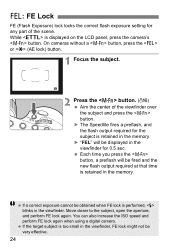
If a correct exposure cannot be very effective. 24 X The Speedlite fires a preflash, and the flash output required for 0.5 sec. Move closer to the subject, open the aperture, and perform FE lock again. If the target .... 1 Focus the subject. 2 Press the button. (2) Aim the center of the scene. You can also increase the ISO speed and perform FE lock again when using a digital camera. 7: FE Lock FE (Flash Exposure) lock locks the correct flash exposure setting for any part of the viewfinder over the subject and press...
If a correct exposure cannot be very effective. 24 X The Speedlite fires a preflash, and the flash output required for 0.5 sec. Move closer to the subject, open the aperture, and perform FE lock again. If the target .... 1 Focus the subject. 2 Press the button. (2) Aim the center of the scene. You can also increase the ISO speed and perform FE lock again when using a digital camera. 7: FE Lock FE (Flash Exposure) lock locks the correct flash exposure setting for any part of the viewfinder over the subject and press...
Instruction Manual
Page 27
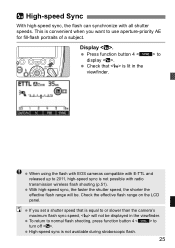
This is convenient when you set a shutter speed that is equal to turn off . Check the effective flash range on the LCD panel. When using the flash with EOS cameras compatible with all shutter speeds. To return to normal flash shooting, press function button 4 to or slower than the camera's ... will not be . Press function button 4 to display . c High-speed Sync With high-speed sync, the flash can synchronize with E-TTL and released up to use aperture-priority AE for fill-flash portraits of a subject.
This is convenient when you set a shutter speed that is equal to turn off . Check the effective flash range on the LCD panel. When using the flash with EOS cameras compatible with all shutter speeds. To return to normal flash shooting, press function button 4 to or slower than the camera's ... will not be . Press function button 4 to display . c High-speed Sync With high-speed sync, the flash can synchronize with E-TTL and released up to use aperture-priority AE for fill-flash portraits of a subject.
Instruction Manual
Page 29
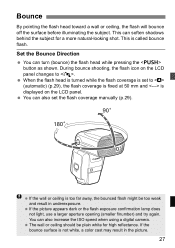
... fixed at 50 mm and is displayed on the LCD panel. If the picture appears dark or the flash exposure confirmation lamp does not light, use a larger aperture opening (smaller f/number) and try again. The wall or ceiling should be too weak and result in the picture. 27 Bounce By pointing.... You can turn (bounce) the flash head while pressing the button as shown. Set the Bounce Direction You can also increase the ISO speed when using a digital camera. If the wall or ceiling is called bounce flash.
... fixed at 50 mm and is displayed on the LCD panel. If the picture appears dark or the flash exposure confirmation lamp does not light, use a larger aperture opening (smaller f/number) and try again. The wall or ceiling should be too weak and result in the picture. 27 Bounce By pointing.... You can turn (bounce) the flash head while pressing the button as shown. Set the Bounce Direction You can also increase the ISO speed when using a digital camera. If the wall or ceiling is called bounce flash.
Instruction Manual
Page 30
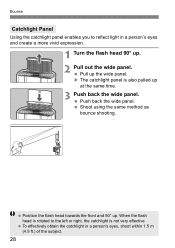
... in a person's eyes and create a more vivid expression. 1 Turn the flash head 90° up at the same time. 3 Push back the wide panel. Shoot using the same method as bounce shooting. When the flash head is rotated to reflect light in a person's eyes, shoot within 1.5 m (4.9 ft.) of the subject. 28... not very effective. Position the flash head towards the front and 90° up the wide panel. Push back the wide panel. Bounce Catchlight Panel Using the catchlight panel enables you to the left or right, the catchlight is also pulled up . 2 Pull out the wide panel.
... in a person's eyes and create a more vivid expression. 1 Turn the flash head 90° up at the same time. 3 Push back the wide panel. Shoot using the same method as bounce shooting. When the flash head is rotated to reflect light in a person's eyes, shoot within 1.5 m (4.9 ft.) of the subject. 28... not very effective. Position the flash head towards the front and 90° up the wide panel. Push back the wide panel. Bounce Catchlight Panel Using the catchlight panel enables you to the left or right, the catchlight is also pulled up . 2 Pull out the wide panel.
Instruction Manual
Page 32
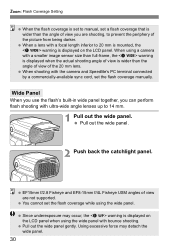
...camera and Speedlite's PC terminal connected by a commercially-available sync cord, set the flash coverage while using the wide panel with ultra-wide angle lenses up to 14 mm. 1 Pull out the wide panel. EF15mm f/2.8 Fisheye and EF8-15mm f/4L Fisheye USM angles of the 20 mm lens. Using excessive ... the LCD panel. Pull out the wide panel. 2 Push back the catchlight panel. Wide Panel When you use the flash's built-in wide panel together, you are not supported. When using a camera with a focal length inferior to prevent the periphery of view is displayed on the LCD panel when...
...camera and Speedlite's PC terminal connected by a commercially-available sync cord, set the flash coverage while using the wide panel with ultra-wide angle lenses up to 14 mm. 1 Pull out the wide panel. EF15mm f/2.8 Fisheye and EF8-15mm f/4L Fisheye USM angles of the 20 mm lens. Using excessive ... the LCD panel. Pull out the wide panel. 2 Push back the catchlight panel. Wide Panel When you use the flash's built-in wide panel together, you are not supported. When using a camera with a focal length inferior to prevent the periphery of view is displayed on the LCD panel when...

