
SELPHY CP600 User Guide
Page 53
3 Click the Application Software [Install] button and click [Next]. Installer Panel 4 Select [Easy Installation] as the setup type and click [Next]. • Select [Custom Installation] to select programs for individual installation. 5 Click [Yes] if you consent to all the conditions of the software license agreement. 6 Review the installation settings and click [Next]. • Follow the screen messages to proceed. 7 When a dialog box appears instructing that the installation is complete, select [Yes, I want to restart my computer now.] and click [Finish]. 51
3 Click the Application Software [Install] button and click [Next]. Installer Panel 4 Select [Easy Installation] as the setup type and click [Next]. • Select [Custom Installation] to select programs for individual installation. 5 Click [Yes] if you consent to all the conditions of the software license agreement. 6 Review the installation settings and click [Next]. • Follow the screen messages to proceed. 7 When a dialog box appears instructing that the installation is complete, select [Yes, I want to restart my computer now.] and click [Finish]. 51
SELPHY CP600 User Guide
Page 57
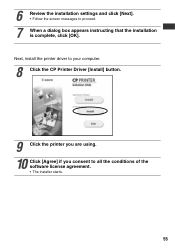
6 Review the installation settings and click [Next]. • Follow the screen messages to all the conditions of the software license agreement. • The installer starts. 55 Next, install the printer driver to your computer. 8 Click the CP Printer Driver [Install] button. 9 Click the printer you are using. 10 Click [Agree] if you consent to proceed. 7 When a dialog box appears instructing that the installation is complete, click [OK].
6 Review the installation settings and click [Next]. • Follow the screen messages to all the conditions of the software license agreement. • The installer starts. 55 Next, install the printer driver to your computer. 8 Click the CP Printer Driver [Install] button. 9 Click the printer you are using. 10 Click [Agree] if you consent to proceed. 7 When a dialog box appears instructing that the installation is complete, click [OK].