
ImageBrowser 6.5 for Macintosh Instruction Manual
Page 3
... awaken properly if you cannot use an AC adapter (sold separately) when connecting to use an AC adapter. • See the Camera User Guide for instructions regarding the sleep (standby) mode. • Do not disconnect the camera from the computer and try reconnecting the camera. • Do not connect two or...
... awaken properly if you cannot use an AC adapter (sold separately) when connecting to use an AC adapter. • See the Camera User Guide for instructions regarding the sleep (standby) mode. • Do not disconnect the camera from the computer and try reconnecting the camera. • Do not connect two or...
ImageBrowser 6.5 for Macintosh Instruction Manual
Page 8
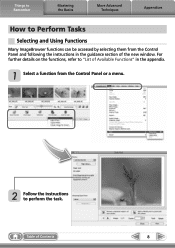
Table of the new window. For further details on the functions, refer to perform the task. Things to Remember Mastering the Basics More Advanced Techniques Appendices How to Perform Tasks Selecting and Using Functions Many ImageBrowser functions can be accessed by selecting them from the Control Panel or a menu. 2 Follow the instructions to "List of Available Functions" in the appendix. 1 Select a function from the Control Panel and following the instructions in the guidance section of Contents 8
Table of the new window. For further details on the functions, refer to perform the task. Things to Remember Mastering the Basics More Advanced Techniques Appendices How to Perform Tasks Selecting and Using Functions Many ImageBrowser functions can be accessed by selecting them from the Control Panel or a menu. 2 Follow the instructions to "List of Available Functions" in the appendix. 1 Select a function from the Control Panel and following the instructions in the guidance section of Contents 8
ImageBrowser 6.5 for Macintosh Instruction Manual
Page 9
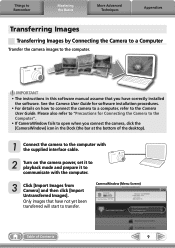
.... Only images that you connect the camera, click the [CameraWindow] icon in this software manual assume that have correctly installed the software. IMPORTANT • The instructions in the Dock (the bar at the bottom of Contents 9 CameraWindow (Menu Screen) Table of the desktop). 1 Connect the camera to the computer with the...
.... Only images that you connect the camera, click the [CameraWindow] icon in this software manual assume that have correctly installed the software. IMPORTANT • The instructions in the Dock (the bar at the bottom of Contents 9 CameraWindow (Menu Screen) Table of the desktop). 1 Connect the camera to the computer with the...
ZoomBrowser EX 6.5 for Windows Instruction Manual
Page 3
... cable. Please refer to your computer manual for procedures on connecting the camera to use an AC adapter. • See the Camera User Guide for instructions regarding the sleep (standby) mode. • Do not disconnect the camera from the computer and try reconnecting the camera. • Do not connect two or...
... cable. Please refer to your computer manual for procedures on connecting the camera to use an AC adapter. • See the Camera User Guide for instructions regarding the sleep (standby) mode. • Do not disconnect the camera from the computer and try reconnecting the camera. • Do not connect two or...
ZoomBrowser EX 6.5 for Windows Instruction Manual
Page 8
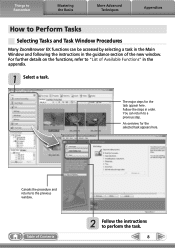
Cancels the procedure and returns to perform the task. 8 The major steps for the selected task appears here. Table of Contents 2 Follow the instructions to the previous window. For further details on the functions, refer to "List of the new window. You can be accessed by selecting a ...task in the Main Window and following the instructions in the guidance section of Available Functions" in order. An overview for the task appear here. Things to Remember Mastering the Basics More Advanced ...
Cancels the procedure and returns to perform the task. 8 The major steps for the selected task appears here. Table of Contents 2 Follow the instructions to the previous window. For further details on the functions, refer to "List of the new window. You can be accessed by selecting a ...task in the Main Window and following the instructions in the guidance section of Available Functions" in order. An overview for the task appear here. Things to Remember Mastering the Basics More Advanced ...

ZoomBrowser EX 6.5 for Windows Instruction Manual
Page 9
...screen that you have correctly installed the software. For Windows 7, use the following steps to the computer. With Windows XP, click [Canon CameraWindow] then [OK] in this case, double-click the ZoomBrowser EX icon on the task bar. 2. Things to Remember Mastering the... that appears, click the link to the one at the right appears, click [Downloads Images From Canon Camera using Canon CameraWindow], then click [OK]. 4. IMPORTANT • The instructions in the AutoPlay window. Please also refer to "Precautions for software installation procedures. • For ...
...screen that you have correctly installed the software. For Windows 7, use the following steps to the computer. With Windows XP, click [Canon CameraWindow] then [OK] in this case, double-click the ZoomBrowser EX icon on the task bar. 2. Things to Remember Mastering the... that appears, click the link to the one at the right appears, click [Downloads Images From Canon Camera using Canon CameraWindow], then click [OK]. 4. IMPORTANT • The instructions in the AutoPlay window. Please also refer to "Precautions for software installation procedures. • For ...

SELPHY CP600 User Guide
Page 6
Printing Procedure and Reference Guides Connecting a camera to the printer and printing/Printing from a mobile phone Preparing Connecting a Camera Reference Guides User Guide (This Guide) p. 23 Communicating with the mobile phone Basic operations Detailed instructions User Guide (This Guide) p. 29, 32 Direct Print User Guide* Connecting the printer to a computer and printing Preparing Installing the Software Connecting Reference Guides 4 User Guide (This Guide) p. 46
Printing Procedure and Reference Guides Connecting a camera to the printer and printing/Printing from a mobile phone Preparing Connecting a Camera Reference Guides User Guide (This Guide) p. 23 Communicating with the mobile phone Basic operations Detailed instructions User Guide (This Guide) p. 29, 32 Direct Print User Guide* Connecting the printer to a computer and printing Preparing Installing the Software Connecting Reference Guides 4 User Guide (This Guide) p. 46
SELPHY CP600 User Guide
Page 10
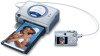
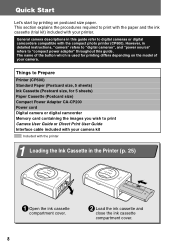
However, in detailed instructions, "camera" refers to "digital cameras", and "power source" refers to "compact power adapter" throughout this guide refer to digital cameras or digital camcorders compatible with the compact photo printer (CP600). General camera descriptions in this guide. Things to Prepare Printer (CP600) Standard Paper (Postcard size, 5 sheets) Ink Cassette (Postcard size...
However, in detailed instructions, "camera" refers to "digital cameras", and "power source" refers to "compact power adapter" throughout this guide refer to digital cameras or digital camcorders compatible with the compact photo printer (CP600). General camera descriptions in this guide. Things to Prepare Printer (CP600) Standard Paper (Postcard size, 5 sheets) Ink Cassette (Postcard size...
SELPHY CP600 User Guide
Page 13
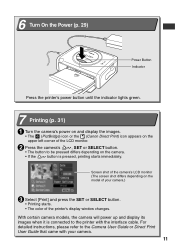
For detailed instructions, please refer to the printer with your camera.) 3 Select [Print] and press the SET or SELECT button. • Printing starts. • The color of the ... printer's power button until the indicator lights green. 7 Printing (p. 31) 1 Turn the camera's power on and display the images. • The (PictBridge) icon or the (Canon Direct Print) icon appears on the upper left corner of the LCD monitor. 2 Press the camera's , SET or SELECT button. • The button to be...
For detailed instructions, please refer to the printer with your camera.) 3 Select [Print] and press the SET or SELECT button. • Printing starts. • The color of the ... printer's power button until the indicator lights green. 7 Printing (p. 31) 1 Turn the camera's power on and display the images. • The (PictBridge) icon or the (Canon Direct Print) icon appears on the upper left corner of the LCD monitor. 2 Press the camera's , SET or SELECT button. • The button to be...

SELPHY CP600 User Guide
Page 16
...and other signs of foreign objects into the devices, immediately unplug the power cord from the power outlet. Contact your dealer or the nearest Canon Customer Support help desk. If liquid splashes onto the devices, wipe the devices dry using the devices, please ensure that smoke or burning ...sounds of the devices or the power plug during thunderstorms. Lightning strikes may result in any CD player that the devices are intended to instruct you have read and understood the safety precautions described below. Store the devices out of the reach of fire or electric shock. Keep clear...
...and other signs of foreign objects into the devices, immediately unplug the power cord from the power outlet. Contact your dealer or the nearest Canon Customer Support help desk. If liquid splashes onto the devices, wipe the devices dry using the devices, please ensure that smoke or burning ...sounds of the devices or the power plug during thunderstorms. Lightning strikes may result in any CD player that the devices are intended to instruct you have read and understood the safety precautions described below. Store the devices out of the reach of fire or electric shock. Keep clear...

SELPHY CP600 User Guide
Page 18
Blocking the vents may deform the casing, resulting in the operating instructions. Objects may damage the power cord. Leaving the devices plugged in damage to overheat, resulting in during printing. Do not reach into internal parts of ...
Blocking the vents may deform the casing, resulting in the operating instructions. Objects may damage the power cord. Leaving the devices plugged in damage to overheat, resulting in during printing. Do not reach into internal parts of ...
SELPHY CP600 User Guide
Page 21
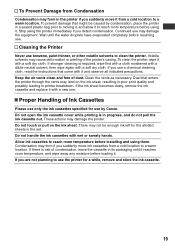
Continued use may not be caused by Canon. If the ink sheet becomes dusty, remove the ink cassette and replace it with a soft dry cloth. There may damage the equipment. Wait until it . ... from a cold location to a warm location. Clean the vents as necessary. Allow ink cassettes to use the printer for use a chemical cleaning cloth, read the instructions that enters the printer through the vents may land on the ink sheet. If you detect condensation.
Continued use may not be caused by Canon. If the ink sheet becomes dusty, remove the ink cassette and replace it with a soft dry cloth. There may damage the equipment. Wait until it . ... from a cold location to a warm location. Clean the vents as necessary. Allow ink cassettes to use the printer for use a chemical cleaning cloth, read the instructions that enters the printer through the vents may land on the ink sheet. If you detect condensation.
SELPHY CP600 User Guide
Page 31
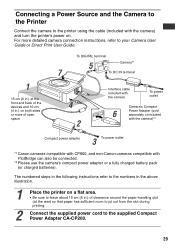
...Camera's Compact 6 Power Adapter (sold separately or included with the camera)*2 Compact power adapter 3 To power outlet *1 Canon cameras compatible with CP600, and non-Canon cameras compatible with the camera) and turn the printer's power on. The numbered steps in the above illustration. 1 ...Place the printer on both sides or more detailed camera connection instructions, refer to the printer using the cable (included with...
...Camera's Compact 6 Power Adapter (sold separately or included with the camera)*2 Compact power adapter 3 To power outlet *1 Canon cameras compatible with CP600, and non-Canon cameras compatible with the camera) and turn the printer's power on. The numbered steps in the above illustration. 1 ...Place the printer on both sides or more detailed camera connection instructions, refer to the printer using the cable (included with...
SELPHY CP600 User Guide
Page 52
... 98 SE/Windows Me/Windows 2000, double-click the [My Computer] icon on with Administrator privileges (computer system administrator) when installing the software. • The instructions in this section are intended for printing. Install the software and the printer driver according to the following procedure to log on the desktop, and...
... 98 SE/Windows Me/Windows 2000, double-click the [My Computer] icon on with Administrator privileges (computer system administrator) when installing the software. • The instructions in this section are intended for printing. Install the software and the printer driver according to the following procedure to log on the desktop, and...

SELPHY CP600 User Guide
Page 53
3 Click the Application Software [Install] button and click [Next]. Installer Panel 4 Select [Easy Installation] as the setup type and click [Next]. • Select [Custom Installation] to select programs for individual installation. 5 Click [Yes] if you consent to all the conditions of the software license agreement. 6 Review the installation settings and click [Next]. • Follow the screen messages to proceed. 7 When a dialog box appears instructing that the installation is complete, select [Yes, I want to restart my computer now.] and click [Finish]. 51
3 Click the Application Software [Install] button and click [Next]. Installer Panel 4 Select [Easy Installation] as the setup type and click [Next]. • Select [Custom Installation] to select programs for individual installation. 5 Click [Yes] if you consent to all the conditions of the software license agreement. 6 Review the installation settings and click [Next]. • Follow the screen messages to proceed. 7 When a dialog box appears instructing that the installation is complete, select [Yes, I want to restart my computer now.] and click [Finish]. 51

SELPHY CP600 User Guide
Page 55
11 When the screen below appears, connect the printer to the computer with a commercially available USB cable and turn the printer's power on. • Refer to Connecting the Printer to Your Computer (p. 58) on how to connect. • Follow the screen messages to proceed. 12 When a dialog box appears instructing that the installation is complete, click [Finish]. • Restart your computer when a dialog box appears instructing you to do so. 13 When the computer desktop displays, remove the CP Printer Solution Disk from the CD-ROM drive. 53
11 When the screen below appears, connect the printer to the computer with a commercially available USB cable and turn the printer's power on. • Refer to Connecting the Printer to Your Computer (p. 58) on how to connect. • Follow the screen messages to proceed. 12 When a dialog box appears instructing that the installation is complete, click [Finish]. • Restart your computer when a dialog box appears instructing you to do so. 13 When the computer desktop displays, remove the CP Printer Solution Disk from the CD-ROM drive. 53
SELPHY CP600 User Guide
Page 56
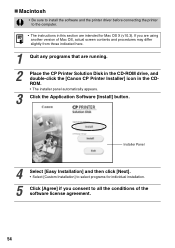
„ Macintosh • Be sure to install the software and the printer driver before connecting the printer to the computer. • The instructions in the CDROM. • The installer panel automatically appears. 3 Click the Application Software [Install] button. If you consent to select programs for individual installation. 5 ...those indicated here. 1 Quit any programs that are running. 2 Place the CP Printer Solution Disk in the CD-ROM drive, and double-click the [Canon CP Printer Installer] icon in this section are using another version of the software license agreement. 54
„ Macintosh • Be sure to install the software and the printer driver before connecting the printer to the computer. • The instructions in the CDROM. • The installer panel automatically appears. 3 Click the Application Software [Install] button. If you consent to select programs for individual installation. 5 ...those indicated here. 1 Quit any programs that are running. 2 Place the CP Printer Solution Disk in the CD-ROM drive, and double-click the [Canon CP Printer Installer] icon in this section are using another version of the software license agreement. 54
SELPHY CP600 User Guide
Page 57
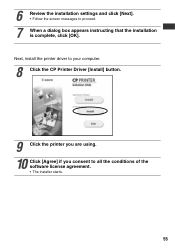
Next, install the printer driver to your computer. 8 Click the CP Printer Driver [Install] button. 9 Click the printer you are using. 10 Click [Agree] if you consent to proceed. 7 When a dialog box appears instructing that the installation is complete, click [OK]. 6 Review the installation settings and click [Next]. • Follow the screen messages to all the conditions of the software license agreement. • The installer starts. 55
Next, install the printer driver to your computer. 8 Click the CP Printer Driver [Install] button. 9 Click the printer you are using. 10 Click [Agree] if you consent to proceed. 7 When a dialog box appears instructing that the installation is complete, click [OK]. 6 Review the installation settings and click [Next]. • Follow the screen messages to all the conditions of the software license agreement. • The installer starts. 55

SELPHY CP600 User Guide
Page 58
Next, register your computer when a dialog box appears instructing you to Your Computer (p. 58). 14 Double-click the hard disk icon where Mac OS X is installed. 15 Double-click the [Printer Setup Utility] or [...
Next, register your computer when a dialog box appears instructing you to Your Computer (p. 58). 14 Double-click the hard disk icon where Mac OS X is installed. 15 Double-click the [Printer Setup Utility] or [...
SELPHY CP600 User Guide
Page 63
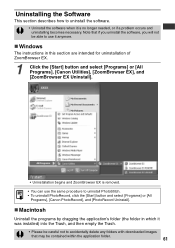
...Start] button and select [Programs] or [All Programs], [Canon PhotoRecord], and [PhotoRecord Uninstall]. „ Macintosh Uninstall the programs by dragging the application's folder (the folder in which it anymore. „ Windows The instructions in this section are intended for uninstallation of ZoomBrowser EX. ...1 Click the [Start] button and select [Programs] or [All Programs], [Canon Utilities], [ZoomBrowser EX], and [ZoomBrowser EX Uninstall]. • ...
...Start] button and select [Programs] or [All Programs], [Canon PhotoRecord], and [PhotoRecord Uninstall]. „ Macintosh Uninstall the programs by dragging the application's folder (the folder in which it anymore. „ Windows The instructions in this section are intended for uninstallation of ZoomBrowser EX. ...1 Click the [Start] button and select [Programs] or [All Programs], [Canon Utilities], [ZoomBrowser EX], and [ZoomBrowser EX Uninstall]. • ...
