
User Guide
Page 13
...machine readable. • Images recorded by the camera are intended for protection against scratches during shipment. If covered, remove the film before contacting a Canon Customer Support Help Desk. • Although the LCD monitor is produced under extremely high-precision manufacturing conditions and more than 99.99% of the pixels... plastic film for personal use , photography may become warm. This does not indicate damage. 13 Preliminary Notes and Legal Information • Take and review some commercial settings. • The camera warranty is valid only in the area of purchase.
...machine readable. • Images recorded by the camera are intended for protection against scratches during shipment. If covered, remove the film before contacting a Canon Customer Support Help Desk. • Although the LCD monitor is produced under extremely high-precision manufacturing conditions and more than 99.99% of the pixels... plastic film for personal use , photography may become warm. This does not indicate damage. 13 Preliminary Notes and Legal Information • Take and review some commercial settings. • The camera warranty is valid only in the area of purchase.
User Guide
Page 74
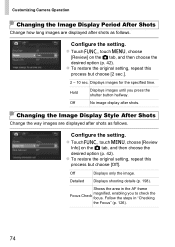
...Check magnified, enabling you press the shutter button halfway. Configure the setting. Detailed Displays shooting details (p. 198). z Touch H, touch n, choose [Review] on the 4 tab, and then choose the desired option (p. 42). Hold Displays images until you to check the focus. z To restore the... [Off]. Shows the area in "Checking the Focus" (p. 126). 74 Off Displays only the image. z Touch H, touch n, choose [Review Info] on the 4 tab, and then choose the desired option (p. 42). Customizing Camera Operation Changing the Image Display Period After Shots Change how...
...Check magnified, enabling you press the shutter button halfway. Configure the setting. Detailed Displays shooting details (p. 198). z Touch H, touch n, choose [Review] on the 4 tab, and then choose the desired option (p. 42). Hold Displays images until you to check the focus. z To restore the... [Off]. Shows the area in "Checking the Focus" (p. 126). 74 Off Displays only the image. z Touch H, touch n, choose [Review Info] on the 4 tab, and then choose the desired option (p. 42). Customizing Camera Operation Changing the Image Display Period After Shots Change how...
User Guide
Page 121
5 Playback Mode Have fun reviewing your shots, and browse or edit them in many ways • To prepare the camera for these operations, press the 1 button to enter Playback mode. • It may not be possible to play back or edit images that were renamed or already edited on a computer, or images from other cameras. 121
5 Playback Mode Have fun reviewing your shots, and browse or edit them in many ways • To prepare the camera for these operations, press the 1 button to enter Playback mode. • It may not be possible to play back or edit images that were renamed or already edited on a computer, or images from other cameras. 121
User Guide
Page 125
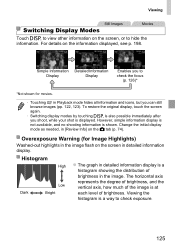
... Dark Low Bright z The graph in the image. Viewing the histogram is a histogram showing the distribution of brightness. Overexposure Warning (for movies. • Touching in [Review Info] on the screen, or to hide the information. For details on the screen in the image flash on the information displayed, see p. 198. To...
... Dark Low Bright z The graph in the image. Viewing the histogram is a histogram showing the distribution of brightness. Overexposure Warning (for movies. • Touching in [Review Info] on the screen, or to hide the information. For details on the screen in the image flash on the information displayed, see p. 198. To...
User Guide
Page 143
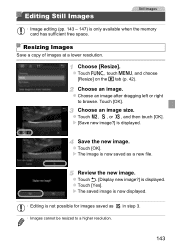
z Touch H, touch n, and choose [Resize] on the 1 tab (p. 42). Save the new image. Review the new image. Editing Still Images Still Images • Image editing (pp. 143 - 147) is displayed. z Touch ^. [Display new image?] is only available when the ...
z Touch H, touch n, and choose [Resize] on the 1 tab (p. 42). Save the new image. Review the new image. Editing Still Images Still Images • Image editing (pp. 143 - 147) is displayed. z Touch ^. [Display new image?] is only available when the ...

User Guide
Page 144
... image to browse. z To move the zoom lever left , and a preview of the image as a separate image file. Switch between frames as a new image and review. X The original image is shown in the lower right. z Touch H, touch n, and choose [Trimming] on p. 143. • Editing is not possible for cropping. Touch [OK...
... image to browse. z To move the zoom lever left , and a preview of the image as a separate image file. Switch between frames as a new image and review. X The original image is shown in the lower right. z Touch H, touch n, and choose [Trimming] on p. 143. • Editing is not possible for cropping. Touch [OK...
User Guide
Page 145
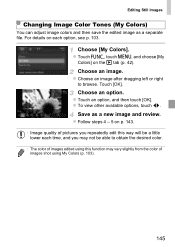
... qr. Editing Still Images Changing Image Color Tones (My Colors) You can adjust image colors and then save the edited image as a new image and review.
... qr. Editing Still Images Changing Image Color Tones (My Colors) You can adjust image colors and then save the edited image as a new image and review.
User Guide
Page 146
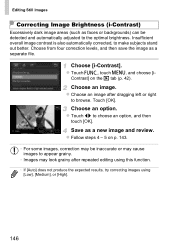
..., try correcting images using [Low], [Medium], or [High]. 146 Choose [i-Contrast]. Choose from four correction levels, and then save the image as a new image and review. Contrast] on p. 143. • For some images, correction may be detected and automatically adjusted to browse. Choose an option. Editing Still Images Correcting Image Brightness...
..., try correcting images using [Low], [Medium], or [High]. 146 Choose [i-Contrast]. Choose from four correction levels, and then save the image as a new image and review. Contrast] on p. 143. • For some images, correction may be detected and automatically adjusted to browse. Choose an option. Editing Still Images Correcting Image Brightness...

User Guide
Page 147
... [OK]. X The image is now corrected, and frames are displayed around corrected image areas. Correct the image. z Enlarge or reduce images as a new image and review. z Touch [New File]. Editing Still Images Correcting Red-Eye Automatically corrects images affected by the camera is now saved as a separate file. Follow the steps...
... [OK]. X The image is now corrected, and frames are displayed around corrected image areas. Correct the image. z Enlarge or reduce images as a new image and review. z Touch [New File]. Editing Still Images Correcting Red-Eye Automatically corrects images affected by the camera is now saved as a separate file. Follow the steps...
User Guide
Page 204
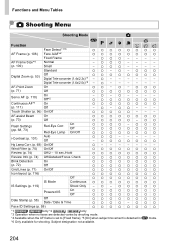
... {{{{{{{{ Review Info (p. 74) Off/Detailed/Focus Check {{{{{{{{ Blink Detection On {{{{{{{{ (p. 72) Off {{{{{{{{ Grid Lines (p. 71) On/Off {{{{{{{{ Icon layout (p. 116) {{{{{{{{ Off {{{{{{{{ IS Mode Continuous IS Settings (p. 119) Shoot Only Powered IS On Off Date Stamp (p. 58) Off Date / Date & Time Face ID Settings (p. 59) {{{{{{{{ *1 ELPH 530 HS IXUS 510 HS only *2 ELPH 320 HS IXUS 240 HS only...
... {{{{{{{{ Review Info (p. 74) Off/Detailed/Focus Check {{{{{{{{ Blink Detection On {{{{{{{{ (p. 72) Off {{{{{{{{ Grid Lines (p. 71) On/Off {{{{{{{{ Icon layout (p. 116) {{{{{{{{ Off {{{{{{{{ IS Mode Continuous IS Settings (p. 119) Shoot Only Powered IS On Off Date Stamp (p. 58) Off Date / Date & Time Face ID Settings (p. 59) {{{{{{{{ *1 ELPH 530 HS IXUS 510 HS only *2 ELPH 320 HS IXUS 240 HS only...


