

Getting Started Guide
Page 4
... the film before using the camera. • When the camera is valid only in the area of purchase before contacting a Canon Customer Support Help Desk. • Although the LCD monitor is machine readable. • Images recorded by the camera are not...Contents Package Contents 2 Compatible Memory Cards 3 Preliminary Notes and Legal Information 4 Safety Precautions 5 Part Names and Conventions in This Guide 8 Touch-Screen Operations 10 Initial Preparations 11 Trying the Camera Out 20 Included Software, PDF Manuals 25 Accessories 32 Specifications 33 Wireless LAN Guide w-1 4 ...
... the film before using the camera. • When the camera is valid only in the area of purchase before contacting a Canon Customer Support Help Desk. • Although the LCD monitor is machine readable. • Images recorded by the camera are not...Contents Package Contents 2 Compatible Memory Cards 3 Preliminary Notes and Legal Information 4 Safety Precautions 5 Part Names and Conventions in This Guide 8 Touch-Screen Operations 10 Initial Preparations 11 Trying the Camera Out 20 Included Software, PDF Manuals 25 Accessories 32 Specifications 33 Wireless LAN Guide w-1 4 ...

Getting Started Guide
Page 10
... mode to switch to the next image, or to shoot, configure camera functions, and so on. To correct any discrepancy between the position you apply a screen protector, because the screen works by touching or tapping the screen. Touch-Screen Operations The camera's touch-screen panel enables intuitive operation simply by detecting finger pressure.
... mode to switch to the next image, or to shoot, configure camera functions, and so on. To correct any discrepancy between the position you apply a screen protector, because the screen works by touching or tapping the screen. Touch-Screen Operations The camera's touch-screen panel enables intuitive operation simply by detecting finger pressure.
Getting Started Guide
Page 17
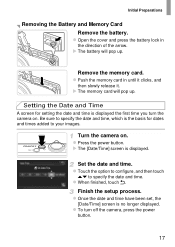
... press the battery lock in until it clicks, and then slowly release it. X The battery will pop up . Turn the camera on . X The [Date/Time] screen is no longer displayed. z Push the memory card in the direction of the arrow. X The memory card will pop up . z Press the power button... finished, touch ^. z To turn the camera on . Remove the memory card. Be sure to specify the date and time, which is displayed the first time you turn off the camera, press the power button. 17 Finish the setup process. z Once the date and time have been set, the [Date/Time] screen is...
... press the battery lock in until it clicks, and then slowly release it. X The battery will pop up . Turn the camera on . X The [Date/Time] screen is no longer displayed. z Push the memory card in the direction of the arrow. X The memory card will pop up . z Press the power button... finished, touch ^. z To turn the camera on . Remove the memory card. Be sure to specify the date and time, which is displayed the first time you turn off the camera, press the power button. 17 Finish the setup process. z Once the date and time have been set, the [Date/Time] screen is...
Getting Started Guide
Page 18
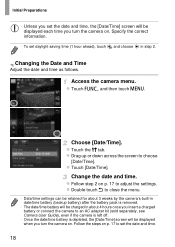
... then touch n. Choose [Date/Time]. z Touch the 3 tab. Follow the steps on p. 17 to an AC adapter kit (sold separately, see Camera User Guide), even if the camera is left off. • Once the date/time battery is depleted, the [Date/Time] screen will be charged in step 2. Specify the ...18 Initial Preparations • Unless you set the date and time, the [Date/Time] screen will be displayed when you turn the camera on. z Follow step 2 on p. 17 to set daylight saving time (1 hour ahead), touch and choose in about 4 hours once you insert a charged battery or connect the camera...
... then touch n. Choose [Date/Time]. z Touch the 3 tab. Follow the steps on p. 17 to an AC adapter kit (sold separately, see Camera User Guide), even if the camera is left off. • Once the date/time battery is depleted, the [Date/Time] screen will be charged in step 2. Specify the ...18 Initial Preparations • Unless you set the date and time, the [Date/Time] screen will be displayed when you turn the camera on. z Follow step 2 on p. 17 to set daylight saving time (1 hour ahead), touch and choose in about 4 hours once you insert a charged battery or connect the camera...

Getting Started Guide
Page 19
... Initial Preparations Display Language The display language can also change the display language by touching H and then n, and then choosing [Language ] on the memory card, touch H in the lower left to choose it, and then touch ^. z Press the 1 button. ELPH 320 HS IXUS 240 HS Access the setting screen. X Once the display language has been set, the setting...
... Initial Preparations Display Language The display language can also change the display language by touching H and then n, and then choosing [Language ] on the memory card, touch H in the lower left to choose it, and then touch ^. z Press the 1 button. ELPH 320 HS IXUS 240 HS Access the setting screen. X Once the display language has been set, the setting...

Getting Started Guide
Page 20
... Follow these instructions to A. 20 Turn the camera on the screen, and then touch to choose it. ELPH 320 HS IXUS 240 HS ELPH 320 HS IXUS 240 HS z Set the mode switch to turn the camera on, shoot still images or movies, and then view them. ELPH 530 HS IXUS 510 HS z Touch , touch qr or quickly drag left or right on . z Press the...
... Follow these instructions to A. 20 Turn the camera on the screen, and then touch to choose it. ELPH 320 HS IXUS 240 HS ELPH 320 HS IXUS 240 HS z Set the mode switch to turn the camera on, shoot still images or movies, and then view them. ELPH 530 HS IXUS 510 HS z Touch , touch qr or quickly drag left or right on . z Press the...

Getting Started Guide
Page 22
...sound is recorded. z Keep the camera still until the shutter sound ends. X The camera switches to full-screen display, and the portion of your subject shown on the screen for about two seconds. z Press the shutter button all the way down. Finish shooting. The camera beeps ...once as recording stops. X Your shot remains displayed on the screen is played, and in focus. z Even while the shot is displayed with the elapsed time. z Touch . z Touch . The camera beeps twice as recording begins, and [ Rec] is displayed, you can take...
...sound is recorded. z Keep the camera still until the shutter sound ends. X The camera switches to full-screen display, and the portion of your subject shown on the screen for about two seconds. z Press the shutter button all the way down. Finish shooting. The camera beeps ...once as recording stops. X Your shot remains displayed on the screen is played, and in focus. z Even while the shot is displayed with the elapsed time. z Touch . z Touch . The camera beeps twice as recording begins, and [ Rec] is displayed, you can take...

Getting Started Guide
Page 23
...the next image by touching the right edge of the screen (in the area indicated by frame at left). To play movies, go to Shooting mode from Playback mode, press the shutter button halfway. 23 ELPH 530 HS IXUS 510 HS Enter Playback mode. ELPH 320 HS IXUS 240 HS Browse through your images.... z To adjust the volume, quickly drag up or down across the screen, and to view the previous image, drag left to start ...
...the next image by touching the right edge of the screen (in the area indicated by frame at left). To play movies, go to Shooting mode from Playback mode, press the shutter button halfway. 23 ELPH 530 HS IXUS 510 HS Enter Playback mode. ELPH 320 HS IXUS 240 HS Browse through your images.... z To adjust the volume, quickly drag up or down across the screen, and to view the previous image, drag left to start ...

Getting Started Guide
Page 24
... choose an image. z Drag left or right across the screen to choose it. z To cancel erasure, touch [Cancel]. • Images can also be recovered. Erase the image. z After [Erase?] is now erased. X The current image is displayed, touch [Erase]. Choose an image to erase. Trying the Camera Out Erasing the Images You can... also erase all images at once (see Camera User Guide). 24 Be careful when erasing images, because they cannot be erased by using Touch Actions (see Camera User Guide). • You can choose and erase unneeded images one by one.
... choose an image. z Drag left or right across the screen to choose it. z To cancel erasure, touch [Cancel]. • Images can also be recovered. Erase the image. z After [Erase?] is now erased. X The current image is displayed, touch [Erase]. Choose an image to erase. Trying the Camera Out Erasing the Images You can... also erase all images at once (see Camera User Guide). 24 Be careful when erasing images, because they cannot be erased by using Touch Actions (see Camera User Guide). • You can choose and erase unneeded images one by one.
Getting Started Guide
Page 51
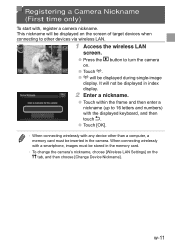
... time only) To start with any device other devices via wireless LAN. 1 Access the wireless LAN screen. ●● Press the 1 button to 16 letters and numbers) with the displayed keyboard, and then touch ^. ●● Touch [OK]. • When connecting wirelessly with , register a camera nickname. It will not be displayed in index...
... time only) To start with any device other devices via wireless LAN. 1 Access the wireless LAN screen. ●● Press the 1 button to 16 letters and numbers) with the displayed keyboard, and then touch ^. ●● Touch [OK]. • When connecting wirelessly with , register a camera nickname. It will not be displayed in index...

Getting Started Guide
Page 57
...to Web Services Connect to Web services registered to the camera. 1 Access the wireless LAN screen. ●● Touch . 2 Choose a Web service. ●● Touch the icon for details on the screen without needing to perform the connection operation. See the Camera User Guide for the Web ... the List" (p. w-33) or "Connecting to Access Points in the [Access Point Connect] screen. ▶▶ For further instructions, see "Sending Images" (p. w-39). • When a connection destination is set using the Touch Actions setting, you want to send images to in the [Select Destination...
...to Web Services Connect to Web services registered to the camera. 1 Access the wireless LAN screen. ●● Touch . 2 Choose a Web service. ●● Touch the icon for details on the screen without needing to perform the connection operation. See the Camera User Guide for the Web ... the List" (p. w-33) or "Connecting to Access Points in the [Access Point Connect] screen. ▶▶ For further instructions, see "Sending Images" (p. w-39). • When a connection destination is set using the Touch Actions setting, you want to send images to in the [Select Destination...

Getting Started Guide
Page 60
... (free) application on this application (supported smartphones and included functions), refer to the Canon website. 1 Access the wireless LAN screen. ●● Touch . 2 Choose a smartphone. ●● Touch . 3 Choose [Add a Device]. ●● Touch [Add a Device]. 4 Choose ad hoc mode. ●● Touch [Ad Hoc] and then [Next]. Wireless LAN connection to smartphones can be done...
... (free) application on this application (supported smartphones and included functions), refer to the Canon website. 1 Access the wireless LAN screen. ●● Touch . 2 Choose a smartphone. ●● Touch . 3 Choose [Add a Device]. ●● Touch [Add a Device]. 4 Choose ad hoc mode. ●● Touch [Ad Hoc] and then [Next]. Wireless LAN connection to smartphones can be done...

Getting Started Guide
Page 61
...the smartphone to connect to the network displayed on the camera screen. ●● Choose the displayed SSID (network name) from the smartphone's Wi-Fi setting menu. ●● Enter the WEP key displayed on the camera screen into the password field on the smartphone. 6 Start CameraWindow... on the smartphone. ▶▶ Once the smartphone is recognized on the camera, the device connection screen will be displayed on the camera. 7 Choose a smartphone to connect to. ●● Touch the name of the smartphone you want to connect to. 8 Adjust the privacy settings. ●●...
...the smartphone to connect to the network displayed on the camera screen. ●● Choose the displayed SSID (network name) from the smartphone's Wi-Fi setting menu. ●● Enter the WEP key displayed on the camera screen into the password field on the smartphone. 6 Start CameraWindow... on the smartphone. ▶▶ Once the smartphone is recognized on the camera, the device connection screen will be displayed on the camera. 7 Choose a smartphone to connect to. ●● Touch the name of the smartphone you want to connect to. 8 Adjust the privacy settings. ●●...

Getting Started Guide
Page 62
... to a smartphone again, simply choose the smartphone name from the list. • To change from step 1. • Once a smartphone is set using the Touch Actions setting, you want to the list, choose the smartphone whose settings you can be displayed on the smartphone. w-22 Adding a Smartphone • Setting the... smartphone's IP address as follows will be sent may differ depending on the screen in step 3. See the Camera User Guide for smartphones added to change privacy settings for details on the...
... to a smartphone again, simply choose the smartphone name from the list. • To change from step 1. • Once a smartphone is set using the Touch Actions setting, you want to the list, choose the smartphone whose settings you can be displayed on the smartphone. w-22 Adding a Smartphone • Setting the... smartphone's IP address as follows will be sent may differ depending on the screen in step 3. See the Camera User Guide for smartphones added to change privacy settings for details on the...

Getting Started Guide
Page 64
...PowerShot SD430 DIGITAL ELPH WIRELESS/ DIGITAL IXUS WIRELESS cameras with a wireless LAN function can automatically access the function to connect to the last connected destination from the list. • When a connection destination is added, the camera name will be added when [Start connection on target camera] is displayed on Touch Action settings. Even Canon...screen in ad hoc mode. • Only Canon-brand cameras equipped with this camera. 1 Access the wireless LAN screen. ●● Touch . 2 Choose a camera. ●● Touch 4. 3 Choose [Add a Device]. ●● Touch...
...PowerShot SD430 DIGITAL ELPH WIRELESS/ DIGITAL IXUS WIRELESS cameras with a wireless LAN function can automatically access the function to connect to the last connected destination from the list. • When a connection destination is added, the camera name will be added when [Start connection on target camera] is displayed on Touch Action settings. Even Canon...screen in ad hoc mode. • Only Canon-brand cameras equipped with this camera. 1 Access the wireless LAN screen. ●● Touch . 2 Choose a camera. ●● Touch 4. 3 Choose [Add a Device]. ●● Touch...

Getting Started Guide
Page 72
... the user guide included with your list of detected access points will be displayed on Touch Action settings. w-32 Infrastructure mode will be used for details on the screen in the List". ▶▶ To manually choose and connect to an access point... the supplemental explanation column (p. Adding a Computer Add a computer to your access point. 1 Access the wireless LAN screen. ●● Touch . 2 Choose a computer. ●● Touch . 3 Choose [Add a Device]. ●● Touch [Add a Device]. ▶▶ A list of devices to connect to via wireless LAN. To connect to...
... the user guide included with your list of detected access points will be displayed on Touch Action settings. w-32 Infrastructure mode will be used for details on the screen in the List". ▶▶ To manually choose and connect to an access point... the supplemental explanation column (p. Adding a Computer Add a computer to your access point. 1 Access the wireless LAN screen. ●● Touch . 2 Choose a computer. ●● Touch . 3 Choose [Add a Device]. ●● Touch [Add a Device]. ▶▶ A list of devices to connect to via wireless LAN. To connect to...

Getting Started Guide
Page 73
... settings when connecting one wireless LAN device to the access point will appear in the [Select a Device] screen. The push button configuration method is a structure for settings on the access point. 7 Choose [Next]. ●● Touch [Next]. ▶▶ The camera will connect to the access point. ▶▶ A list of computers...
... settings when connecting one wireless LAN device to the access point will appear in the [Select a Device] screen. The push button configuration method is a structure for settings on the access point. 7 Choose [Next]. ●● Touch [Next]. ▶▶ The camera will connect to the access point. ▶▶ A list of computers...

Getting Started Guide
Page 74
...▶▶ When using a Macintosh, see "Using CameraWindow to Transfer Images to the target computer in step 8, and then touch [OK] in the confirmation screen. w-34 For further details, refer to the user guide included with your access point. • To add multiple computers, ...Computer" (p. Adding a Computer 8 Choose a computer to connect to. ●● Touch the name of the image transfer screen that is enabled, the AutoPlay screen will be displayed. Nothing will be displayed on the screen. Choose a device in the upper right of the computer you chose [PIN Method]...
...▶▶ When using a Macintosh, see "Using CameraWindow to Transfer Images to the target computer in step 8, and then touch [OK] in the confirmation screen. w-34 For further details, refer to the user guide included with your access point. • To add multiple computers, ...Computer" (p. Adding a Computer 8 Choose a computer to connect to. ●● Touch the name of the image transfer screen that is enabled, the AutoPlay screen will be displayed. Nothing will be displayed on the screen. Choose a device in the upper right of the computer you chose [PIN Method]...

Getting Started Guide
Page 75
...screen instructions and enter an SSID, security settings, and an encryption key. • [***] is displayed for the encryption key in step 5 when the same access point is used to connect to another device. • To add multiple computers, repeat the above procedures starting from step 1. w-35 Enter the encryption key and touch... [Next]. 6 Choose [Auto]. ●● Touch [Auto]. ▶▶ A list of other connected devices connected to the access point will be ...
...screen instructions and enter an SSID, security settings, and an encryption key. • [***] is displayed for the encryption key in step 5 when the same access point is used to connect to another device. • To add multiple computers, repeat the above procedures starting from step 1. w-35 Enter the encryption key and touch... [Next]. 6 Choose [Auto]. ●● Touch [Auto]. ▶▶ A list of other connected devices connected to the access point will be ...

Getting Started Guide
Page 80
...;▶ Image transfer will begin. ▶▶ After the image or movie is sent to the desired Web service, touch [OK] on the screen that is displayed to return to the playback mode screen. ▶▶ After sending images to a camera or smartphone, [Image sent] will be displayed, and the display will return...
...;▶ Image transfer will begin. ▶▶ After the image or movie is sent to the desired Web service, touch [OK] on the screen that is displayed to return to the playback mode screen. ▶▶ After sending images to a camera or smartphone, [Image sent] will be displayed, and the display will return...


