

Getting Started Guide
Page 1
ENGLISH Getting Started Please refer to the complete user guide included on the CD-ROM for more detailed information. • Before use, be sure to read this guide, including the safety precautions. • This guide will familiarize you with how to use the camera correctly. • Keep the guide handy for future reference.
ENGLISH Getting Started Please refer to the complete user guide included on the CD-ROM for more detailed information. • Before use, be sure to read this guide, including the safety precautions. • This guide will familiarize you with how to use the camera correctly. • Keep the guide handy for future reference.
Getting Started Guide
Page 2
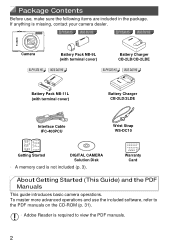
... About Getting Started (This Guide) and the PDF Manuals This guide introduces basic camera operations. ELPH 530 HS IXUS 510 HS ELPH 530 HS IXUS 510 HS Camera Battery Pack NB-9L (with terminal cover) Battery Charger CB-2LB/CB-2LBE ELPH 320 HS IXUS 240 HS ELPH 320 HS IXUS 240 HS Battery Pack NB-11L (with terminal cover) Battery Charger CB-2LD/2LDE Interface...
... About Getting Started (This Guide) and the PDF Manuals This guide introduces basic camera operations. ELPH 530 HS IXUS 510 HS ELPH 530 HS IXUS 510 HS Camera Battery Pack NB-9L (with terminal cover) Battery Charger CB-2LB/CB-2LBE ELPH 320 HS IXUS 240 HS ELPH 320 HS IXUS 240 HS Battery Pack NB-11L (with terminal cover) Battery Charger CB-2LD/2LDE Interface...

Getting Started Guide
Page 3
...has been approved for use Eye-Fi cards in the area, please check with the camera. ELPH 530 HS IXUS 510 HS • microSD memory cards* • microSDHC memory cards* • microSDXC memory cards* ELPH 320 HS IXUS 240 HS • SD memory cards* • SDHC memory cards* • SDXC memory ...cards* • Eye-Fi cards * Conforms to use in many countries or regions. ELPH 320 HS IXUS 240 HS About Eye-Fi Cards This product is required ...
...has been approved for use Eye-Fi cards in the area, please check with the camera. ELPH 530 HS IXUS 510 HS • microSD memory cards* • microSDHC memory cards* • microSDXC memory cards* ELPH 320 HS IXUS 240 HS • SD memory cards* • SDHC memory cards* • SDXC memory ...cards* • Eye-Fi cards * Conforms to use in many countries or regions. ELPH 320 HS IXUS 240 HS About Eye-Fi Cards This product is required ...

Getting Started Guide
Page 4
... while abroad, return to the area of purchase before using the camera. • When the camera is machine readable. • Images recorded by the camera are not liable for any malfunction of a camera or accessory, including memory cards, that Canon Inc., its subsidiaries and affiliates, and its distributors are intended for personal use , photography may...
... while abroad, return to the area of purchase before using the camera. • When the camera is machine readable. • Images recorded by the camera are not liable for any malfunction of a camera or accessory, including memory cards, that Canon Inc., its subsidiaries and affiliates, and its distributors are intended for personal use , photography may...

Getting Started Guide
Page 5
...Strap: Putting the strap around a child's neck could damage eyesight. If liquids or foreign objects come into contact with the camera interior, immediately turn the camera off and remove the battery. In the event that you use the equipment in asphyxiation. • Use only recommended power sources...come into contact with water (e.g. In particular, remain at least one meter (39 inches) away from the outlet and consult your camera distributor or a Canon Customer Support Help Desk. • Use only the recommended battery. • Do not place the battery near or in close ...
...Strap: Putting the strap around a child's neck could damage eyesight. If liquids or foreign objects come into contact with the camera interior, immediately turn the camera off and remove the battery. In the event that you use the equipment in asphyxiation. • Use only recommended power sources...come into contact with water (e.g. In particular, remain at least one meter (39 inches) away from the outlet and consult your camera distributor or a Canon Customer Support Help Desk. • Use only the recommended battery. • Do not place the battery near or in close ...

Getting Started Guide
Page 6
... strong sunlight - This may cause discomfort. Humid or dusty areas These could damage the speakers. This is possible to injury or damage the camera. • When using , placing or storing the product in the following places: - This could lead to suffer hearing loss from the ... waves emitted by the strap, be emitted from listening with the operation of damage to the equipment. • Do not aim the camera at a windy location, be careful not to cover it get caught on other devices. Caution Denotes the possibility of electronic instruments and other...
... strong sunlight - This may cause discomfort. Humid or dusty areas These could damage the speakers. This is possible to injury or damage the camera. • When using , placing or storing the product in the following places: - This could lead to suffer hearing loss from the ... waves emitted by the strap, be emitted from listening with the operation of damage to the equipment. • Do not aim the camera at a windy location, be careful not to cover it get caught on other devices. Caution Denotes the possibility of electronic instruments and other...

Getting Started Guide
Page 7
...or other metal materials may lead to overheat and distort, resulting in your bag, ensure that hard objects do not come into contact with the camera in fire. • Do not place the battery near pets. Leaving the unit plugged in your pocket. Pets biting the battery could cause ... or explosion, resulting in fire or damage. • Do not sit down with the screen. • Do not attach any hard objects to the camera. Contacting other insulators. Doing so may cause malfunctions or damage the screen. 7 Doing so may cause malfunctions or damage the screen. • When putting...
...or other metal materials may lead to overheat and distort, resulting in your bag, ensure that hard objects do not come into contact with the camera in fire. • Do not place the battery near pets. Leaving the unit plugged in your pocket. Pets biting the battery could cause ... or explosion, resulting in fire or damage. • Do not sit down with the screen. • Do not attach any hard objects to the camera. Contacting other insulators. Doing so may cause malfunctions or damage the screen. 7 Doing so may cause malfunctions or damage the screen. • When putting...
Getting Started Guide
Page 8
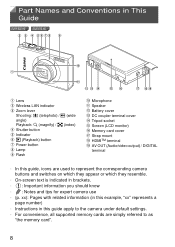
xx): Pages with related information (in this guide apply to the camera under default settings. • For convenience, all supported memory cards are used to as "the memory card". 8 Part Names and Conventions in This Guide ELPH 530 HS IXUS 510 HS Lens Wireless LAN indicator Zoom lever Shooting: i (telephoto) / j ...HDMITM terminal AV OUT (Audio/video output) / DIGITAL terminal • In this guide, icons are simply referred to represent the corresponding camera buttons and switches on which they appear or which they resemble. • On-screen text is indicated in this example, "xx"...
xx): Pages with related information (in this guide apply to the camera under default settings. • For convenience, all supported memory cards are used to as "the memory card". 8 Part Names and Conventions in This Guide ELPH 530 HS IXUS 510 HS Lens Wireless LAN indicator Zoom lever Shooting: i (telephoto) / j ...HDMITM terminal AV OUT (Audio/video output) / DIGITAL terminal • In this guide, icons are simply referred to represent the corresponding camera buttons and switches on which they appear or which they resemble. • On-screen text is indicated in this example, "xx"...

Getting Started Guide
Page 9
ELPH 320 HS IXUS 240 HS Part Names and Conventions in This Guide Lens Speaker Zoom lever Shooting: i (telephoto) / j (wide angle) Playback: k (magnify) / g (index) Shutter button Power button Mode... used to indicate functions that differ depending on the camera model: ELPH 530 HS IXUS 510 HS : Functions and precautions for the PowerShot ELPH 530 HS/IXUS 510 HS only. ELPH 320 HS IXUS 240 HS : Functions and precautions for the PowerShot ELPH 320 HS/IXUS 240 HS only. • This guide uses PowerShot ELPH 530 HS/IXUS 510 HS illustrations and screenshots for still images, movies, or both...
ELPH 320 HS IXUS 240 HS Part Names and Conventions in This Guide Lens Speaker Zoom lever Shooting: i (telephoto) / j (wide angle) Playback: k (magnify) / g (index) Shutter button Power button Mode... used to indicate functions that differ depending on the camera model: ELPH 530 HS IXUS 510 HS : Functions and precautions for the PowerShot ELPH 530 HS/IXUS 510 HS only. ELPH 320 HS IXUS 240 HS : Functions and precautions for the PowerShot ELPH 320 HS/IXUS 240 HS only. • This guide uses PowerShot ELPH 530 HS/IXUS 510 HS illustrations and screenshots for still images, movies, or both...

Getting Started Guide
Page 10
...sharp objects other operations. • Gestures may not be detected as easily if you touch and the position detected, calibrate the screen (see Camera User Guide). 10 Do not use the stylus attached to the strap. Drag Touch the screen and move your finger. For Easier Touch-...Screen Operations z If you have difficulty operating the camera by detecting finger pressure. z This gesture is used to operate the touch-screen. Touch Touch the screen briefly with your finger across it....
...sharp objects other operations. • Gestures may not be detected as easily if you touch and the position detected, calibrate the screen (see Camera User Guide). 10 Do not use the stylus attached to the strap. Drag Touch the screen and move your finger. For Easier Touch-...Screen Operations z If you have difficulty operating the camera by detecting finger pressure. z This gesture is used to operate the touch-screen. Touch Touch the screen briefly with your finger across it....

Getting Started Guide
Page 11
.... Attaching the Strap Attach the strap. Do not rest your wrist. ELPH 320 HS IXUS 240 HS z Place the strap around your body and hold the camera securely to prevent it from moving . Initial Preparations Prepare for shooting as follows. Holding the Camera ELPH 530 HS IXUS 510 HS z Place the strap around your fingers on the flash. 11
.... Attaching the Strap Attach the strap. Do not rest your wrist. ELPH 320 HS IXUS 240 HS z Place the strap around your body and hold the camera securely to prevent it from moving . Initial Preparations Prepare for shooting as follows. Holding the Camera ELPH 530 HS IXUS 510 HS z Place the strap around your fingers on the flash. 11

Getting Started Guide
Page 12
Be sure to charge the battery initially, because the camera is finished, the lamp turns green. z After aligning the S marks on the battery and charger, insert the battery by pushing it in ( ) and down ( ). X The ... battery charged. z For CB-2LBE/CB-2LDE: Plug the power cord into the charger, then plug the other end into a power outlet ( ). ELPH 320 HS IXUS 240 HS ELPH 530 HS IXUS 510 HS CB-2LB Charge the battery. Insert the battery. z For CB-2LB/CB-2LD: Flip out the plug ( ) and plug the charger into a power...
Be sure to charge the battery initially, because the camera is finished, the lamp turns green. z After aligning the S marks on the battery and charger, insert the battery by pushing it in ( ) and down ( ). X The ... battery charged. z For CB-2LBE/CB-2LDE: Plug the power cord into the charger, then plug the other end into a power outlet ( ). ELPH 320 HS IXUS 240 HS ELPH 530 HS IXUS 510 HS CB-2LB Charge the battery. Insert the battery. z For CB-2LB/CB-2LD: Flip out the plug ( ) and plug the charger into a power...

Getting Started Guide
Page 14
...pressing the battery lock in the direction of the arrow, insert the battery facing as you should format the memory card with this camera (see Camera User Guide). z Batteries inserted facing the wrong way cannot be locked into the locked position. z Slide the cover ( ) and...into the correct position. Initial Preparations Inserting the Battery and Memory Card Insert the included battery and a memory card (sold separately). ELPH 530 HS IXUS 510 HS Open the battery cover. Open the memory card cover. Terminals Battery Lock Insert the battery. Close the battery cover. z Lower...
...pressing the battery lock in the direction of the arrow, insert the battery facing as you should format the memory card with this camera (see Camera User Guide). z Batteries inserted facing the wrong way cannot be locked into the locked position. z Slide the cover ( ) and...into the correct position. Initial Preparations Inserting the Battery and Memory Card Insert the included battery and a memory card (sold separately). ELPH 530 HS IXUS 510 HS Open the battery cover. Open the memory card cover. Terminals Battery Lock Insert the battery. Close the battery cover. z Lower...

Getting Started Guide
Page 15
... Card z Open the cover and push the memory card in the direction of the arrow. Inserting memory cards facing the wrong way may damage the camera.
... Card z Open the cover and push the memory card in the direction of the arrow. Inserting memory cards facing the wrong way may damage the camera.

Getting Started Guide
Page 16
... unlocked position. Terminals Battery Lock Terminals 16 Insert the battery. Inserting memory cards facing the wrong way may damage the camera. Close the memory card/battery cover. Initial Preparations ELPH 320 HS IXUS 240 HS Check the card's write-protect tab. z While pressing the battery lock in the direction of the arrow, insert the battery...
... unlocked position. Terminals Battery Lock Terminals 16 Insert the battery. Inserting memory cards facing the wrong way may damage the camera. Close the memory card/battery cover. Initial Preparations ELPH 320 HS IXUS 240 HS Check the card's write-protect tab. z While pressing the battery lock in the direction of the arrow, insert the battery...
Getting Started Guide
Page 17
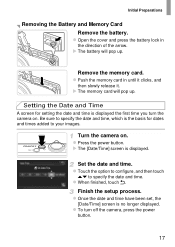
... and time, which is the basis for setting the date and time is displayed the first time you turn off the camera, press the power button. 17 z To turn the camera on . Initial Preparations Removing the Battery and Memory Card Remove the battery. z Push the memory card in the direction of... the power button. z When finished, touch ^. Setting the Date and Time A screen for dates and times added to specify the date and time. Turn the camera on . X The [Date/Time] screen is no longer displayed. X The battery will pop up . z Touch the option to configure, and then touch op to...
... and time, which is the basis for setting the date and time is displayed the first time you turn off the camera, press the power button. 17 z To turn the camera on . Initial Preparations Removing the Battery and Memory Card Remove the battery. z Push the memory card in the direction of... the power button. z When finished, touch ^. Setting the Date and Time A screen for dates and times added to specify the date and time. Turn the camera on . X The [Date/Time] screen is no longer displayed. X The battery will pop up . z Touch the option to configure, and then touch op to...
Getting Started Guide
Page 18
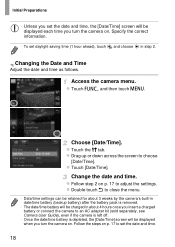
...-in date/time battery (backup battery) after the battery pack is depleted, the [Date/Time] screen will be displayed when you turn the camera on p. 17 to choose [Date/Time]. z Touch H, and then touch n. z Drag up or down across the screen to set the date and time. 18 z Double-...touch ^ to adjust the settings. Choose [Date/Time]. z Touch [Date/Time]. Access the camera menu. Change the date and time. Initial Preparations • Unless you set the date and time, the [Date/Time] screen will be charged in step...
...-in date/time battery (backup battery) after the battery pack is depleted, the [Date/Time] screen will be displayed when you turn the camera on p. 17 to choose [Date/Time]. z Touch H, and then touch n. z Drag up or down across the screen to set the date and time. 18 z Double-...touch ^ to adjust the settings. Choose [Date/Time]. z Touch [Date/Time]. Access the camera menu. Change the date and time. Initial Preparations • Unless you set the date and time, the [Date/Time] screen will be charged in step...

Getting Started Guide
Page 20
... , touch qr or quickly drag left or right on . z To confirm your choice, touch [OK]. ELPH 320 HS IXUS 240 HS ELPH 320 HS IXUS 240 HS z Set the mode switch to turn the camera on, shoot still images or movies, and then view them. X The startup screen is displayed. Shooting (Smart Auto) For fully automatic selection of the...
... , touch qr or quickly drag left or right on . z To confirm your choice, touch [OK]. ELPH 320 HS IXUS 240 HS ELPH 320 HS IXUS 240 HS z Set the mode switch to turn the camera on, shoot still images or movies, and then view them. X The startup screen is displayed. Shooting (Smart Auto) For fully automatic selection of the...

Getting Started Guide
Page 21
... are detected indicate that they are displayed to zoom away from the subject, move the zoom lever toward j (wide angle). Compose the shot. Trying the Camera Out z Aim the camera at the subject. Shoot. z To zoom in and enlarge the subject, move it will make a slight clicking noise. The... camera beeps twice after focusing, and AF frames are in the upper right. AF Frames 21 X A scene icon is displayed in the upper left and right ...
... are detected indicate that they are displayed to zoom away from the subject, move the zoom lever toward j (wide angle). Compose the shot. Trying the Camera Out z Aim the camera at the subject. Shoot. z To zoom in and enlarge the subject, move it will make a slight clicking noise. The... camera beeps twice after focusing, and AF frames are in the upper right. AF Frames 21 X A scene icon is displayed in the upper left and right ...

Getting Started Guide
Page 22
...Recording will stop automatically when the memory card becomes full. 22 X Your shot remains displayed on the screen is played, and in focus. X The camera switches to full-screen display, and the portion of your subject shown on the screen for about two seconds. z Touch . z Even while the shot... is displayed with the elapsed time. z Touch . The camera beeps twice as recording begins, and [ Rec] is displayed, you can take another shot by pressing the shutter button again. X Frames displayed around any...
...Recording will stop automatically when the memory card becomes full. 22 X Your shot remains displayed on the screen is played, and in focus. X The camera switches to full-screen display, and the portion of your subject shown on the screen for about two seconds. z Touch . z Even while the shot... is displayed with the elapsed time. z Touch . The camera beeps twice as recording begins, and [ Rec] is displayed, you can take another shot by pressing the shutter button again. X Frames displayed around any...


