ZoomBrowser EX 6.5 for Windows Instruction Manual
Page 12
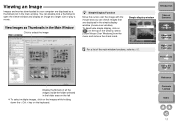
... 3High-Level Functions 4 Preferences 5Using the Internet Reference Display thumbnails of the window, select [Show Mouse Over Windows] from the menu and remove the check mark. You can check images that are displayed in the simple display window (mouse over window). View Images as a thumbnails list in the folder area on...
... 3High-Level Functions 4 Preferences 5Using the Internet Reference Display thumbnails of the window, select [Show Mouse Over Windows] from the menu and remove the check mark. You can check images that are displayed in the simple display window (mouse over window). View Images as a thumbnails list in the folder area on...
ZoomBrowser EX 6.5 for Windows Instruction Manual
Page 16
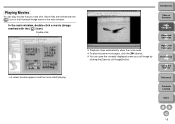
... Contents 1Basic Operation 2Advanced Operation 3High-Level Functions 4 Preferences 5Using the Internet Reference Contents Lookup Index 15 In the main window, double-click a movie (image marked with the [ ] icon in the thumbnail image frame in the main window. Playing Movies You can save the currently displayed scene as a still image by... and the movie starts playing. You can play the same movie again, click the [ ] button. To play movies that you have shot. Movie files are marked with the [ ] icon).
... Contents 1Basic Operation 2Advanced Operation 3High-Level Functions 4 Preferences 5Using the Internet Reference Contents Lookup Index 15 In the main window, double-click a movie (image marked with the [ ] icon in the thumbnail image frame in the main window. Playing Movies You can save the currently displayed scene as a still image by... and the movie starts playing. You can play the same movie again, click the [ ] button. To play movies that you have shot. Movie files are marked with the [ ] icon).

ZoomBrowser EX 6.5 for Windows Instruction Manual
Page 48
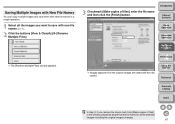
... a Screen Saver window The data for the screen saver. Display the [Screen Saver] tab sheet in the screen saver] checkbox When you remove the check mark, the data is created using the original image, and if the original image is deleted or the file name is changed , the screen saver will...
... a Screen Saver window The data for the screen saver. Display the [Screen Saver] tab sheet in the screen saver] checkbox When you remove the check mark, the data is created using the original image, and if the original image is deleted or the file name is changed , the screen saver will...

ZoomBrowser EX 6.5 for Windows Instruction Manual
Page 60
...an image by clicking the [Add] button when you reach a scene you can play the movie in step 3, you like. Remove the check mark from the images before and after the selected image Playback/pause, stop, frame back, frame forward, volume adjustment, half-speed playback, double-speed playback... of Contents 1Basic Operation 2Advanced Operation 3High-Level Functions 4 Preferences 5Using the Internet Reference Contents Lookup Add/remove all the check marks Rotate all the images Save the images with check marks The [Set up save destination, etc.) and then click the [Finish] button.
...an image by clicking the [Add] button when you reach a scene you can play the movie in step 3, you like. Remove the check mark from the images before and after the selected image Playback/pause, stop, frame back, frame forward, volume adjustment, half-speed playback, double-speed playback... of Contents 1Basic Operation 2Advanced Operation 3High-Level Functions 4 Preferences 5Using the Internet Reference Contents Lookup Add/remove all the check marks Rotate all the images Save the images with check marks The [Set up save destination, etc.) and then click the [Finish] button.
ZoomBrowser EX 6.5 for Windows Instruction Manual
Page 62
... all the images you want to save with the new names. 5Using the Internet Reference Contents Lookup Index In step 3, if you remove the check mark from the original images are saved with new file names (p.11). 2 Click the buttons [View & Classify] X [Rename Multiple Files].
... all the images you want to save with the new names. 5Using the Internet Reference Contents Lookup Index In step 3, if you remove the check mark from the original images are saved with new file names (p.11). 2 Click the buttons [View & Classify] X [Rename Multiple Files].
ZoomBrowser EX 6.5 for Windows Instruction Manual
Page 76
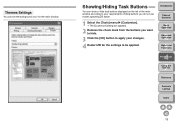
... Contents 1Basic Operation 2Advanced Operation 3High-Level Functions 4 Preferences 5Using the Internet Reference Contents Lookup Index 75 The [Customize] dialog box appears. 2 Remove the check mark from the buttons you do not use makes operating ZB easier. 1 Select the [Tools] menu X [Customize].
... Contents 1Basic Operation 2Advanced Operation 3High-Level Functions 4 Preferences 5Using the Internet Reference Contents Lookup Index 75 The [Customize] dialog box appears. 2 Remove the check mark from the buttons you do not use makes operating ZB easier. 1 Select the [Tools] menu X [Customize].
ZoomBrowser EX 6.5 for Windows Instruction Manual
Page 82
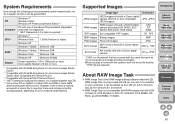
...EOS DIGITAL RAW images camera excluding EOS D6000, EOS D2000, EOS DCS1, EOS DCS3 .CR2 .TIF .CRW TIFF images Exif-compatible TIFF images .TIF, .TIFF BMP images Bitmap images .BMP PCD images Photo CD images .PCD + MOV movies MOV movies shot with a Canon digital camera .MOV .THM* + AVI movies AVI movies shot with a Canon digital camera... on your computer, it may drop frame and not play a movie with EOS1D Mark IV, EOS 5D Mark II, EOS 7D, EOS 50D, EOS REBEL T2i/ 550D, and EOS REBEL T1i/500D. When you play smoothly during playback, depending on your computer specifications...
...EOS DIGITAL RAW images camera excluding EOS D6000, EOS D2000, EOS DCS1, EOS DCS3 .CR2 .TIF .CRW TIFF images Exif-compatible TIFF images .TIF, .TIFF BMP images Bitmap images .BMP PCD images Photo CD images .PCD + MOV movies MOV movies shot with a Canon digital camera .MOV .THM* + AVI movies AVI movies shot with a Canon digital camera... on your computer, it may drop frame and not play a movie with EOS1D Mark IV, EOS 5D Mark II, EOS 7D, EOS 50D, EOS REBEL T2i/ 550D, and EOS REBEL T1i/500D. When you play smoothly during playback, depending on your computer specifications...

EOS Utility 2.8 for Windows Instruction Manual
Page 1
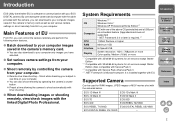
... of the screen to switch to the relevant page. O Text inside < > indicates a camera switch name or icon, or a keyboard key name. Communication Software for EOS Utility. O : Marks information that chapter. O Switching Between Pages O Click on arrows on the bottom right of...Contents at a Glance 1 Downloading Images 2Camera Settings 3Remote Shooting 4 Preferences Reference Index © CANON INC. 2010 CT1-7185EUWE-001 Example: EOS-1D Mark IV J 1D Mk IV O displays the relevant camera model. O In this Instruction Manual O EU is displayed as menu names, button names and ...
... of the screen to switch to the relevant page. O Text inside < > indicates a camera switch name or icon, or a keyboard key name. Communication Software for EOS Utility. O : Marks information that chapter. O Switching Between Pages O Click on arrows on the bottom right of...Contents at a Glance 1 Downloading Images 2Camera Settings 3Remote Shooting 4 Preferences Reference Index © CANON INC. 2010 CT1-7185EUWE-001 Example: EOS-1D Mark IV J 1D Mk IV O displays the relevant camera model. O In this Instruction Manual O EU is displayed as menu names, button names and ...
EOS Utility 2.8 for Windows Instruction Manual
Page 3
... on your computer only images you can also download to shoot automatically with the camera, you can also shoot remotely by controlling the camera from your EOS DIGITAL camera. System Requirements Windows 7*1 OS Windows Vista*2 Windows XP Professional/Home Edition*3 Computer.... O Batch download to your computer images saved in the camera's memory card. EOS-1D Mark IV EOS-1D Mark III EOS 7D EOS 40D EOS REBEL T1i/500D EOS DIGITAL REBEL XS/1000D EOS-1Ds Mark III EOS 5D Mark II EOS 50D EOS REBEL T2i/550D EOS DIGITAL REBEL XSi/450D - O You can download to your computer...
... on your computer only images you can also download to shoot automatically with the camera, you can also shoot remotely by controlling the camera from your EOS DIGITAL camera. System Requirements Windows 7*1 OS Windows Vista*2 Windows XP Professional/Home Edition*3 Computer.... O Batch download to your computer images saved in the camera's memory card. EOS-1D Mark IV EOS-1D Mark III EOS 7D EOS 40D EOS REBEL T1i/500D EOS DIGITAL REBEL XS/1000D EOS-1Ds Mark III EOS 5D Mark II EOS 50D EOS REBEL T2i/550D EOS DIGITAL REBEL XSi/450D - O You can download to your computer...

EOS Utility 2.8 for Windows Instruction Manual
Page 6
... Contents at a Glance 1 Downloading Images Cameras other than 1D Mk IV 1Ds Mk III 1D Mk III O With the < > mark on your camera. Connecting the Camera and Computer To download to your computer images shot with your camera, you can fix the plug to the camera with the cable protector to prevent the ... complete. Continue with "Starting up EU". 1D Mk IV O With the < > mark on the plug facing the back of the camera, connect it to the camera's terminal. 1Ds Mk III 1D Mk III O With the < > mark on using, refer to connect your camera and computer using the interface cable provided with...
... Contents at a Glance 1 Downloading Images Cameras other than 1D Mk IV 1Ds Mk III 1D Mk III O With the < > mark on your camera. Connecting the Camera and Computer To download to your computer images shot with your camera, you can fix the plug to the camera with the cable protector to prevent the ... complete. Continue with "Starting up EU". 1D Mk IV O With the < > mark on the plug facing the back of the camera, connect it to the camera's terminal. 1Ds Mk III 1D Mk III O With the < > mark on using, refer to connect your camera and computer using the interface cable provided with...
EOS Utility 2.8 for Windows Instruction Manual
Page 9
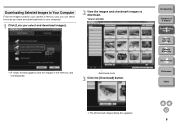
Add check mark 3 Click the [Download] button. Downloading Selected Images to download. Introduction Contents at a Glance 1 Downloading Images 2Camera Settings 3Remote Shooting 4 Preferences Reference Index ¿ The [Download image] dialog box appears. 8 Viewer window ¿ A viewer window appears and the images in your camera's memory card, you can select the ones you want and download them to your computer. 1 Click [Lets you select and download images]. 2 View the images and checkmark images to Your Computer From the images saved in the memory card are displayed.
Add check mark 3 Click the [Download] button. Downloading Selected Images to download. Introduction Contents at a Glance 1 Downloading Images 2Camera Settings 3Remote Shooting 4 Preferences Reference Index ¿ The [Download image] dialog box appears. 8 Viewer window ¿ A viewer window appears and the images in your camera's memory card, you can select the ones you want and download them to your computer. 1 Click [Lets you select and download images]. 2 View the images and checkmark images to Your Computer From the images saved in the memory card are displayed.
EOS Utility 2.8 for Windows Instruction Manual
Page 42
Afterward, when downloading image data to your computer from the camera's memory card, use the method described on p.7 to p.10 of the [Remote Live View window], a [ ] icon and the recording time are not downloaded. 4 Click the [..., p.32). 7 Click the [ ] button and begin shooting. ¿ At the bottom left of this Instruction Manual to your computer. Image data having a check mark removed from the camera's memory card to download. 4 Preferences Reference Index 41 Recording time O Click the [ ] button again to end shooting. ¿ When the [Remote Live View window...
Afterward, when downloading image data to your computer from the camera's memory card, use the method described on p.7 to p.10 of the [Remote Live View window], a [ ] icon and the recording time are not downloaded. 4 Click the [..., p.32). 7 Click the [ ] button and begin shooting. ¿ At the bottom left of this Instruction Manual to your computer. Image data having a check mark removed from the camera's memory card to download. 4 Preferences Reference Index 41 Recording time O Click the [ ] button again to end shooting. ¿ When the [Remote Live View window...

EOS Utility 2.8 for Windows Instruction Manual
Page 44
... p.7 to download. 7D 1 Prepare for "Remote Live View Shooting" (p.26). Image data having a check mark removed from its file name are not downloaded. You cannot operate the camera when the [ ] button is clicked. O Follow the procedure of this Instruction Manual to p.10 of step.... Introduction Contents at a Glance 1 Downloading Images 2Camera Settings 3Remote Shooting ¿ The [Remote Live View window] appears. To operate the camera, click the [ ] button again or close the [Remote Live View window]. 4 Preferences Reference Index 43 Afterward, when downloading image data ...
... p.7 to download. 7D 1 Prepare for "Remote Live View Shooting" (p.26). Image data having a check mark removed from its file name are not downloaded. You cannot operate the camera when the [ ] button is clicked. O Follow the procedure of this Instruction Manual to p.10 of step.... Introduction Contents at a Glance 1 Downloading Images 2Camera Settings 3Remote Shooting ¿ The [Remote Live View window] appears. To operate the camera, click the [ ] button again or close the [Remote Live View window]. 4 Preferences Reference Index 43 Afterward, when downloading image data ...
EOS Utility 2.8 for Windows Instruction Manual
Page 46
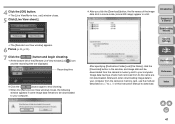
...[Download] button in the window, and image data will be downloaded from the camera's memory card to your computer from its file name are not downloaded. Image data having a check mark removed from the camera's memory card, use the method described on p.7 to p.10 of step 1.... REBELT2i 550D 1 Prepare for "Remote Live View Shooting" (p.26). 2 Click the [ ] button. You cannot operate the camera when the [ ] button is clicked. To operate the camera, click the [ ] button again or close the [Remote Live View window]. 3Remote Shooting 4 Preferences Reference Index 45 Afterward,...
...[Download] button in the window, and image data will be downloaded from the camera's memory card to your computer from its file name are not downloaded. Image data having a check mark removed from the camera's memory card, use the method described on p.7 to p.10 of step 1.... REBELT2i 550D 1 Prepare for "Remote Live View Shooting" (p.26). 2 Click the [ ] button. You cannot operate the camera when the [ ] button is clicked. To operate the camera, click the [ ] button again or close the [Remote Live View window]. 3Remote Shooting 4 Preferences Reference Index 45 Afterward,...
EOS Utility 2.8 for Windows Instruction Manual
Page 48
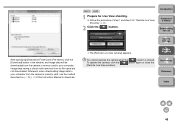
Image data having a check mark removed from their file name are not downloaded. Set.] window before setting. O When setting the movie recording size, click [Live View/Movie func. REBELT1i 500D 1 Prepare for "Remote Live View Shooting" (p.26). 2 Set the camera's mode dial to < >. Introduction ...1 Downloading Images 2Camera Settings 3Remote Shooting 4 Preferences Reference Index Select Click 47 Afterward, when downloading image data to your computer from the camera's memory card, use the method described on p.7 to p.10 of step 1 and step 2 for Live View shooting. O Follow ...
Image data having a check mark removed from their file name are not downloaded. Set.] window before setting. O When setting the movie recording size, click [Live View/Movie func. REBELT1i 500D 1 Prepare for "Remote Live View Shooting" (p.26). 2 Set the camera's mode dial to < >. Introduction ...1 Downloading Images 2Camera Settings 3Remote Shooting 4 Preferences Reference Index Select Click 47 Afterward, when downloading image data to your computer from the camera's memory card, use the method described on p.7 to p.10 of step 1 and step 2 for Live View shooting. O Follow ...
EOS Utility 2.8 for Windows Instruction Manual
Page 49
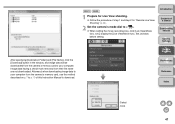
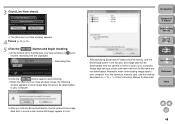
... Folder] and [File Name], click the [Download] button in a list. 48 Afterward, when downloading image data to your computer from the camera's memory card, use the method described on p.7 to p.10 of this Instruction Manual to download. 4 Preferences Reference Index O After you click...] closes, the following window appears if some image data remains to be downloaded from its file name are displayed. Image data having a check mark removed from the camera's memory card to your computer. 3 Click [Live View shoot]. ¿ The [Remote Live View window] appears. 4 Focus (p.30, ...
... Folder] and [File Name], click the [Download] button in a list. 48 Afterward, when downloading image data to your computer from the camera's memory card, use the method described on p.7 to p.10 of this Instruction Manual to download. 4 Preferences Reference Index O After you click...] closes, the following window appears if some image data remains to be downloaded from its file name are displayed. Image data having a check mark removed from the camera's memory card to your computer. 3 Click [Live View shoot]. ¿ The [Remote Live View window] appears. 4 Focus (p.30, ...
EOS Utility 2.8 for Windows Instruction Manual
Page 56
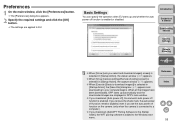
...1 Downloading Images 2Camera Settings 3Remote Shooting 4 Preferences O When [Show [Lets you checkmark [Auto power off], the camera's auto power off function on the camera (only when the camera is added to EU. When all the images have been downloaded, DPP starts up and whether the auto power off ...Add WFT Pairing Software to the Startup folder], the WFT pairing software is connected to your computer begins. Reference Index 55 O When [Show [Camera settings/Remote shooting] screen] is selected in [Startup Action], the viewer window (p.67) appears. O If you set the auto power off ...
...1 Downloading Images 2Camera Settings 3Remote Shooting 4 Preferences O When [Show [Lets you checkmark [Auto power off], the camera's auto power off function on the camera (only when the camera is added to EU. When all the images have been downloaded, DPP starts up and whether the auto power off ...Add WFT Pairing Software to the Startup folder], the WFT pairing software is connected to your computer begins. Reference Index 55 O When [Show [Camera settings/Remote shooting] screen] is selected in [Startup Action], the viewer window (p.67) appears. O If you set the auto power off ...

EOS Utility 2.8 for Windows Instruction Manual
Page 61
... the camera. Remove the check mark from waking up correctly. Introduction Contents at a Glance 1 Downloading Images 2Camera Settings 3Remote Shooting 4 Preferences Reference Index 60 If you do not perform any operation while the camera and computer are not displayed in DPP O In Digital Photo ...Professional, select the [Tools] menu X [Sync folder with your computer up EU. In this message appears, communication with EOS Utility]. Depending on sleep mode. Always...
... the camera. Remove the check mark from waking up correctly. Introduction Contents at a Glance 1 Downloading Images 2Camera Settings 3Remote Shooting 4 Preferences Reference Index 60 If you do not perform any operation while the camera and computer are not displayed in DPP O In Digital Photo ...Professional, select the [Tools] menu X [Sync folder with your computer up EU. In this message appears, communication with EOS Utility]. Depending on sleep mode. Always...

EOS Utility 2.8 for Windows Instruction Manual
Page 65
...4 Fix the cable protector with the cable protector to prevent it from detaching during remote shooting. 1D Mk IV 1 Open the covers. 3 With the plug as it is in step 2, connect it to the camera with the fixing screw. 2 Pass the small plug of the cable through the cable protector, ...and pull it in the direction of the arrow. < > mark Introduction Contents at a Glance 1 Downloading Images 2Camera Settings 3Remote Shooting 4 Preferences ...
...4 Fix the cable protector with the cable protector to prevent it from detaching during remote shooting. 1D Mk IV 1 Open the covers. 3 With the plug as it is in step 2, connect it to the camera with the fixing screw. 2 Pass the small plug of the cable through the cable protector, ...and pull it in the direction of the arrow. < > mark Introduction Contents at a Glance 1 Downloading Images 2Camera Settings 3Remote Shooting 4 Preferences ...
EOS Utility 2.8 for Windows Instruction Manual
Page 66
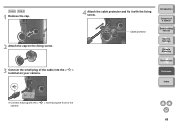
Cable protector Introduction Contents at a Glance 1 Downloading Images 2Camera Settings 3Remote Shooting 4 Preferences Reference Index O Connect the plug with the fixing screw. 1Ds Mk III 1D Mk III 1 Remove the cap. 2 Attach the cap on the fixing screw. 3 Connect the small plug of the cable into the < > terminal on your camera. 4 Attach the cable protector and fix it with the < camera. > mark facing the front of the 65
Cable protector Introduction Contents at a Glance 1 Downloading Images 2Camera Settings 3Remote Shooting 4 Preferences Reference Index O Connect the plug with the fixing screw. 1Ds Mk III 1D Mk III 1 Remove the cap. 2 Attach the cap on the fixing screw. 3 Connect the small plug of the cable into the < > terminal on your camera. 4 Attach the cable protector and fix it with the < camera. > mark facing the front of the 65
