
DC100 Instruction Manual
Page 3
...be hazardous. combination should be sure the antenna is a safety feature. Retain Instructions - This is grounded permanently damage the camera. portable communication devices or other power sources 2. See figure 1. Quick stops, excessive force, and uneven surfaces may fall,... fit into the outlet, try reversing the plug. 5. Power Cord Protection - The CA-570 Compact refers to the Canon DVD Camcorder DC100 Power Adapter should be retained such as recommended polarized plug. The product may cause the product and cartcombinationtooverturn. 3 grounding ...
...be hazardous. combination should be sure the antenna is a safety feature. Retain Instructions - This is grounded permanently damage the camera. portable communication devices or other power sources 2. See figure 1. Quick stops, excessive force, and uneven surfaces may fall,... fit into the outlet, try reversing the plug. 5. Power Cord Protection - The CA-570 Compact refers to the Canon DVD Camcorder DC100 Power Adapter should be retained such as recommended polarized plug. The product may cause the product and cartcombinationtooverturn. 3 grounding ...
DC100 Instruction Manual
Page 8
... 29 Viewing Still Images 30 Magnifying the Image 31 Selecting the Recording Data Display 32 Advanced Functions Options Lists - MENU / FUNC 33 MENU Options 33 Camera Setup (Digital Zoom, Image Stabilizer, etc 33 Still Image Operations (Erase All Images 34 Disc Operations (Photomovie, Finalize, etc 34 Display Setup (LCD Brightness, Language...
... 29 Viewing Still Images 30 Magnifying the Image 31 Selecting the Recording Data Display 32 Advanced Functions Options Lists - MENU / FUNC 33 MENU Options 33 Camera Setup (Digital Zoom, Image Stabilizer, etc 33 Still Image Operations (Erase All Images 34 Disc Operations (Photomovie, Finalize, etc 34 Display Setup (LCD Brightness, Language...
DC100 Instruction Manual
Page 10
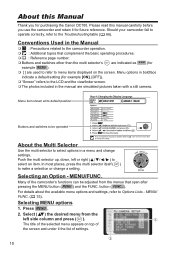
... an Option - Conventions Used in the Manual : Precautions related to select options in the manual are simulated pictures taken with a still camera. For details about the available menu options and settings, refer to select an item. Press MENU . 2. Many of the camcorder's functions can ... ) and the FUNC. About this manual carefully before you for example MENU ). [ ] are indicated as *** (for purchasing the Canon DC100. Please read this Manual Thank you use the camcorder and retain it the list of settings. 10 Selecting MENU options 1. In most places, press...
... an Option - Conventions Used in the Manual : Precautions related to select options in the manual are simulated pictures taken with a still camera. For details about the available menu options and settings, refer to select an item. Press MENU . 2. Many of the camcorder's functions can ... ) and the FUNC. About this manual carefully before you for example MENU ). [ ] are indicated as *** (for purchasing the Canon DC100. Please read this Manual Thank you use the camcorder and retain it the list of settings. 10 Selecting MENU options 1. In most places, press...
DC100 Instruction Manual
Page 11
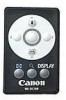
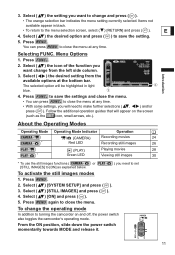
Press FUNC. to [ON] as the icon, small arrows, etc.). About the Operating Modes Operating Mode Operating Mode Indicator Operation / (CAMERA) Recording movies 24 * Red LED Recording still images 26 (PLAY) Playing movies 28 * Green LED Viewing still images 30 * To use the still images functions ( ...
Press FUNC. to [ON] as the icon, small arrows, etc.). About the Operating Modes Operating Mode Operating Mode Indicator Operation / (CAMERA) Recording movies 24 * Red LED Recording still images 26 (PLAY) Playing movies 28 * Green LED Viewing still images 30 * To use the still images functions ( ...
DC100 Instruction Manual
Page 14
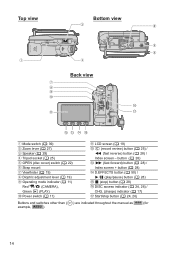
... lever ( 27) Speaker ( 29) Tripod socket ( 25) OPEN (disc cover) switch ( 22) Strap mount Viewfinder ( 19) Dioptric adjustment lever ( 19) Operating mode indicator ( 11) Red / (CAMERA), Green (PLAY) Power switch ( 11) LCD screen ( 19) (record review) button ( 25) / (fast reverse) button ( 28) / Index screen - button ( 28) (fast forward) button ( 28) / Index...
... lever ( 27) Speaker ( 29) Tripod socket ( 25) OPEN (disc cover) switch ( 22) Strap mount Viewfinder ( 19) Dioptric adjustment lever ( 19) Operating mode indicator ( 11) Red / (CAMERA), Green (PLAY) Power switch ( 11) LCD screen ( 19) (record review) button ( 25) / (fast reverse) button ( 28) / Index screen - button ( 28) (fast forward) button ( 28) / Index...

DC100 Instruction Manual
Page 32
...Select ( ) [DATA CODE] and press ( ). 4. Selecting the Recording Data Display The camcorder keeps a data code containing the recording date and time and other camera data such as shutter speed and exposure (f-stop ) and shutter speed used when recording the image. Press MENU to About the Operating Modes ( 11). : [DATE... and time of the recording. Select ( ) [DISPLAY SETUP] and press ( ). 3. MENU ( 33) DISPLAY SETUP DATA CODE DATE & TIME Options [ DATE] [ TIME] [ DATE & TIME] [ CAMERA DATA] [ CAM.& D/T] Displays the date or time when the scene or still image was recorded.
...Select ( ) [DATA CODE] and press ( ). 4. Selecting the Recording Data Display The camcorder keeps a data code containing the recording date and time and other camera data such as shutter speed and exposure (f-stop ) and shutter speed used when recording the image. Press MENU to About the Operating Modes ( 11). : [DATE... and time of the recording. Select ( ) [DISPLAY SETUP] and press ( ). 3. MENU ( 33) DISPLAY SETUP DATA CODE DATE & TIME Options [ DATE] [ TIME] [ DATE & TIME] [ CAMERA DATA] [ CAM.& D/T] Displays the date or time when the scene or still image was recorded.

DC100 Instruction Manual
Page 33
... (Digital Zoom, Image Stabilizer, etc.) CAMERA SETUP A.SL SHUTTER. [ ON], [ OFF] The camcorder automatically uses slow shutter speeds to obtain brighter recordings in black on a tripod. MENU / FUNC. MENU/FUNC. ( 10). ...
... (Digital Zoom, Image Stabilizer, etc.) CAMERA SETUP A.SL SHUTTER. [ ON], [ OFF] The camcorder automatically uses slow shutter speeds to obtain brighter recordings in black on a tripod. MENU / FUNC. MENU/FUNC. ( 10). ...

DC100 Instruction Manual
Page 35
DATA CODE ( 32) [ DATE], [ TIME], [ ( 32) [ DATE], [ TIME], [ DATE & TIME], [ CAMERA DATA], [ DATE & TIME] CAM. & D/T] LEVEL MARKER [ ON], [ OFF] A horizontal line will match that of the viewfinder or the recordings. BACKLIGHT [ NORMAL], [ BRIGHT] ( 19) LCD MIRROR [ ...
DATA CODE ( 32) [ DATE], [ TIME], [ ( 32) [ DATE], [ TIME], [ DATE & TIME], [ CAMERA DATA], [ DATE & TIME] CAM. & D/T] LEVEL MARKER [ ON], [ OFF] A horizontal line will match that of the viewfinder or the recordings. BACKLIGHT [ NORMAL], [ BRIGHT] ( 19) LCD MIRROR [ ...

DC100 Instruction Manual
Page 46
... a 10-second countdown. The countdown appears on the screen. Using the Self Timer To change the operating mode, refer to cancel the self timer. MENU CAMERA SETUP SELF TIMER MENU ON " " appears. : Press Start/Stop . The countdown appears on the screen. : Press Start/Stop , first halfway to activate the autofocus and...
... a 10-second countdown. The countdown appears on the screen. Using the Self Timer To change the operating mode, refer to cancel the self timer. MENU CAMERA SETUP SELF TIMER MENU ON " " appears. : Press Start/Stop . The countdown appears on the screen. : Press Start/Stop , first halfway to activate the autofocus and...

