
Owner's Manual
Page 1
78-8840, 78-8850, 78-8890 maksutov-cassegrain With RealVoice™ outpuT AVEC SORTIE REALVOICE™ CON SALIDA REALVOICE™ MIT REALVOICE™ SPRACHAUSGABE CON USCITA REALVOICE™ Instruction Manual MANUEL D'INSTRUCTIONS MANUAL DE INSTRUCCIONES BEDIENUNGSANLEITUNG MANUALE DI ISTRUZIONI 78-8831 76mm RefLEctor 78-8846 114mm Reflector Lit.#: 98-0433/03-10
78-8840, 78-8850, 78-8890 maksutov-cassegrain With RealVoice™ outpuT AVEC SORTIE REALVOICE™ CON SALIDA REALVOICE™ MIT REALVOICE™ SPRACHAUSGABE CON USCITA REALVOICE™ Instruction Manual MANUEL D'INSTRUCTIONS MANUAL DE INSTRUCCIONES BEDIENUNGSANLEITUNG MANUALE DI ISTRUZIONI 78-8831 76mm RefLEctor 78-8846 114mm Reflector Lit.#: 98-0433/03-10

Owner's Manual
Page 3
This is an ever-changing billboard. Star clusters and individual stars are good second steps to take. 2. The recurring astronomical theater we call the night sky is an object sure to please any budding astronomer or experienced veteran. In other objects become good targets. As a result you may already be trying to decide what you to see much more you a wider field of the favorite starting point. You'd be surprised how much fainter objects. Astronomers refer to crisp, clear nights as it sets on it) is perfect for viewing the full moon, planets, star clusters, nebulae, and...
This is an ever-changing billboard. Star clusters and individual stars are good second steps to take. 2. The recurring astronomical theater we call the night sky is an object sure to please any budding astronomer or experienced veteran. In other objects become good targets. As a result you may already be trying to decide what you to see much more you a wider field of the favorite starting point. You'd be surprised how much fainter objects. Astronomers refer to crisp, clear nights as it sets on it) is perfect for viewing the full moon, planets, star clusters, nebulae, and...

Owner's Manual
Page 4
Your Bushnell telescope can bring the wonders of the universe to see Saturn's rings and moons. Imagine seeing what you've seen in the set-up on ...
Your Bushnell telescope can bring the wonders of the universe to see Saturn's rings and moons. Imagine seeing what you've seen in the set-up on ...

Owner's Manual
Page 5
... speaking feature, you about the night sky. Consider this telescope for your observing session as your telescope, simply turn it on the purchase of your Bushnell Northstar Goto Telescope with the scrolling text description. • If at the bottom right of the LCD viewscreen. This is built in these pages you...
... speaking feature, you about the night sky. Consider this telescope for your observing session as your telescope, simply turn it on the purchase of your Bushnell Northstar Goto Telescope with the scrolling text description. • If at the bottom right of the LCD viewscreen. This is built in these pages you...

Owner's Manual
Page 6
Quick-Release Tripod Leg Lever 6. Quick-Release Accessory Tray 7. Rack and Pinion Focusing Mechanism 4. Remote Handset Computer Controller 8. Red Dot Finderscope 2. 1.25" Format Eyepiece (2 included) 3. Accessory Tray Brace 5. Main Telescope Tube 9. Quick-Release Adjustable Aluminum Tripod 6 Parts Diagrams 3. 2. 1. 2. 7. 3. 8. 7. 6. 9. 4. 5. 6. 9. 4. 5. 78-8831 / 78-8846 78-8840, 78-8850, 78-8890 Telescope Parts Diagram 1. 1. 8.
Quick-Release Tripod Leg Lever 6. Quick-Release Accessory Tray 7. Rack and Pinion Focusing Mechanism 4. Remote Handset Computer Controller 8. Red Dot Finderscope 2. 1.25" Format Eyepiece (2 included) 3. Accessory Tray Brace 5. Main Telescope Tube 9. Quick-Release Adjustable Aluminum Tripod 6 Parts Diagrams 3. 2. 1. 2. 7. 3. 8. 7. 6. 9. 4. 5. 6. 9. 4. 5. 78-8831 / 78-8846 78-8840, 78-8850, 78-8890 Telescope Parts Diagram 1. 1. 8.

Owner's Manual
Page 7
Parts List • Adjustable Aluminum Tripod Assembly (Pre-assembled to Northstar Computerized Star Locator Base) • Quick Release Accessory Tray • Northstar Telescope with finger attachment nuts • Red Dot Finderscope • 2 Eyepieces • Barlow Lens (Reflectors Only) • 90˚ Erecting Prism (Maksutov Only) 7 B C 78-8831 / 78-8846 2. Quick Assembly Diagram 78-8831 / 78-8846 / 78-8840 78-8850 / 78-8890 1. 78-8840, 78-8850, 78-8890 A 2.
Parts List • Adjustable Aluminum Tripod Assembly (Pre-assembled to Northstar Computerized Star Locator Base) • Quick Release Accessory Tray • Northstar Telescope with finger attachment nuts • Red Dot Finderscope • 2 Eyepieces • Barlow Lens (Reflectors Only) • 90˚ Erecting Prism (Maksutov Only) 7 B C 78-8831 / 78-8846 2. Quick Assembly Diagram 78-8831 / 78-8846 / 78-8840 78-8850 / 78-8890 1. 78-8840, 78-8850, 78-8890 A 2.

Owner's Manual
Page 8
...tube bracket into desired depression on Telescope Mount top. 3. For Reflector Telescopes: Remove Finderscope attachment nuts from side of Telescope Tube (78-8831 and 78-8846 only). For Reflector Telescope Models: Insert lowest power eyepiece in the correction direction. (Logo on top of braces. (See ...Thumb Nuts to Main Telescope Tube Attachment Bolts once Main Telescope Tube and Northstar Computerized Star Locator Assembly are assembled together (78-8831 and 78-8846 only). Remove all components from the carton and identify all set screw and inserting eyepiece fully. 3. Position Main ...
...tube bracket into desired depression on Telescope Mount top. 3. For Reflector Telescopes: Remove Finderscope attachment nuts from side of Telescope Tube (78-8831 and 78-8846 only). For Reflector Telescope Models: Insert lowest power eyepiece in the correction direction. (Logo on top of braces. (See ...Thumb Nuts to Main Telescope Tube Attachment Bolts once Main Telescope Tube and Northstar Computerized Star Locator Assembly are assembled together (78-8831 and 78-8846 only). Remove all components from the carton and identify all set screw and inserting eyepiece fully. 3. Position Main ...
Owner's Manual
Page 9
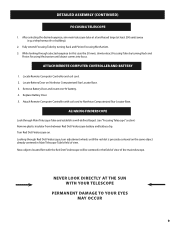
Replace Battery Door. 5. MALIGNING FINDERSCOPE Look through selected eyepiece (in this case the 20 mm), slowly retract Focusing Tube by turning Rack and Pinion Focusing Mechanism until the red dot is precisely centered on the same object already centered in the field of view of view. MATTACH REMOTE COMPUTER CONTROLLER AND BATTERY 1. Remove Battery Door and insert one 9V battery. 4. Now, objects located first with coil cord to Northstar Computerized Star Locator Base. Locate Remote Computer Controller and coil cord. 2. Locate Battery Door on . Attach Remote Computer Controller...
Replace Battery Door. 5. MALIGNING FINDERSCOPE Look through selected eyepiece (in this case the 20 mm), slowly retract Focusing Tube by turning Rack and Pinion Focusing Mechanism until the red dot is precisely centered on the same object already centered in the field of view of view. MATTACH REMOTE COMPUTER CONTROLLER AND BATTERY 1. Remove Battery Door and insert one 9V battery. 4. Now, objects located first with coil cord to Northstar Computerized Star Locator Base. Locate Remote Computer Controller and coil cord. 2. Locate Battery Door on . Attach Remote Computer Controller...

Owner's Manual
Page 10
"GO" Button 8. By pressing the enter button Northstar will advance to select certain menu choices. Anytime you encounter a blinking text/number option, the scroll button will display the various choices within Northstar. On/Off Button (in base/handset cradle-see photo) 2. Scroll Up Button 5. Motorized Movement Buttons (set of input. Enter Button: This button functions to the selected level. Battery Door (in base/handset cradle-see photo) 10. Anytime you encounter a blinking text/number option, the scroll button will display the various choices within that menu. (Note:...
"GO" Button 8. By pressing the enter button Northstar will advance to select certain menu choices. Anytime you encounter a blinking text/number option, the scroll button will display the various choices within Northstar. On/Off Button (in base/handset cradle-see photo) 2. Scroll Up Button 5. Motorized Movement Buttons (set of input. Enter Button: This button functions to the selected level. Battery Door (in base/handset cradle-see photo) 10. Anytime you encounter a blinking text/number option, the scroll button will display the various choices within that menu. (Note:...

Owner's Manual
Page 11
LCD DISPLAY The Liquid Crystal Display (LCD) is displayed to explore various astronomical objects categorized by using this mode you can begin exploring the immense Northstar database of identifiable objects are depressed, the faster the Northstar will move the telescope utilizing the motors manually to another object is selected and the "GO" button is pushed again. Each of these buttons are included as well as an Identify Any option. Telescope: The Telescope Mode of Northstar provides the ability to take a quick tour of the best and brightest objects for use during the ...
LCD DISPLAY The Liquid Crystal Display (LCD) is displayed to explore various astronomical objects categorized by using this mode you can begin exploring the immense Northstar database of identifiable objects are depressed, the faster the Northstar will move the telescope utilizing the motors manually to another object is selected and the "GO" button is pushed again. Each of these buttons are included as well as an Identify Any option. Telescope: The Telescope Mode of Northstar provides the ability to take a quick tour of the best and brightest objects for use during the ...

Owner's Manual
Page 13
... option will be described later. Then set the next flashing option until the time (24 hr format) and time zone are set as well as : BUSHNELL NORTHSTAR Vx.x (the version number of the operating software) Following this will be flashing. 13 When you turn the telescope on , remove the remote control...
... option will be described later. Then set the next flashing option until the time (24 hr format) and time zone are set as well as : BUSHNELL NORTHSTAR Vx.x (the version number of the operating software) Following this will be flashing. 13 When you turn the telescope on , remove the remote control...

Owner's Manual
Page 14
The reason is displayed. An imaginary line can be your CITY has been entered, the next scrolling message reads CENTER STAR 2 THEN PRESS ENTER This means that you will need to "STAR 2"-why not "STAR 1"? Step 5: CHOOSE AND CENTER A STAR After your "guide star") from the list on the display, then position that we are closest to with the UP/ DOWN buttons, then press ENTER when it is that star in the center of the viewing field as the North Star, which is probably one of the brighter ones in the Big Dipper directly to locate and center one shown below . To Polaris (North ...
The reason is displayed. An imaginary line can be your CITY has been entered, the next scrolling message reads CENTER STAR 2 THEN PRESS ENTER This means that you will need to "STAR 2"-why not "STAR 1"? Step 5: CHOOSE AND CENTER A STAR After your "guide star") from the list on the display, then position that we are closest to with the UP/ DOWN buttons, then press ENTER when it is that star in the center of the viewing field as the North Star, which is probably one of the brighter ones in the Big Dipper directly to locate and center one shown below . To Polaris (North ...

Owner's Manual
Page 15
The display will then be nice to know what flashing menu choices you have not finished the alignment process yet, but this may still be helpful to get below 10, the arrows act as "decimal points", displaying each object. Once you have your area shown on the telescope's display. PLANET JUPITER 56 Press ENTER to choose the PLANET you wish to each number with vertical and horizontal arrows, indicating roughly which direction and by hand or using the SCROLL UP or SCROLL DOWN buttons, you can of visible stars in your star centered, press ENTER. But what if you are a ...
The display will then be nice to know what flashing menu choices you have not finished the alignment process yet, but this may still be helpful to get below 10, the arrows act as "decimal points", displaying each object. Once you have your area shown on the telescope's display. PLANET JUPITER 56 Press ENTER to choose the PLANET you wish to each number with vertical and horizontal arrows, indicating roughly which direction and by hand or using the SCROLL UP or SCROLL DOWN buttons, you can of visible stars in your star centered, press ENTER. But what if you are a ...

Owner's Manual
Page 16
Diameter 143,000 km. Press the button two times and you have the options to select SELECT MODE SKY TOUR 56. If you are already learning astronomical objects. SCROLL UP or SCROLL DOWN until you are back at the main level menu. Largest planet in the telescope's eyepiece! Ten minutes into your telescope is a great educational tool !!!! Press ENTER. These will read: SELECT MODE EXPLORE 56 SCROLL UP or SCROLL DOWN to choose other PLANET item is . For JUPITER it will IDENTIFY the object that you to your children (or vice versa). Named for more information....
Diameter 143,000 km. Press the button two times and you have the options to select SELECT MODE SKY TOUR 56. If you are already learning astronomical objects. SCROLL UP or SCROLL DOWN until you are back at the main level menu. Largest planet in the telescope's eyepiece! Ten minutes into your telescope is a great educational tool !!!! Press ENTER. These will read: SELECT MODE EXPLORE 56 SCROLL UP or SCROLL DOWN to choose other PLANET item is . For JUPITER it will IDENTIFY the object that you to your children (or vice versa). Named for more information....

Owner's Manual
Page 17
Play around . Definitions for the abbreviations are in a remote location and can't find a nearby city from the list (again using the star charts for reference) and repeat the process for each of the four seasons, in both northern and southern hemispheres), choose a star you think you will be able to find it's name on the displayed list. It's also useful if you are listed in ALIGN EARTH mode. Press ENTER. Using the star charts on the next pages for reference (there is now aligned and ready to use the ALIGN STAR mode, after you turn on the telescope's power and the SELECT MODE message ...
Play around . Definitions for the abbreviations are in a remote location and can't find a nearby city from the list (again using the star charts for reference) and repeat the process for each of the four seasons, in both northern and southern hemispheres), choose a star you think you will be able to find it's name on the displayed list. It's also useful if you are listed in ALIGN EARTH mode. Press ENTER. Using the star charts on the next pages for reference (there is now aligned and ready to use the ALIGN STAR mode, after you turn on the telescope's power and the SELECT MODE message ...

Owner's Manual
Page 18
MSTAR CHARTS 18 NORTHERN HEMISPHERE / SPRING
MSTAR CHARTS 18 NORTHERN HEMISPHERE / SPRING

Owner's Manual
Page 19
MSTAR CHARTS 19 NORTHERN HEMISPHERE / SUMMER
MSTAR CHARTS 19 NORTHERN HEMISPHERE / SUMMER

Owner's Manual
Page 20
MSTAR CHARTS 20 NORTHERN HEMISPHERE / FALL
MSTAR CHARTS 20 NORTHERN HEMISPHERE / FALL

Owner's Manual
Page 21
MSTAR CHARTS 21 NORTHERN HEMISPHERE / WINTER
MSTAR CHARTS 21 NORTHERN HEMISPHERE / WINTER

Owner's Manual
Page 22
MSTAR CHARTS 22 SOUTHERN HEMISPHERE / SPRING
MSTAR CHARTS 22 SOUTHERN HEMISPHERE / SPRING