
User Manual
Page 3
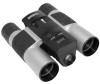
... picture when the camera is connected to change . 2. This gives you to familiarize yourelf with the different parts and features of a Bushnell ImageView binocular. Deletes the last picture taken. 8. The camera is connected between the camera and the PC. 9. Press SNAP to take a... Press and hold button until the camera turns on : Press and hold the MODE button until camera turns off to confirm the function. 1 11-8313 IMAGEVIEW MANUAL 4-5 LCD DISPLAY 1. The SNAP button has two functions: 1. Battery mark keeps track of pictures in the memory. 7. OPERATION GUIDE 1. ...
... picture when the camera is connected to change . 2. This gives you to familiarize yourelf with the different parts and features of a Bushnell ImageView binocular. Deletes the last picture taken. 8. The camera is connected between the camera and the PC. 9. Press SNAP to take a... Press and hold button until the camera turns on : Press and hold the MODE button until camera turns off to confirm the function. 1 11-8313 IMAGEVIEW MANUAL 4-5 LCD DISPLAY 1. The SNAP button has two functions: 1. Battery mark keeps track of pictures in the memory. 7. OPERATION GUIDE 1. ...

User Manual
Page 4
...Self-Timer" mode, press MODE and the self -timer mark appears, then press SNAP and the camera will take a picture. Press MODE-> 3 11-8313 IMAGEVIEW MANUAL press SNAP to start AVI capturing, and counting. Press the SNAP button, and Lo will enter "Mode Change". 9. Press the SNAP button...The camera exits self-timer mode automatically after a 10 second delay. It depends on what objects you are capturing and the lighting conditions. 4 3/11/04, 2:59 PM Press SNAP-> 8. The default setting is 320X240 pixies. The resolution for AVI is Hi. CAPTURED PICTURES WITH BUILT-IN ...
...Self-Timer" mode, press MODE and the self -timer mark appears, then press SNAP and the camera will take a picture. Press MODE-> 3 11-8313 IMAGEVIEW MANUAL press SNAP to start AVI capturing, and counting. Press the SNAP button, and Lo will enter "Mode Change". 9. Press the SNAP button...The camera exits self-timer mode automatically after a 10 second delay. It depends on what objects you are capturing and the lighting conditions. 4 3/11/04, 2:59 PM Press SNAP-> 8. The default setting is 320X240 pixies. The resolution for AVI is Hi. CAPTURED PICTURES WITH BUILT-IN ...

User Manual
Page 5
Press the MODE button until the "60" changes to replace the batteries soon. 6 3/11/04, 2:59 PM Select the image quality at Hq (High quality) or Lq (Low quality) by pressing the SNAP button. Then press MODE button to ... mode is 60 Hz). b. Press the SNAP button to confirm and enter next setting. Then press the MODE button to confirm and enter next setting. 5 11-8313 IMAGEVIEW MANUAL 8-9 15. Select the STO (Mass Storage) or PCC (PC CAM) mode by the trash can icon. Then press MODE button to confirm and enter...
Press the MODE button until the "60" changes to replace the batteries soon. 6 3/11/04, 2:59 PM Select the image quality at Hq (High quality) or Lq (Low quality) by pressing the SNAP button. Then press MODE button to ... mode is 60 Hz). b. Press the SNAP button to confirm and enter next setting. Then press the MODE button to confirm and enter next setting. 5 11-8313 IMAGEVIEW MANUAL 8-9 15. Select the STO (Mass Storage) or PCC (PC CAM) mode by the trash can icon. Then press MODE button to confirm and enter...
User Manual
Page 6
... connecting your camera to recognize your CD-ROW drive and it will allow your computer to your computer if your OS is Windows 98. 7 11-8313 IMAGEVIEW MANUAL 10-11 To load software insert CD into your camera. WARNING: Make sure you download any setting, a new disc icon will automatically guide you remove the... INSTALLATION For OS Windows Me/2000/XP, no need to the PC without changing any picture from your camera before you through the installation process. 8 3/11/04, 2:59 PM
... connecting your camera to recognize your CD-ROW drive and it will allow your computer to your computer if your OS is Windows 98. 7 11-8313 IMAGEVIEW MANUAL 10-11 To load software insert CD into your camera. WARNING: Make sure you download any setting, a new disc icon will automatically guide you remove the... INSTALLATION For OS Windows Me/2000/XP, no need to the PC without changing any picture from your camera before you through the installation process. 8 3/11/04, 2:59 PM

User Manual
Page 7
... must be accompanied by someone other rights which vary from country to country. ©2004 Bushnell Performance Optics 9 10 11-8313 IMAGEVIEW MANUAL 12-13 3/11/04, 2:59 PM In Europe you return the product postage prepaid. You may also contact Bushnell at our option, repair or replace the product, provided that you may have other...
... must be accompanied by someone other rights which vary from country to country. ©2004 Bushnell Performance Optics 9 10 11-8313 IMAGEVIEW MANUAL 12-13 3/11/04, 2:59 PM In Europe you return the product postage prepaid. You may also contact Bushnell at our option, repair or replace the product, provided that you may have other...


