Owners Manual
Page 9
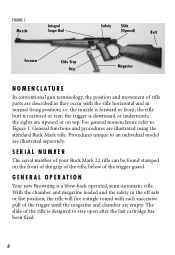
... of the grip of the rifle, below of the trigger guard. Procedures unique to Figure 1. With the chamber and magazine loaded and the safety in normal firing position; i.e. the sights are illustrated using the standard Buck Mark rifle. For general nomenclature refer to an individual model are illustrated separately. GENERAL OPERATION Your new Browning is rearward...
... of the grip of the rifle, below of the trigger guard. Procedures unique to Figure 1. With the chamber and magazine loaded and the safety in normal firing position; i.e. the sights are illustrated using the standard Buck Mark rifle. For general nomenclature refer to an individual model are illustrated separately. GENERAL OPERATION Your new Browning is rearward...
Owners Manual
Page 17
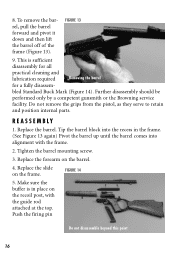
... 5. Replace the forearm on the frame. Push the firing pin Do not disassemble beyond this point 16 FIGURE 13 9. bled Standard Buck Mark (Figure 14). Tip the barrel block into alignment with the guide rod attached at the top. Make sure the buffer is sufficient disassembly... for all practical cleaning and lubrication required Removing the barrel for a fully disassem- Do not remove the grips from the pistol, as they serve to retain and position internal parts. R E A S S E M B LY 1. Further disassembly should be ...
... 5. Replace the forearm on the frame. Push the firing pin Do not disassemble beyond this point 16 FIGURE 13 9. bled Standard Buck Mark (Figure 14). Tip the barrel block into alignment with the guide rod attached at the top. Make sure the buffer is sufficient disassembly... for all practical cleaning and lubrication required Removing the barrel for a fully disassem- Do not remove the grips from the pistol, as they serve to retain and position internal parts. R E A S S E M B LY 1. Further disassembly should be ...
