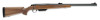

Owners Manual
Page 18
... of the magazine, it could cause feeding problems or interfere when inserting the magazine into the matching groove in the same manner. The base of the magazine into the shotgun. 5 Reattach the magazine by the magazine catch. If the front of a shell protrudes beyond the front of an empty magazine using this...
... of the magazine, it could cause feeding problems or interfere when inserting the magazine into the matching groove in the same manner. The base of the magazine into the shotgun. 5 Reattach the magazine by the magazine catch. If the front of a shell protrudes beyond the front of an empty magazine using this...

Owners Manual
Page 19
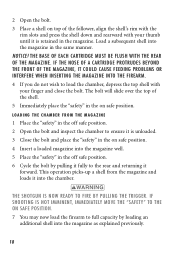
..., it could cause feeding problems or interfere when inserting the magazine into the shotgun. 4 After loading the magazine, swing the floorplate and loaded magazine upwards until...at ta c h e d t o t h e f l o o r p l at e 1 Close the bolt and place the "safety" in the on safe position. 2 Press the magazine release in front of the trigger guard and...shell must be loaded like most other bolt action firearms. With the bolt drawn open, shells are inserted into...of the magazine. NOTICE! conventional magazine loading procedure The A-Bolt Shotgun may also be flush with the rim slots and press ...
..., it could cause feeding problems or interfere when inserting the magazine into the shotgun. 4 After loading the magazine, swing the floorplate and loaded magazine upwards until...at ta c h e d t o t h e f l o o r p l at e 1 Close the bolt and place the "safety" in the on safe position. 2 Press the magazine release in front of the trigger guard and...shell must be loaded like most other bolt action firearms. With the bolt drawn open, shells are inserted into...of the magazine. NOTICE! conventional magazine loading procedure The A-Bolt Shotgun may also be flush with the rim slots and press ...
Owners Manual
Page 20
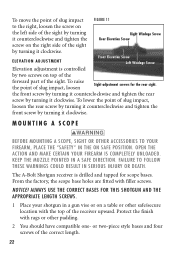
...shotgun IS now READY TO FIRE BY pulling the trigger. 2 Open the bolt. 3 Place a shell on top of the follower, align the shell's rim with the rim slots and press the shell down and rearward with your finger and close the bolt. The base... of each cartridge must be flush with your thumb until it forward. The bolt will slide over the top of the shell. .... Load a subsequent shell into the magazine in the off safe position. 2 Open the bolt and inspect the chamber to ensure it is retained in the on safe position. If shooting...
...shotgun IS now READY TO FIRE BY pulling the trigger. 2 Open the bolt. 3 Place a shell on top of the follower, align the shell's rim with the rim slots and press the shell down and rearward with your finger and close the bolt. The base... of each cartridge must be flush with your thumb until it forward. The bolt will slide over the top of the shell. .... Load a subsequent shell into the magazine in the off safe position. 2 Open the bolt and inspect the chamber to ensure it is retained in the on safe position. If shooting...
Owners Manual
Page 24
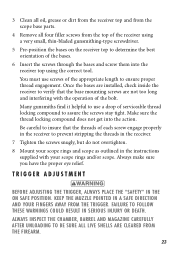
...Scope Before mounting a scope, sight or other accessories to your shotgun in the on a table or other padding. 2 You should have compatible one- The A-Bolt Shotgun receiver is controlled by turning it clockwise. Always use the correct bases for this shotgun and the appropriate length screws. 1 Place your firearm, place...finish with filler screws. Notice! To raise the point of slug impact, loosen Sight adjustment screws for scope bases. From the factory, the scope base holes are fitted with rags or other safe/secure location with the top of the receiver upward. To move ...
...Scope Before mounting a scope, sight or other accessories to your shotgun in the on a table or other padding. 2 You should have compatible one- The A-Bolt Shotgun receiver is controlled by turning it clockwise. Always use the correct bases for this shotgun and the appropriate length screws. 1 Place your firearm, place...finish with filler screws. Notice! To raise the point of slug impact, loosen Sight adjustment screws for scope bases. From the factory, the scope base holes are fitted with rags or other safe/secure location with the top of the receiver upward. To move ...
Owners Manual
Page 25
...base parts. 4 Remove all four filler screws from the trigger. Be careful to insure that the base mounting screws are installed, check inside the receiver to verify that the threads of the bases. 6 Insert the screws through the bases... and screw them into the action. Once the bases are not too long and interfering with ...receiver top using a very small, thin-bladed gunsmithing-type screwdriver. 5 Pre-position the bases on safe position. keep the muzzle pointed in a safe direction and your fingers away...
...base parts. 4 Remove all four filler screws from the trigger. Be careful to insure that the base mounting screws are installed, check inside the receiver to verify that the threads of the bases. 6 Insert the screws through the bases... and screw them into the action. Once the bases are not too long and interfering with ...receiver top using a very small, thin-bladed gunsmithing-type screwdriver. 5 Pre-position the bases on safe position. keep the muzzle pointed in a safe direction and your fingers away...