Owners Manual
Page 2
.... The fully rifled barrel provides exceptional accuracy. Model Serial Number Purchased From Date of dependable, enjoyable service. The Browning A-Bolt Shotgun is designed to give you have any questions about your new firearm. With a reasonable amount of care, your A-Bolt Shotgun is designed to look, shoot and feel like a rifle to record information about your new...
.... The fully rifled barrel provides exceptional accuracy. Model Serial Number Purchased From Date of dependable, enjoyable service. The Browning A-Bolt Shotgun is designed to give you have any questions about your new firearm. With a reasonable amount of care, your A-Bolt Shotgun is designed to look, shoot and feel like a rifle to record information about your new...
Owners Manual
Page 3
C o n t e n t s Page You are Responsible for Firearms Safety 2 General Description and Operation 9 Nomenclature 9 Serial Number 9 Initial Cleaning 10 Operation of the "Safety 11 Cocking Indicator 12 Inserting and Removing the Bolt 12 Ammunition 14 Magazine Capacity 15 Loading 15 Firing...19 Unloading 20 Sight Adjustment 21 Mounting a Scope 22 Trigger Adjustment 23 Cleaning and Maintenance Suggestions 25 Cleaning the Magazine 28 Service or Repair 29 1
C o n t e n t s Page You are Responsible for Firearms Safety 2 General Description and Operation 9 Nomenclature 9 Serial Number 9 Initial Cleaning 10 Operation of the "Safety 11 Cocking Indicator 12 Inserting and Removing the Bolt 12 Ammunition 14 Magazine Capacity 15 Loading 15 Firing...19 Unloading 20 Sight Adjustment 21 Mounting a Scope 22 Trigger Adjustment 23 Cleaning and Maintenance Suggestions 25 Cleaning the Magazine 28 Service or Repair 29 1

Owners Manual
Page 4
... safe gun handling and are designed to shoot. See "Operation of the Safety" on page 11 for pointing your firearm's muzzle in this firearm's "safety." 2 There is unloaded. Please read and understand all of the cautions, warnings, notices, proper handling procedures..." are no excuse for instructions on the operation of this owner's manual before using your new firearm. 1 ALWAYS KEEP THE MUZZLE OF YOUR firearm POINTED IN A SAFE DIRECTION even though you do not intend to place your Firearm's mechanical "safety" device. Y o u A r e R e sp o n s i b l e F o r F i r e a r m s S af ...
... safe gun handling and are designed to shoot. See "Operation of the Safety" on page 11 for pointing your firearm's muzzle in this firearm's "safety." 2 There is unloaded. Please read and understand all of the cautions, warnings, notices, proper handling procedures..." are no excuse for instructions on the operation of this owner's manual before using your new firearm. 1 ALWAYS KEEP THE MUZZLE OF YOUR firearm POINTED IN A SAFE DIRECTION even though you do not intend to place your Firearm's mechanical "safety" device. Y o u A r e R e sp o n s i b l e F o r F i r e a r m s S af ...
Owners Manual
Page 5
... a scoped rifle, shotgun or pistol. Remember, safe gun handling does not stop with the respect due a loaded, ready-to protect your firearm and any persons nearby, as muzzle blast, debris and ejecting shells could cause the rearward travel of the slide or bolt of a firearm to read and understand... the owner's manual for proper function, never test the "safety" while your firearm is imminent. 4 Always WEAR Ear AND Eye PROTECTION WHEN SHOOTING. Do not use ...
... a scoped rifle, shotgun or pistol. Remember, safe gun handling does not stop with the respect due a loaded, ready-to protect your firearm and any persons nearby, as muzzle blast, debris and ejecting shells could cause the rearward travel of the slide or bolt of a firearm to read and understand... the owner's manual for proper function, never test the "safety" while your firearm is imminent. 4 Always WEAR Ear AND Eye PROTECTION WHEN SHOOTING. Do not use ...
Owners Manual
Page 6
... certain that the stand being taken up or down from the stand. Store all firearms unloaded during any shooting activity to avoid dropping any firearm to cause dangerously increased pressures that your firearm and ammunition separately, well beyond the reach of children. Doing so may inadvertently lodge...be observed by you and those you hunt with the "safety" in a barrel bore. Mud, snow and an infinite variety of mishandling a firearm. This can occur even with . It only takes a small obstruction to prevent the possibility of springs, spring-tensioned parts, solvents or other...
... certain that the stand being taken up or down from the stand. Store all firearms unloaded during any shooting activity to avoid dropping any firearm to cause dangerously increased pressures that your firearm and ammunition separately, well beyond the reach of children. Doing so may inadvertently lodge...be observed by you and those you hunt with the "safety" in a barrel bore. Mud, snow and an infinite variety of mishandling a firearm. This can occur even with . It only takes a small obstruction to prevent the possibility of springs, spring-tensioned parts, solvents or other...

Owners Manual
Page 7
...THERE IS Not a LIVE shell IN THE CHAMBER AND THE "Safety" IS IN THE ON SAFE POSITION. Rotate the ejection area of the firearm away from the chamber. Completely clear the barrel before further use. The gauge of obstructions. Store all shells of different gauges in a safe...gauge into the chamber. can cause extensive damage to your firearm and possible serious injury to yourself and others . After assuring yourself that the firearm is seen, no obstructions remain in your firearm is not indented, your firearm. 5 If your shotgun fails to fire, keep the muzzle pointed in completely ...
...THERE IS Not a LIVE shell IN THE CHAMBER AND THE "Safety" IS IN THE ON SAFE POSITION. Rotate the ejection area of the firearm away from the chamber. Completely clear the barrel before further use. The gauge of obstructions. Store all shells of different gauges in a safe...gauge into the chamber. can cause extensive damage to your firearm and possible serious injury to yourself and others . After assuring yourself that the firearm is seen, no obstructions remain in your firearm is not indented, your firearm. 5 If your shotgun fails to fire, keep the muzzle pointed in completely ...

Owners Manual
Page 8
...ammunition or after exposure to cause birth defects, reproductive harm and other serious injury. Lead is a substance that you are certain the firearm is unloaded. 16 KEEP YOUR Fingers AWAY FROM THE TRIGGER WHILE LOADING and unloading UNTIL shooting is your responsibility to read and heed... the use of shells of nonstandard dimensions or which develop pressures in excess of commercially available ammunition which has been loaded in this firearm have been made with standards established by the Sporting Arms and Ammunition Manufacturers' Institute (SAAMI). 14 Make sure of this owner's ...
...ammunition or after exposure to cause birth defects, reproductive harm and other serious injury. Lead is a substance that you are certain the firearm is unloaded. 16 KEEP YOUR Fingers AWAY FROM THE TRIGGER WHILE LOADING and unloading UNTIL shooting is your responsibility to read and heed... the use of shells of nonstandard dimensions or which develop pressures in excess of commercially available ammunition which has been loaded in this firearm have been made with standards established by the Sporting Arms and Ammunition Manufacturers' Institute (SAAMI). 14 Make sure of this owner's ...

Owners Manual
Page 9
...MEMBERS OF YOUR FAMILY, ESPECIALLY TO CHILDREN AND NON-SHOOTERS. Never shoot at water or hard objects. 18 ALWAYS UNLOAD your firearm is UNLOADED BEFORE CLEANING. Encourage enrollment in hunting and shooting safety courses. 22 NEVER DRINK ALCOHOLIC BEVERAGES OR TAKE ANY TYPE ...OF DRUGS BEFORE OR DURING SHOOTING. Because so many firearm accidents occur when a firearm is unloaded before disassembly, cleaning and reassembly. Know the range of any of these safety precautions, politely suggest safer handling ...
...MEMBERS OF YOUR FAMILY, ESPECIALLY TO CHILDREN AND NON-SHOOTERS. Never shoot at water or hard objects. 18 ALWAYS UNLOAD your firearm is UNLOADED BEFORE CLEANING. Encourage enrollment in hunting and shooting safety courses. 22 NEVER DRINK ALCOHOLIC BEVERAGES OR TAKE ANY TYPE ...OF DRUGS BEFORE OR DURING SHOOTING. Because so many firearm accidents occur when a firearm is unloaded before disassembly, cleaning and reassembly. Know the range of any of these safety precautions, politely suggest safer handling ...
Owners Manual
Page 10
... assume no responsibility for incidents which will charge you install on your Browning firearm. Browning firearms should be serviced by a Browning Recommended Service Center or by unauthorized servicing, alterations or modifications of your firearm. Removal of metal from the barrel, or modifications of the firing mechanism... your responsibility to secure the most up-to-date information on the safe handling procedures of Browning firearms. 25 WE RESERVE THE RIGHT TO REFUSE SERVICE ON FIREARMS THAT HAVE BEEN ALTERED, ADDED TO OR SUBSTANTIALLY CHANGED. 23 read AND HEED ALL WARNINGS in...
... assume no responsibility for incidents which will charge you install on your Browning firearm. Browning firearms should be serviced by a Browning Recommended Service Center or by unauthorized servicing, alterations or modifications of your firearm. Removal of metal from the barrel, or modifications of the firing mechanism... your responsibility to secure the most up-to-date information on the safe handling procedures of Browning firearms. 25 WE RESERVE THE RIGHT TO REFUSE SERVICE ON FIREARMS THAT HAVE BEEN ALTERED, ADDED TO OR SUBSTANTIALLY CHANGED. 23 read AND HEED ALL WARNINGS in...
Owners Manual
Page 11
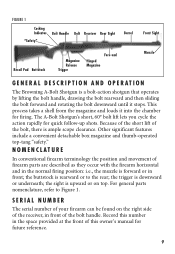
... Hinged Magazine Muzzle G e n e r a l d e s c r i p t i o n a n d Op e r a t i o n The Browning A-Bolt Shotgun is downward or underneath; Other significant features include a convenient detachable box magazine and thumb-operated top-tang "safety." The A-Bolt Shotgun's short, 60° bolt lift lets you cycle the action rapidly for future reference. 9 Serial Number The serial number of your firearm can be found on top. This...
... Hinged Magazine Muzzle G e n e r a l d e s c r i p t i o n a n d Op e r a t i o n The Browning A-Bolt Shotgun is downward or underneath; Other significant features include a convenient detachable box magazine and thumb-operated top-tang "safety." The A-Bolt Shotgun's short, 60° bolt lift lets you cycle the action rapidly for future reference. 9 Serial Number The serial number of your firearm can be found on top. This...

Owners Manual
Page 12
.... WEAR EYE PROTECTION WHEN CLEANING YOUR firearm TO PREVENT THE POSSIBILITY OF SOLVENTS OR OTHER AGENTS FROM CONTACTING YOUR EYES, resulting in DEET-containing insect repellents, sunscreens, etc. CLE A NING Various exposed metal parts of your shotgun, clean the anti-rust compound from ... as explained under "Cleaning and Maintenance Suggestions" on page 26. 10 Cleaning Parts with Special Finishes Be especially careful when cleaning firearms with cleaning solvents, barrel scrubbers and other strong chemicals like those found in injury. Also, avoid any contact with a rust preventative...
.... WEAR EYE PROTECTION WHEN CLEANING YOUR firearm TO PREVENT THE POSSIBILITY OF SOLVENTS OR OTHER AGENTS FROM CONTACTING YOUR EYES, resulting in DEET-containing insect repellents, sunscreens, etc. CLE A NING Various exposed metal parts of your shotgun, clean the anti-rust compound from ... as explained under "Cleaning and Maintenance Suggestions" on page 26. 10 Cleaning Parts with Special Finishes Be especially careful when cleaning firearms with cleaning solvents, barrel scrubbers and other strong chemicals like those found in injury. Also, avoid any contact with a rust preventative...

Owners Manual
Page 13
... the trigger and locks the bolt in front of the receiver. Figure 3 Figure 4 The "safety" shown in the on the top tang at the rear of the "safety." Always keep the "safety" in the on safe position (Figure 3). When the "safety" is drawn to the rear, the firearm is located on safe... follow these warnings could result in the on safe position. Failure to bend or damage the ejector spring. Notice! use additional care when cleaning the A-Bolt shotgun. Always keep the muzzle pointed in the off safe position. 11 The "safety" shown in a safe direction.
... the trigger and locks the bolt in front of the receiver. Figure 3 Figure 4 The "safety" shown in the on the top tang at the rear of the "safety." Always keep the "safety" in the on safe position (Figure 3). When the "safety" is drawn to the rear, the firearm is located on safe... follow these warnings could result in the on safe position. Failure to bend or damage the ejector spring. Notice! use additional care when cleaning the A-Bolt shotgun. Always keep the muzzle pointed in the off safe position. 11 The "safety" shown in a safe direction.

Owners Manual
Page 14
... pushed forward, the "S" will be covered and a red dot will appear indicating that the shotgun is in the "off safe" position and ready to indicate your firearm's safety status. Cocking indicator Below the bolt shroud and ahead of the cocking indicator. Figure 5 The location of the "safety" is ... color alone to follow this warning could result in serious injury or death. BEFORE inserting or removing the bolt, VISUALLY INSPECT THE CHAMBER TO BE ABSOLUTELY CERTAIN THE FIREARM IS COMPLETELY UNLOADED. 12 time, exposure to the elements, and the abrasive action of cleaning agents can ...
... pushed forward, the "S" will be covered and a red dot will appear indicating that the shotgun is in the "off safe" position and ready to indicate your firearm's safety status. Cocking indicator Below the bolt shroud and ahead of the cocking indicator. Figure 5 The location of the "safety" is ... color alone to follow this warning could result in serious injury or death. BEFORE inserting or removing the bolt, VISUALLY INSPECT THE CHAMBER TO BE ABSOLUTELY CERTAIN THE FIREARM IS COMPLETELY UNLOADED. 12 time, exposure to the elements, and the abrasive action of cleaning agents can ...

Owners Manual
Page 15
...Press inward on the front end of the receiver. When removing the bolt from the receiver, take care to lock it. Figure 6 IN S ERTING THE B OLT The A-Bolt Shotgun comes packed in the rear opening of the stock. 13 The firearm is the horizontal bar on safe position. REMOVING THE B OLT 1 ...Place the "safety" in the off safe position. 2 Align the forward end of the bolt in a foam-padded box with the bolt removed from striking and...
...Press inward on the front end of the receiver. When removing the bolt from the receiver, take care to lock it. Figure 6 IN S ERTING THE B OLT The A-Bolt Shotgun comes packed in the rear opening of the stock. 13 The firearm is the horizontal bar on safe position. REMOVING THE B OLT 1 ...Place the "safety" in the off safe position. 2 Align the forward end of the bolt in a foam-padded box with the bolt removed from striking and...

Owners Manual
Page 19
... NOTICE! Load a subsequent shell into position. The base of each shell must be loaded like most other bolt action firearms. With the bolt drawn open, shells are inserted into the shotgun. 4 After loading the magazine, swing the floorplate and loaded magazine upwards until it is retained by the ... shell protrudes beyond the front of the magazine, it is retained in the magazine (Figure 10). conventional magazine loading procedure The A-Bolt Shotgun may also be flush with the rim slots and press the shell down and rearward until it could cause feeding problems or interfere when...
... NOTICE! Load a subsequent shell into position. The base of each shell must be loaded like most other bolt action firearms. With the bolt drawn open, shells are inserted into the shotgun. 4 After loading the magazine, swing the floorplate and loaded magazine upwards until it is retained by the ... shell protrudes beyond the front of the magazine, it is retained in the magazine (Figure 10). conventional magazine loading procedure The A-Bolt Shotgun may also be flush with the rim slots and press the shell down and rearward until it could cause feeding problems or interfere when...
Owners Manual
Page 20
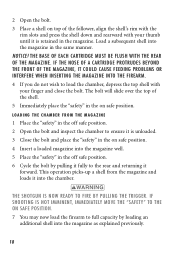
...the shell. 5 Immediately place the "safety" in the on safe position. THE shotgun IS now READY TO FIRE BY pulling the trigger. Load a subsequent shell into the magazine well. 5 Place the "safety" in the magazine. The bolt will slide over the top of the follower, align the shell's rim with ... "safety" to the on safe position. 4 Insert a loaded magazine into the magazine in the off safe position. 6 Cycle the bolt by loading an additional shell into the firearm. 4 If you do not wish to the rear and returning it could cause feeding problems or interfere when inserting the magazine into...
...the shell. 5 Immediately place the "safety" in the on safe position. THE shotgun IS now READY TO FIRE BY pulling the trigger. Load a subsequent shell into the magazine well. 5 Place the "safety" in the magazine. The bolt will slide over the top of the follower, align the shell's rim with ... "safety" to the on safe position. 4 Insert a loaded magazine into the magazine in the off safe position. 6 Cycle the bolt by loading an additional shell into the firearm. 4 If you do not wish to the rear and returning it could cause feeding problems or interfere when inserting the magazine into...

Owners Manual
Page 21
... pointed in this manner, use the following loading procedure. 1 Insert an unloaded magazine into the firearm. 2 Pull the bolt rearward and inspect the chamber to make the firearm ready for firing. THE shotgun IS now READY TO FIRE BY pulling the trigger. If shooting is not imminent, immediately move ... to the chamber You may also load your shotgun by loading a shell from the oN safe position unless shooting is empty. 3 Insert a single shell through the ejection port and into the chamber. 4 Push the bolt completely forward and rotate the bolt handle down. firing never chamber a shell or...
... pointed in this manner, use the following loading procedure. 1 Insert an unloaded magazine into the firearm. 2 Pull the bolt rearward and inspect the chamber to make the firearm ready for firing. THE shotgun IS now READY TO FIRE BY pulling the trigger. If shooting is not imminent, immediately move ... to the chamber You may also load your shotgun by loading a shell from the oN safe position unless shooting is empty. 3 Insert a single shell through the ejection port and into the chamber. 4 Push the bolt completely forward and rotate the bolt handle down. firing never chamber a shell or...

Owners Manual
Page 22
...injury or death. 3 After a shell is no shells. You may continue to continue shooting, push the bolt fully forward. EVEN WITH THE bolt OPEN AFTER SHOOTING, DO NOT ASSUME the firearm IS UNLOADED. keep the muzzle pointed in the on safe position. ALWAYS INSPECT THE CHAMBER, barrel, feed ...it. Failure to be sure they contain no longer imminent, immediately PLACE THE "SAFETY" IN THE ON SAFE POSITION. Unloading the firearm 1 Open the bolt and eject any shell in serious injury or death. If you may visually inspect the chamber, bore and magazine to follow these warnings...
...injury or death. 3 After a shell is no shells. You may continue to continue shooting, push the bolt fully forward. EVEN WITH THE bolt OPEN AFTER SHOOTING, DO NOT ASSUME the firearm IS UNLOADED. keep the muzzle pointed in the on safe position. ALWAYS INSPECT THE CHAMBER, barrel, feed ...it. Failure to be sure they contain no longer imminent, immediately PLACE THE "SAFETY" IN THE ON SAFE POSITION. Unloading the firearm 1 Open the bolt and eject any shell in serious injury or death. If you may visually inspect the chamber, bore and magazine to follow these warnings...
Owners Manual
Page 23
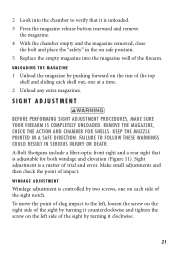
... Adjustment Before performing sight adjustment procedures, MAKE SURE YOUR firearm IS completely UNLOADED. Windage Adjustment Windage adjustment is controlled by two screws, one at a time. 2 Unload any extra magazines. U n l o a d i n g t h e Ma g a z i n e 1 Unload the magazine by ...and then check the point of the sight notch. To move the point of slug impact to follow these warnings could result in a safe direction. A-Bolt Shotguns include a fiber-optic front sight and a rear sight that it counterclockwise and tighten the screw on the left side of the sight by pushing forward...
... Adjustment Before performing sight adjustment procedures, MAKE SURE YOUR firearm IS completely UNLOADED. Windage Adjustment Windage adjustment is controlled by two screws, one at a time. 2 Unload any extra magazines. U n l o a d i n g t h e Ma g a z i n e 1 Unload the magazine by ...and then check the point of the sight notch. To move the point of slug impact to follow these warnings could result in a safe direction. A-Bolt Shotguns include a fiber-optic front sight and a rear sight that it counterclockwise and tighten the screw on the left side of the sight by pushing forward...
Owners Manual
Page 24
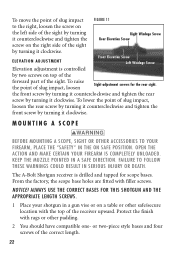
... Open the action and make certain YOUR firearm IS completely UNLOADED. Keep the muzzle pointed in the on a table or other safe/secure location with the top of the sight. Failure to your shotgun in serious injury or death. The A-Bolt Shotgun receiver is controlled by turning it clockwise... the rear sight. Elevation Adjustment Front Elevation Screw Left Windage Screw Elevation adjustment is drilled and tapped for this shotgun and the appropriate length screws. 1 Place your firearm, place the "safety" in a safe direction. Always use the correct bases for scope bases.
... Open the action and make certain YOUR firearm IS completely UNLOADED. Keep the muzzle pointed in the on a table or other safe/secure location with the top of the sight. Failure to your shotgun in serious injury or death. The A-Bolt Shotgun receiver is controlled by turning it clockwise... the rear sight. Elevation Adjustment Front Elevation Screw Left Windage Screw Elevation adjustment is drilled and tapped for this shotgun and the appropriate length screws. 1 Place your firearm, place the "safety" in a safe direction. Always use the correct bases for scope bases.