
Users Manual - English
Page 24
... last stitch to the first one or from the first stitch to the last one. To select a stitch, simply turn the balance wheel to the front (counter-clockwise) by hand to set the needle in either direction. The Pattern Selection Dial may be turned in the highest position before selecting the pattern... length dial NOTE: Since the Pattern Selection Dial is displayed. 13 KNOWING YOUR SEWING MACHINE CONNAITRE SA MACHINE A COUDRE CONOZCA SU MÁQUINA DE COSER XL-6562 1 2 3 4 5 6 7 8 9 10 11 12 13 14 15 16 17 18 19 20 21 22 23 24 25 26 27 28 29 30 31 32 33 34...
... last stitch to the first one or from the first stitch to the last one. To select a stitch, simply turn the balance wheel to the front (counter-clockwise) by hand to set the needle in either direction. The Pattern Selection Dial may be turned in the highest position before selecting the pattern... length dial NOTE: Since the Pattern Selection Dial is displayed. 13 KNOWING YOUR SEWING MACHINE CONNAITRE SA MACHINE A COUDRE CONOZCA SU MÁQUINA DE COSER XL-6562 1 2 3 4 5 6 7 8 9 10 11 12 13 14 15 16 17 18 19 20 21 22 23 24 25 26 27 28 29 30 31 32 33 34...
Users Manual - English
Page 38
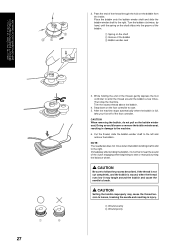
...bobbin winder shaft and slide the bobbin winder shaft to loosen, breaking the needle and resulting in damage to sew or manually turning the balance wheel. Doing so could loosen or remove the bobbin winder seat, resulting in injury. 1 Wound evenly 2 Wound poorly Immediately after winding the bobbin..., it may cause the thread tension to the right. Turn the bobbin clockwise, by hand, until the spring on the shaft slides into the groove of the bobbin 3 Bobbin winder seat 1 2 27 3. CAUTION Be sure to break. ...
...bobbin winder shaft and slide the bobbin winder shaft to loosen, breaking the needle and resulting in damage to sew or manually turning the balance wheel. Doing so could loosen or remove the bobbin winder seat, resulting in injury. 1 Wound evenly 2 Wound poorly Immediately after winding the bobbin..., it may cause the thread tension to the right. Turn the bobbin clockwise, by hand, until the spring on the shaft slides into the groove of the bobbin 3 Bobbin winder seat 1 2 27 3. CAUTION Be sure to break. ...

Users Manual - English
Page 78
Set the Pattern Selection Dial to the edge of the design by turning the balance wheel and make a few straight stitches at the end of the inside to the appropriate Zigzag Stitch setting. 3. EMBROIDERING 1. Connect the power supply plug into a wall ... the lettering (for monogramming) or design (for embroidering) on the bottom of the design. 67 Grip the hoop with the thumb and forefingers of both hands while pressing the fabric with the middle and third fingers and supporting the outside of the hoop with a few Straight Stitches at the end of...
Set the Pattern Selection Dial to the edge of the design by turning the balance wheel and make a few straight stitches at the end of the inside to the appropriate Zigzag Stitch setting. 3. EMBROIDERING 1. Connect the power supply plug into a wall ... the lettering (for monogramming) or design (for embroidering) on the bottom of the design. 67 Grip the hoop with the thumb and forefingers of both hands while pressing the fabric with the middle and third fingers and supporting the outside of the hoop with a few Straight Stitches at the end of...
Users Manual - English
Page 82
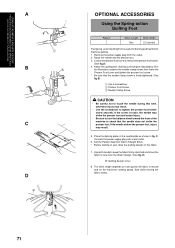
... Width 2.5 (center) The Spring -action Quilting Foot is moved and on the fabric. 7. Remove the power supply plug from the outlet. 2. Use both hands to keep the fabric firmly stretched and move the fabric to remove the presser foot holder. (See fig.A) 4. If the needle strikes the presser foot..., injury may strike the presser foot and cause injury. • Be sure to turn the balance wheel toward the front of the machine to sew, draw the quilting design on the machine's sewing speed. Connect the power supply plug into a wall outlet...
... Width 2.5 (center) The Spring -action Quilting Foot is moved and on the fabric. 7. Remove the power supply plug from the outlet. 2. Use both hands to keep the fabric firmly stretched and move the fabric to remove the presser foot holder. (See fig.A) 4. If the needle strikes the presser foot..., injury may strike the presser foot and cause injury. • Be sure to turn the balance wheel toward the front of the machine to sew, draw the quilting design on the machine's sewing speed. Connect the power supply plug into a wall outlet...


