
Users Manual - English
Page 2
... risk of electric shock: 1. Always unplug the machine from the outlet. 9. This sewing machine is intended for use by the manufacturer as threading the needle, changing the needle, threading the bobbin, or changing the presser foot. 15. Never operate the machine with any object into water. Special care is being administered. 8. WARNING...
... risk of electric shock: 1. Always unplug the machine from the outlet. 9. This sewing machine is intended for use by the manufacturer as threading the needle, changing the needle, threading the bobbin, or changing the presser foot. 15. Never operate the machine with any object into water. Special care is being administered. 8. WARNING...

Users Manual - English
Page 4
... Needle Threader (models equipped with a needle threader 19 Quick Thread-Setting System FAST START BOBBIN (models equipped with a quick thread-setting system) .... 20 Drawing up the lower thread ...21 Sewing with a Twin Needle ...21 Tension of the Thread ...22 CHART OF SEWING FABRICS, NEEDLES AND THREAD COMBINATIONS 24 Please Read Before Sewing ...25 Straight Stitching...
... Needle Threader (models equipped with a needle threader 19 Quick Thread-Setting System FAST START BOBBIN (models equipped with a quick thread-setting system) .... 20 Drawing up the lower thread ...21 Sewing with a Twin Needle ...21 Tension of the Thread ...22 CHART OF SEWING FABRICS, NEEDLES AND THREAD COMBINATIONS 24 Please Read Before Sewing ...25 Straight Stitching...

Users Manual - English
Page 5
... Plug in the reverse direction. J Zigzag presser foot KNOWING YOUR SEWING MACHINE PRINCIPAL PARTS 1 Bobbin-winding assembly (page 15) This winds the thread onto the bobbin, which you use this to stitch in the foot controller plug and connect the machine to the power supply. I Foot controller...Main power/sewing light switch (page 7) You can use for the lower thread. 2 Spool pin (page 15 and 18) Holds the spool of thread. 3 Bobbin-winding tension disc and thread guide (page 15) 4 Thread take-up lever (page 18) 5 Thread cutter (page 26) 6 Upper tension-control dial (page 22) This ...
... Plug in the reverse direction. J Zigzag presser foot KNOWING YOUR SEWING MACHINE PRINCIPAL PARTS 1 Bobbin-winding assembly (page 15) This winds the thread onto the bobbin, which you use this to stitch in the foot controller plug and connect the machine to the power supply. I Foot controller...Main power/sewing light switch (page 7) You can use for the lower thread. 2 Spool pin (page 15 and 18) Holds the spool of thread. 3 Bobbin-winding tension disc and thread guide (page 15) 4 Thread take-up lever (page 18) 5 Thread cutter (page 26) 6 Upper tension-control dial (page 22) This ...
Users Manual - English
Page 14
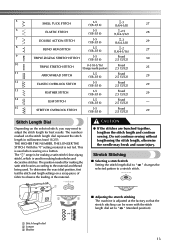
... length and continue sewing. Stretch Stitching ■ Selecting a stretch stitch Setting the stitch length dial to " SS " changes the selected pattern to the material and thread being used when sewing on a button. THE HIGHER THE NUMBER, THE LONGER THE STITCH. This is used for making a satin stitch (close zigzag stitch), which...
... length and continue sewing. Stretch Stitching ■ Selecting a stretch stitch Setting the stitch length dial to " SS " changes the selected pattern to the material and thread being used when sewing on a button. THE HIGHER THE NUMBER, THE LONGER THE STITCH. This is used for making a satin stitch (close zigzag stitch), which...
Users Manual - English
Page 15
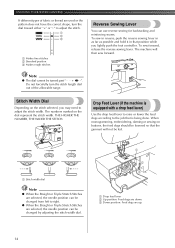
... feed lever to raise or lower the feed dogs according to adjust the stitch width. KNOWING YOUR SEWING MACHINE If different types of fabric or thread are used or the pattern does not have the correct shape, turn the stitch length dial out of the allowable range. . Do not forcefully turn...
... feed lever to raise or lower the feed dogs according to adjust the stitch width. KNOWING YOUR SEWING MACHINE If different types of fabric or thread are used or the pattern does not have the correct shape, turn the stitch length dial out of the allowable range. . Do not forcefully turn...
Users Manual - English
Page 16
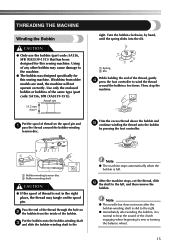
... does not move after the bobbin-winding shaft is slid to the right. ● Immediately after winding the bobbin, it is normal to wind the thread around the bobbin-winding tension disc. Turn the bobbin clockwise, by pressing the foot controller. 1 2 1 Bobbin-winding tension disc 2 Bobbin-winding shaft ...the machine. ● The bobbin was designed specifically for this sewing machine. right. Actual size 11.5 mm (7/16") Put the spool of thread on 2 the bobbin from older models are used, the machine will not operate correctly. Then, stop the machine. After the machine stops, cut the...
... does not move after the bobbin-winding shaft is slid to the right. ● Immediately after winding the bobbin, it is normal to wind the thread around the bobbin-winding tension disc. Turn the bobbin clockwise, by pressing the foot controller. 1 2 1 Bobbin-winding tension disc 2 Bobbin-winding shaft ...the machine. ● The bobbin was designed specifically for this sewing machine. right. Actual size 11.5 mm (7/16") Put the spool of thread on 2 the bobbin from older models are used, the machine will not operate correctly. Then, stop the machine. After the machine stops, cut the...

Users Manual - English
Page 17
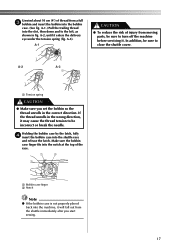
... follow the instructions carefully. Raise the needle to its highest position by pulling the latch toward you (counterclockwise) and raise the presser foot lever. Lower Threading CAUTION ● Setting the bobbin improperly may break the needle. 1 2 1 Wound evenly 2 Wound poorly 1 2 1 Wound evenly 2 Wound poorly ●...the foot controller and the machine starts to loosen, and may cause the thread tension to break. If you do not cut the thread completely, and the bobbin is wound, when the thread runs low it may cause the thread tension to work, you . 1 2 1 Bobbin case latch 2 ...
... follow the instructions carefully. Raise the needle to its highest position by pulling the latch toward you (counterclockwise) and raise the presser foot lever. Lower Threading CAUTION ● Setting the bobbin improperly may break the needle. 1 2 1 Wound evenly 2 Wound poorly 1 2 1 Wound evenly 2 Wound poorly ●...the foot controller and the machine starts to loosen, and may cause the thread tension to break. If you do not cut the thread completely, and the bobbin is wound, when the thread runs low it may cause the thread tension to work, you . 1 2 1 Bobbin case latch 2 ...
Users Manual - English
Page 18
...; To reduce the risk of injury from the shuttle immediately after you set the bobbin so the thread unrolls in fig. Make sure the bobbin case finger fits into the notch at the top of thread from a full 3 bobbin and insert the bobbin into the bobbin case. (See fig. Holding the ... the latch, fully 4 insert the bobbin case into the slot, then down and to the left, as shown in the correct direction. A-1.) Pull the trailing thread into the shuttle race and release the latch. In addition, be incorrect or break the needle. Unwind about 10 cm (4") of the race. 1 2 1 Bobbin case...
...; To reduce the risk of injury from the shuttle immediately after you set the bobbin so the thread unrolls in fig. Make sure the bobbin case finger fits into the notch at the top of thread from a full 3 bobbin and insert the bobbin into the bobbin case. (See fig. Holding the ... the latch, fully 4 insert the bobbin case into the slot, then down and to the left, as shown in the correct direction. A-1.) Pull the trailing thread into the shuttle race and release the latch. In addition, be incorrect or break the needle. Unwind about 10 cm (4") of the race. 1 2 1 Bobbin case...
Users Manual - English
Page 19
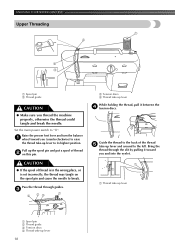
... foot lever and turn the balance 1 wheel toward you and into the eyelet. 1 1 1 Thread take-up lever 1 Spool pin 2 Thread guide 3 Tension discs 4 Thread take-up lever 18 Guide the thread to the back of thread 2 on the spool pin and cause the needle to the left. Pass the... the spool pin and put a spool of the thread 5 take -up lever While holding the thread, pull it toward you thread the machine properly, otherwise the thread could tangle and break the needle. Bring the thread through guides. 3 4 23 1 3 Tension discs 4 Thread take-up lever to "O". CAUTION ● If ...
... foot lever and turn the balance 1 wheel toward you and into the eyelet. 1 1 1 Thread take-up lever 1 Spool pin 2 Thread guide 3 Tension discs 4 Thread take-up lever 18 Guide the thread to the back of thread 2 on the spool pin and cause the needle to the left. Pass the... the spool pin and put a spool of the thread 5 take -up lever While holding the thread, pull it toward you thread the machine properly, otherwise the thread could tangle and break the needle. Bring the thread through guides. 3 4 23 1 3 Tension discs 4 Thread take-up lever to "O". CAUTION ● If ...
Users Manual - English
Page 20
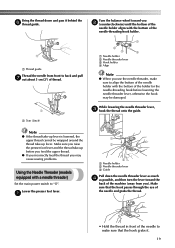
... needle threader lever, otherwise the hook may cause sewing problems. Using the Needle Threader (models equipped with the bottom of the needle to "O". Bring the thread down the needle threader lever as much 4 as possible, and then turn the lever toward the back of the machine (away from front to back... and pull 7 out about 5 cm (2") of thread. 1 1 5cm (2inch) Turn the balance wheel toward you 2 (counterclockwise) until the bottom of the needle holder aligns with the bottom of the needle...
... needle threader lever, otherwise the hook may cause sewing problems. Using the Needle Threader (models equipped with the bottom of the needle to "O". Bring the thread down the needle threader lever as much 4 as possible, and then turn the lever toward the back of the machine (away from front to back... and pull 7 out about 5 cm (2") of thread. 1 1 5cm (2inch) Turn the balance wheel toward you 2 (counterclockwise) until the bottom of the needle holder aligns with the bottom of the needle...
Users Manual - English
Page 21
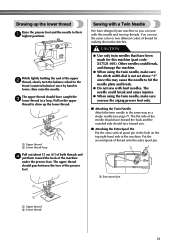
...the table on the cutter to 5 draw up the lower thread. Make sure the main power switch is not necessary to complete the lower threading. The hook will pull the thread through the needle. 1 2 1 1 Hook 2 Thread Quick Thread-Setting System FAST START BOBBIN (models equipped with home sewing machine...75/11-100/16. If you to start sewing immediately after inserting the bobbin without pulling up the bobbin thread.) (Refer to "O". KNOWING YOUR SEWING MACHINE While lightly holding the thread, turn the 5 needle threader lever toward the front of the machine (toward the back of the sewing...
...the table on the cutter to 5 draw up the lower thread. Make sure the main power switch is not necessary to complete the lower threading. The hook will pull the thread through the needle. 1 2 1 1 Hook 2 Thread Quick Thread-Setting System FAST START BOBBIN (models equipped with home sewing machine...75/11-100/16. If you to start sewing immediately after inserting the bobbin without pulling up the bobbin thread.) (Refer to "O". KNOWING YOUR SEWING MACHINE While lightly holding the thread, turn the 5 needle threader lever toward the front of the machine (toward the back of the sewing...
Users Manual - English
Page 22
... machine. ● When using the twin needle, make sure the stitch width dial is not set above "3" since this needle and two top threads. Pull on the top right-hand side of the machine under the presser foot. Other needles could break and cause injuries. ● When using... presser foot only. ■ Attaching the Twin Needle Attach the twin needle in a loop. Drawing up the lower thread. 1 2 1 Upper thread 2 Lower thread loop Pull out about 15 cm (6") of both threads and 4 put them toward the back and the rounded side should have been made for making decorative stitches. CAUTION ...
... machine. ● When using the twin needle, make sure the stitch width dial is not set above "3" since this needle and two top threads. Pull on the top right-hand side of the machine under the presser foot. Other needles could break and cause injuries. ● When using... presser foot only. ■ Attaching the Twin Needle Attach the twin needle in a loop. Drawing up the lower thread. 1 2 1 Upper thread 2 Lower thread loop Pull out about 15 cm (6") of both threads and 4 put them toward the back and the rounded side should have been made for making decorative stitches. CAUTION ...

Users Manual - English
Page 23
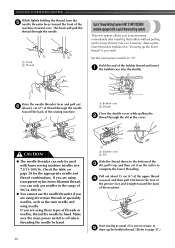
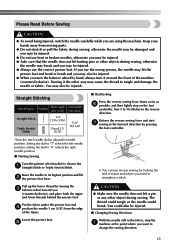
...on the reverse side of the fabric. Memo ● We recommend that you sew a scrap piece of your next project. Instead, the thread tension must be adjusted adequately with a small screwdriver in the bobbin by turning the dial to back. If the result is too loose.... Bobbin Increase the tension in a clockwise direction. Using the needle threader may need to thread the twin needle. Remember to return the screw to a lower number. 2 1 654 2 1 1 Reverse 2 Surface Upper tension is "5". 22 2 1 2 1 1 Reverse 2 Surface...
...on the reverse side of the fabric. Memo ● We recommend that you sew a scrap piece of your next project. Instead, the thread tension must be adjusted adequately with a small screwdriver in the bobbin by turning the dial to back. If the result is too loose.... Bobbin Increase the tension in a clockwise direction. Using the needle threader may need to thread the twin needle. Remember to return the screw to a lower number. 2 1 654 2 1 1 Reverse 2 Surface Upper tension is "5". 22 2 1 2 1 1 Reverse 2 Surface...
Users Manual - English
Page 25
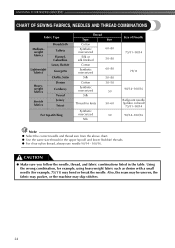
..., or the machine may bend or break the needle. KNOWING YOUR SEWING MACHINE CHART OF SEWING FABRICS, NEEDLES AND THREAD COMBINATIONS Fabric Type Mediumweight fabrics Lightweight fabrics Heavyweight fabrics Stretch fabrics Broadcloth Taffeta Flannel, Gabardine Lawn, Batiste Georgette Challis, Satin... Denim Corduroy Tweed Jersey Tricot For top-stitching Thread Type Cotton Synthetic mercerized Silk or silk finished Cotton Synthetic mercerized Silk Cotton Synthetic mercerized Silk Size 60-80 50...
..., or the machine may bend or break the needle. KNOWING YOUR SEWING MACHINE CHART OF SEWING FABRICS, NEEDLES AND THREAD COMBINATIONS Fabric Type Mediumweight fabrics Lightweight fabrics Heavyweight fabrics Stretch fabrics Broadcloth Taffeta Flannel, Gabardine Lawn, Batiste Georgette Challis, Satin... Denim Corduroy Tweed Jersey Tricot For top-stitching Thread Type Cotton Synthetic mercerized Silk or silk finished Cotton Synthetic mercerized Silk Cotton Synthetic mercerized Silk Size 60-80 50...
Users Manual - English
Page 26
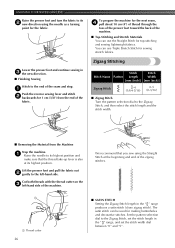
If you use the wrong presser, the needle may hit the presser foot and bend or break and you may cause the thread to adjust the needle position. Release the reverse sewing lever and start 7 sewing in the forward direction by hand, always turn the balance wheel by .... *Turn the stitch width dial to tangle and damage the needle or fabric. Pull up the lower thread by turning the 3 balance wheel toward the front of the machine (counterclockwise). Sew 5 to strengthen a stitch. The thread could tangle or the needle could also be injured. ● When you want to choose the...
If you use the wrong presser, the needle may hit the presser foot and bend or break and you may cause the thread to adjust the needle position. Release the reverse sewing lever and start 7 sewing in the forward direction by hand, always turn the balance wheel by .... *Turn the stitch width dial to tangle and damage the needle or fabric. Pull up the lower thread by turning the 3 balance wheel toward the front of the machine (counterclockwise). Sew 5 to strengthen a stitch. The thread could tangle or the needle could also be injured. ● When you want to choose the...
Users Manual - English
Page 27
... 26 ■ SATIN STITCH Setting the Zigzag Stitch length in the " " range, and set the stitch width dial between "0" and "5". Cut both threads with the thread cutter on the 3 left -hand side. Set the pattern selection dial to the Zigzag Stitch, set the stitch length in the " " range produces a satin... Stop the machine. 1 Raise the needle to its highest position. To prepare the machine for the next seam, 4 pull about 10 cm (4") of thread through the toes of the presser foot toward the back of the fabric. KNOWING YOUR SEWING MACHINE Raise the presser foot and turn the fabric...
... 26 ■ SATIN STITCH Setting the Zigzag Stitch length in the " " range, and set the stitch width dial between "0" and "5". Cut both threads with the thread cutter on the 3 left -hand side. Set the pattern selection dial to the Zigzag Stitch, set the stitch length in the " " range produces a satin... Stop the machine. 1 Raise the needle to its highest position. To prepare the machine for the next seam, 4 pull about 10 cm (4") of thread through the toes of the presser foot toward the back of the fabric. KNOWING YOUR SEWING MACHINE Raise the presser foot and turn the fabric...

Users Manual - English
Page 28
..., as in fig. C. 4 When the fabric is useful for stretch fabrics. Use the Blind Hem Stitch when sewing on the fold as in fig. Both threads should be used to finish the edge of a project, like ) edge on the seamline and the zigzag stitches sewn slightly over the folded edge. Set... the pattern selection dial to the Shell Tuck Stitch. 1 Adjust the thread tension so that 3 it is tighter 2 than normal. Sew at the edge. Leave a 6 mm (15/64") overlap at a slow speed. 4 27 Place the fabric under...
..., as in fig. C. 4 When the fabric is useful for stretch fabrics. Use the Blind Hem Stitch when sewing on the fold as in fig. Both threads should be used to finish the edge of a project, like ) edge on the seamline and the zigzag stitches sewn slightly over the folded edge. Set... the pattern selection dial to the Shell Tuck Stitch. 1 Adjust the thread tension so that 3 it is tighter 2 than normal. Sew at the edge. Leave a 6 mm (15/64") overlap at a slow speed. 4 27 Place the fabric under...
Users Manual - English
Page 29
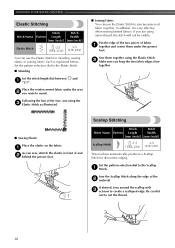
Put the edge of the two pieces of fabric 1 together and center them together using nylon thread, the stitch will not be visible. Place the reinforcement fabric under the presser foot. Scallop Stitching Stitch Stitch Stitch Name Pattern Length Width [mm (inch)]... fabrics. Sew them under the area 2 you keep the two fabric edges close together. If desired, trim around the scallop with 3 scissors to cut the thread. 28 Set the pattern selection dial to the Elastic Stitch. ■ Mending Set the stitch length dial between " " and 1 "2.5". ■ Joining Fabric You can...
Put the edge of the two pieces of fabric 1 together and center them together using nylon thread, the stitch will not be visible. Place the reinforcement fabric under the presser foot. Scallop Stitching Stitch Stitch Stitch Name Pattern Length Width [mm (inch)]... fabrics. Sew them under the area 2 you keep the two fabric edges close together. If desired, trim around the scallop with 3 scissors to cut the thread. 28 Set the pattern selection dial to the Elastic Stitch. ■ Mending Set the stitch length dial between " " and 1 "2.5". ■ Joining Fabric You can...
Users Manual - English
Page 32
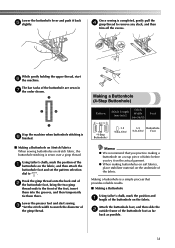
... the underside of fabric before you practice making buttonholes on soft fabrics, place stabilizer material on the fabric. Making a buttonhole is sewn over a gimp thread. Lower the presser foot and start 6 the machine. The bar tacks of the buttonhole are sewn in 7 the order shown. 3 2 4 1...the 2 outside frame of the foot, insert them into the grooves, and then temporarily tie them there. PUSH PUSH PUSH While gently holding the upper thread, start sewing. 3 *Set the stitch width to " ". Once sewing is 8 finished. ■ Making a Buttonhole on Stretch Fabrics When sewing ...
... the underside of fabric before you practice making buttonholes on soft fabrics, place stabilizer material on the fabric. Making a buttonhole is sewn over a gimp thread. Lower the presser foot and start 6 the machine. The bar tacks of the buttonhole are sewn in 7 the order shown. 3 2 4 1...the 2 outside frame of the foot, insert them into the grooves, and then temporarily tie them there. PUSH PUSH PUSH While gently holding the upper thread, start sewing. 3 *Set the stitch width to " ". Once sewing is 8 finished. ■ Making a Buttonhole on Stretch Fabrics When sewing ...

Users Manual - English
Page 35
... sew different types of zippers, and can easily position the zipper to the left side of the zipper foot. Cut 6 the upper and lower threads and tie both threads at the back of the material 2 cm (3/4") and 3 place the zipper under the folded section. If it hits, see step 1. When sewing the...
... sew different types of zippers, and can easily position the zipper to the left side of the zipper foot. Cut 6 the upper and lower threads and tie both threads at the back of the material 2 cm (3/4") and 3 place the zipper under the folded section. If it hits, see step 1. When sewing the...


