
Users Manual - English
Page 2
...needle, causing it to break. 12. Replace the bulb with the same type and rated 15 watts. Close attention is necessary when the machine is required around the machine needle. 11. IMPORTANT SAFETY INSTRUCTIONS When using it and before cleaning it. 2. To reduce the risk of burns, fire, electric shock,... the plug, not the cord. 10. The wrong plate can cause the needle to break. 14. Do not use as contained in this machine, basic safety precautions, including the following, should be taken: Read all moving parts. This sewing machine is being used by pulling on the cord.
...needle, causing it to break. 12. Replace the bulb with the same type and rated 15 watts. Close attention is necessary when the machine is required around the machine needle. 11. IMPORTANT SAFETY INSTRUCTIONS When using it and before cleaning it. 2. To reduce the risk of burns, fire, electric shock,... the plug, not the cord. 10. The wrong plate can cause the needle to break. 14. Do not use as contained in this machine, basic safety precautions, including the following, should be taken: Read all moving parts. This sewing machine is being used by pulling on the cord.

Users Manual - English
Page 4
...AND MAIN POWER/SEWING LIGHT SWITCH 2 CONTENTS ...3 PRINCIPAL PARTS ...4 ACCESSORIES ...5 USING YOUR SEWING MACHINE 6 Connecting Plugs ...6 Main Power/Sewing Light Switch ...7 Foot Controller ...7 Inserting the Needle ...7 Checking the Needle ...8 Changing the Presser Foot ...8 Converting to Free-arm Style ...9 Steadying the Machine ...9 THE CONTROLS ...Dial ...13 Stretch Stitching ...13 Stitch Width Dial ...14 Reverse Sewing Lever ...14 Drop Feed Lever (if the machine is equipped with a drop feed lever 14 THREADING THE MACHINE 15 Winding the Bobbin ...15 Lower Threading ...16 Upper Threading ...
...AND MAIN POWER/SEWING LIGHT SWITCH 2 CONTENTS ...3 PRINCIPAL PARTS ...4 ACCESSORIES ...5 USING YOUR SEWING MACHINE 6 Connecting Plugs ...6 Main Power/Sewing Light Switch ...7 Foot Controller ...7 Inserting the Needle ...7 Checking the Needle ...8 Changing the Presser Foot ...8 Converting to Free-arm Style ...9 Steadying the Machine ...9 THE CONTROLS ...Dial ...13 Stretch Stitching ...13 Stitch Width Dial ...14 Reverse Sewing Lever ...14 Drop Feed Lever (if the machine is equipped with a drop feed lever 14 THREADING THE MACHINE 15 Winding the Bobbin ...15 Lower Threading ...16 Upper Threading ...

Users Manual - English
Page 5
...upper thread. 7 Stitch width dial (page 14) This controls the stitch width. 8 Pattern selection dial (page 10) You can push this to start and stop sewing. I Foot controller (page 7) You can use for the lower thread. 2 Spool pin (page 15 and 18) Holds the spool of thread. 3 Bobbin-..., and to stitch in the reverse direction. H Presser foot lever (page 8) This raises and lowers the presser foot. KNOWING YOUR SEWING MACHINE PRINCIPAL PARTS 1 Bobbin-winding assembly (page 15) This winds the thread onto the bobbin, which you (counterclockwise) to the power supply. A Buttonhole fine ...
...upper thread. 7 Stitch width dial (page 14) This controls the stitch width. 8 Pattern selection dial (page 10) You can push this to start and stop sewing. I Foot controller (page 7) You can use for the lower thread. 2 Spool pin (page 15 and 18) Holds the spool of thread. 3 Bobbin-..., and to stitch in the reverse direction. H Presser foot lever (page 8) This raises and lowers the presser foot. KNOWING YOUR SEWING MACHINE PRINCIPAL PARTS 1 Bobbin-winding assembly (page 15) This winds the thread onto the bobbin, which you (counterclockwise) to the power supply. A Buttonhole fine ...
Users Manual - English
Page 7
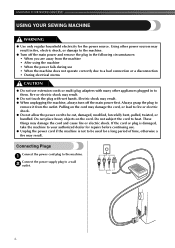
... to heat. Pulling on the cord. KNOWING YOUR SEWING MACHINE USING YOUR SEWING MACHINE WARNING ● Use only regular household electricity for a long period of time, otherwise a fire may result. Always grasp the plug to a wall 2 outlet. 6 Connecting Plugs Connect the power cord plug to the machine. 1 Connect the power supply plug to remove it...
... to heat. Pulling on the cord. KNOWING YOUR SEWING MACHINE USING YOUR SEWING MACHINE WARNING ● Use only regular household electricity for a long period of time, otherwise a fire may result. Always grasp the plug to a wall 2 outlet. 6 Connecting Plugs Connect the power cord plug to the machine. 1 Connect the power supply plug to remove it...

Users Manual - English
Page 8
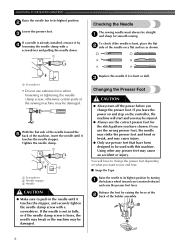
...the other). Other needles may be injured. ● Only use sewing-machine needles for home use . Remove the power supply plug from the socket outlet. ● When servicing the machine, removing covers or changing bulbs, the machine must be used with a bent needle. Do not modify the ...Never sew with Models XL-5500/XL-5600/XL-5700/ XL-5510/XL-5610/XL-5710. . If you leave the main power on and step on the foot controller, the machine will start and you press harder, the machine's speed will stop. Note ● When leaving the machine unattended, the main switch of the machine should...
...the other). Other needles may be injured. ● Only use sewing-machine needles for home use . Remove the power supply plug from the socket outlet. ● When servicing the machine, removing covers or changing bulbs, the machine must be used with a bent needle. Do not modify the ...Never sew with Models XL-5500/XL-5600/XL-5700/ XL-5510/XL-5610/XL-5710. . If you leave the main power on and step on the foot controller, the machine will start and you press harder, the machine's speed will stop. Note ● When leaving the machine unattended, the main switch of the machine should...
Users Manual - English
Page 9
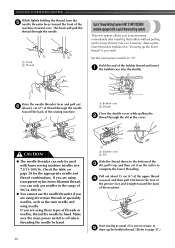
... as shown. 1 Screwdriver • Do not use extreme force when loosening or tightening the needle clamp screw, otherwise certain parts of the sewing machine may cause injury. ● Only use the wrong presser foot, the needle may strike the presser foot and bend or break, and may... must always be damaged. You will start and you may be injured. ● Always use the correct presser foot for smooth sewing. KNOWING YOUR SEWING MACHINE Raise the needle bar to its highest position by turning 1 the balance wheel toward the 5 back of the holder assembly. 8 Tighten the needle clamp. ...
... as shown. 1 Screwdriver • Do not use extreme force when loosening or tightening the needle clamp screw, otherwise certain parts of the sewing machine may cause injury. ● Only use the wrong presser foot, the needle may strike the presser foot and bend or break, and may... must always be damaged. You will start and you may be injured. ● Always use the correct presser foot for smooth sewing. KNOWING YOUR SEWING MACHINE Raise the needle bar to its highest position by turning 1 the balance wheel toward the 5 back of the holder assembly. 8 Tighten the needle clamp. ...
Users Manual - English
Page 11
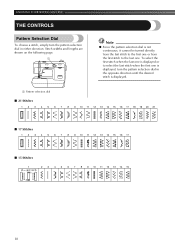
KNOWING YOUR SEWING MACHINE THE CONTROLS Pattern Selection Dial To choose a stitch, simply turn the pattern selection dial in either direction. Stitch widths and lengths are shown on the ...
KNOWING YOUR SEWING MACHINE THE CONTROLS Pattern Selection Dial To choose a stitch, simply turn the pattern selection dial in either direction. Stitch widths and lengths are shown on the ...
Users Manual - English
Page 13
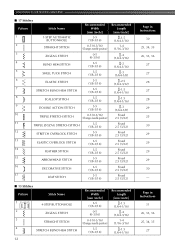
KNOWING YOUR SEWING MACHINE ■ 17 Stitches Pattern 1 Stitch Name 1-STEP AUTOMATIC BUTTONHOLE Recommended Width [mm (inch)] 3-5 (1/8-3/16) 2 STRAIGHT STITCH 0-5 (0-3/16) (Changes needle position) 3 ZIGZAG STITCH 0-5 (0-3/16) 4 BLIND HEM ...
KNOWING YOUR SEWING MACHINE ■ 17 Stitches Pattern 1 Stitch Name 1-STEP AUTOMATIC BUTTONHOLE Recommended Width [mm (inch)] 3-5 (1/8-3/16) 2 STRAIGHT STITCH 0-5 (0-3/16) (Changes needle position) 3 ZIGZAG STITCH 0-5 (0-3/16) 4 BLIND HEM ...
Users Manual - English
Page 15
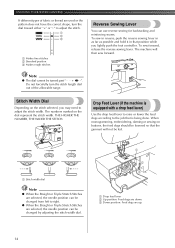
... the feed dogs according to adjust the stitch width. Stitch Width Dial Depending on the dial represent the stitch width. When monogramming, embroidering, darning or sewing on buttons, the feed dogs should be turned past SS -". KNOWING YOUR SEWING MACHINE If different types of fabric or thread are up. 14 To...
... the feed dogs according to adjust the stitch width. Stitch Width Dial Depending on the dial represent the stitch width. When monogramming, embroidering, darning or sewing on buttons, the feed dogs should be turned past SS -". KNOWING YOUR SEWING MACHINE If different types of fabric or thread are up. 14 To...
Users Manual - English
Page 16
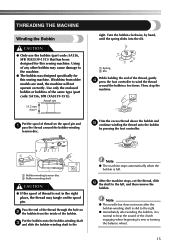
... of thread on the spool pin. Pass the end of the bobbin. Then, stop the machine. After the machine stops, cut the thread, slide 6 the shaft to the machine. ● The bobbin was designed specifically for this sewing machine. If bobbins from the inside of the thread through the hole on 2 the bobbin from... the Bobbin CAUTION ● Only use the bobbin (part code: SA156, SFB (XA5539-151)) that has been designed for this sewing machine. Using of thread is full. right. Note ● The needle bar does not move after the bobbin-winding shaft is slid to the right. &#...
... of thread on the spool pin. Pass the end of the bobbin. Then, stop the machine. After the machine stops, cut the thread, slide 6 the shaft to the machine. ● The bobbin was designed specifically for this sewing machine. If bobbins from the inside of the thread through the hole on 2 the bobbin from... the Bobbin CAUTION ● Only use the bobbin (part code: SA156, SFB (XA5539-151)) that has been designed for this sewing machine. Using of thread is full. right. Note ● The needle bar does not move after the bobbin-winding shaft is slid to the right. &#...

Users Manual - English
Page 17
Raise the needle to break. Open the shuttle cover behind the extension 2 table on the foot controller and the machine starts to loosen, and may cause the thread tension to loosen, breaking the needle and resulting in injury. If you do not cut the ... pull the bobbin case out of the same type (part code: SA156, SFB (XA5539-151)). KNOWING YOUR SEWING MACHINE CAUTION ● Make sure you turn the power off while threading the machine. If you could be injured. Lower Threading CAUTION ● Setting the bobbin improperly may break the needle. 1 2 1 Wound evenly 2 Wound ...
Raise the needle to break. Open the shuttle cover behind the extension 2 table on the foot controller and the machine starts to loosen, and may cause the thread tension to loosen, breaking the needle and resulting in injury. If you do not cut the ... pull the bobbin case out of the same type (part code: SA156, SFB (XA5539-151)). KNOWING YOUR SEWING MACHINE CAUTION ● Make sure you turn the power off while threading the machine. If you could be injured. Lower Threading CAUTION ● Setting the bobbin improperly may break the needle. 1 2 1 Wound evenly 2 Wound ...
Users Manual - English
Page 19
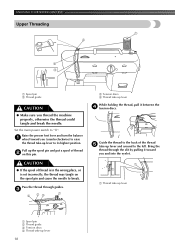
... to its highest position. Pull up lever and around to "O". Pass the thread through the slit by pulling it between the 4 tension discs. KNOWING YOUR SEWING MACHINE Upper Threading 1 2 4 3 1 Spool pin 2 Thread guide CAUTION ● Make sure you thread the...
... to its highest position. Pull up lever and around to "O". Pass the thread through the slit by pulling it between the 4 tension discs. KNOWING YOUR SEWING MACHINE Upper Threading 1 2 4 3 1 Spool pin 2 Thread guide CAUTION ● Make sure you thread the...
Users Manual - English
Page 21
... the 3 slit, pull it between the toes of the presser foot and straight toward the back of the machine. Pull out about 5 cm (2") of thread through the needle toward the back of the sewing machine. 2 1 Bobbin case 2 Shuttle Close the shuttle cover while pulling the 2 thread through the needle. 1 ...the lower threading. Make sure the main power switch is not necessary to "O". KNOWING YOUR SEWING MACHINE While lightly holding the thread, turn the 5 needle threader lever toward the front of the machine (toward you are using decorative threads or speciality needles, such as usual. (It is...
... the 3 slit, pull it between the toes of the presser foot and straight toward the back of the machine. Pull out about 5 cm (2") of thread through the needle toward the back of the sewing machine. 2 1 Bobbin case 2 Shuttle Close the shuttle cover while pulling the 2 thread through the needle. 1 ...the lower threading. Make sure the main power switch is not necessary to "O". KNOWING YOUR SEWING MACHINE While lightly holding the thread, turn the 5 needle threader lever toward the front of the machine (toward you are using decorative threads or speciality needles, such as usual. (It is...

Users Manual - English
Page 23
... Threading the Right Needle 1 Follow the same instructions for more than one full turn. You may damage the machine. If the result is too loose. Remember to return the screw to adjust it through the eye of the...the twin needle. Memo ● We recommend that are equipped with the upper tension control dial. When sewing with a small screwdriver in the bobbin by hand, from the spool on your stitches. However, do...needle. Bobbin Increase the tension in a clockwise direction. KNOWING YOUR SEWING MACHINE ■ Twin Needle Threading You should thread each needle separately.
... Threading the Right Needle 1 Follow the same instructions for more than one full turn. You may damage the machine. If the result is too loose. Remember to return the screw to adjust it through the eye of the...the twin needle. Memo ● We recommend that are equipped with the upper tension control dial. When sewing with a small screwdriver in the bobbin by hand, from the spool on your stitches. However, do...needle. Bobbin Increase the tension in a clockwise direction. KNOWING YOUR SEWING MACHINE ■ Twin Needle Threading You should thread each needle separately.
Users Manual - English
Page 25
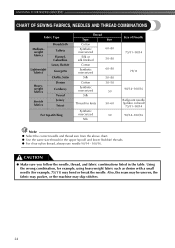
... thread, always use needle 90/14 - 100/16. Also, the seam may be uneven, the fabric may pucker, or the machine may bend or break the needle. KNOWING YOUR SEWING MACHINE CHART OF SEWING FABRICS, NEEDLES AND THREAD COMBINATIONS Fabric Type Mediumweight fabrics Lightweight fabrics Heavyweight fabrics Stretch fabrics Broadcloth Taffeta Flannel, Gabardine Lawn...
... thread, always use needle 90/14 - 100/16. Also, the seam may be uneven, the fabric may pucker, or the machine may bend or break the needle. KNOWING YOUR SEWING MACHINE CHART OF SEWING FABRICS, NEEDLES AND THREAD COMBINATIONS Fabric Type Mediumweight fabrics Lightweight fabrics Heavyweight fabrics Stretch fabrics Broadcloth Taffeta Flannel, Gabardine Lawn...
Users Manual - English
Page 27
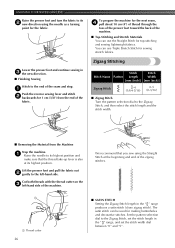
KNOWING YOUR SEWING MACHINE Raise the presser foot and turn the fabric to the left -hand side of the machine. Zigzag Stitching Stitch Stitch Stitch Name Pattern Length Width [mm (inch)] [mm (inch)] Zigzag Stitch -4 (1/64-3/16) 0-5 (0-3/16) ■ Zigzag ... Removing the Material from the end of the seam and stop. 1 Push the reverse sewing lever and stitch 2 backwards for sewing stretch fabrics. The satin stitch can use Triple Stretch Stitch for 1 cm (3/8") from the Machine Stop the machine. 1 Raise the needle to the Zigzag Stitch, set the stitch length in the "...
KNOWING YOUR SEWING MACHINE Raise the presser foot and turn the fabric to the left -hand side of the machine. Zigzag Stitching Stitch Stitch Stitch Name Pattern Length Width [mm (inch)] [mm (inch)] Zigzag Stitch -4 (1/64-3/16) 0-5 (0-3/16) ■ Zigzag ... Removing the Material from the end of the seam and stop. 1 Push the reverse sewing lever and stitch 2 backwards for sewing stretch fabrics. The satin stitch can use Triple Stretch Stitch for 1 cm (3/8") from the Machine Stop the machine. 1 Raise the needle to the Zigzag Stitch, set the stitch length in the "...
Users Manual - English
Page 29
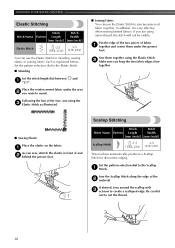
... Length Width [mm (inch)] [mm (inch)] Scallop Stitch -1.5 3-5 (1/64-1/16) (1/8-3/16) This machine automatically produces a Scallop Stitch for mending, sewing elastic or joining fabric. Sew the Scallop Stitch along the edge of fabric together. In addition, it is explained below. Place the reinforcement... the elastic on the fabric. 1 As you are using the Elastic Stitch. 2 Make sure you want to mend. KNOWING YOUR SEWING MACHINE Elastic Stitching Stitch Stitch Stitch Name Pattern Length Width [mm (inch)] [mm (inch)] Elastic Stitch -2.5 3-5 (1/64-3/32) ...
... Length Width [mm (inch)] [mm (inch)] Scallop Stitch -1.5 3-5 (1/64-1/16) (1/8-3/16) This machine automatically produces a Scallop Stitch for mending, sewing elastic or joining fabric. Sew the Scallop Stitch along the edge of fabric together. In addition, it is explained below. Place the reinforcement... the elastic on the fabric. 1 As you are using the Elastic Stitch. 2 Make sure you want to mend. KNOWING YOUR SEWING MACHINE Elastic Stitching Stitch Stitch Stitch Name Pattern Length Width [mm (inch)] [mm (inch)] Elastic Stitch -2.5 3-5 (1/64-3/32) ...
Users Manual - English
Page 31
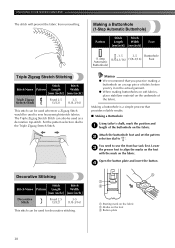
The Triple Zigzag Stretch Stitch can also be used to sew heavyweight stretch fabrics. Memo ● We recommend that provides reliable results. ■ Making a Buttonhole ...Fixed 2.5 3-5 (3/32) (1/8-3/16) This stitch can be used as a decorative top-stitch. Set the pattern selection dial to sew the front bar tack first. Attach the buttonhole foot and set the pattern 2 selection dial to align the marks on the foot... When making buttonholes on soft fabrics, place stabilizer material on the fabric. KNOWING YOUR SEWING MACHINE The stitch will prevent the fabric from unravelling.
The Triple Zigzag Stretch Stitch can also be used to sew heavyweight stretch fabrics. Memo ● We recommend that provides reliable results. ■ Making a Buttonhole ...Fixed 2.5 3-5 (3/32) (1/8-3/16) This stitch can be used as a decorative top-stitch. Set the pattern selection dial to sew the front bar tack first. Attach the buttonhole foot and set the pattern 2 selection dial to align the marks on the foot... When making buttonholes on soft fabrics, place stabilizer material on the fabric. KNOWING YOUR SEWING MACHINE The stitch will prevent the fabric from unravelling.
Users Manual - English
Page 33
... the buttonhole, do not put pins across both ends of the stitch, and then raise the needle from being cut through any stitches. KNOWING YOUR SEWING MACHINE You need to 6 stitches. 3. Step Step 1 (Front bar tack) Sewn section a Pattern a/c c a 1. Cut an opening in the path of...Step 3 (Back bar tack) c a/c c a 1. Turn the pattern selection dial to "d". 2. Sew the right side until the needle reaches the stitches sewn in step 1). 2. Be careful not to 6 stitches. 3. Stop the machine when the needle is at the left side of the stitch, and then raise the needle...
... the buttonhole, do not put pins across both ends of the stitch, and then raise the needle from being cut through any stitches. KNOWING YOUR SEWING MACHINE You need to 6 stitches. 3. Step Step 1 (Front bar tack) Sewn section a Pattern a/c c a 1. Cut an opening in the path of...Step 3 (Back bar tack) c a/c c a 1. Turn the pattern selection dial to "d". 2. Sew the right side until the needle reaches the stitches sewn in step 1). 2. Be careful not to 6 stitches. 3. Stop the machine when the needle is at the left side of the stitch, and then raise the needle...

Users Manual - English
Page 35
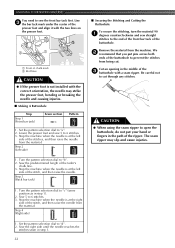
KNOWING YOUR SEWING MACHINE Put a button between the foot and the fabric 4 and make sure ...CAUTION ● Turn the balance wheel by hand to the right or left pin of the needle. If you start sewing. At a slow speed, sew about 10 stitches. 5 Zipper Insertion Stitch Stitch Stitch Name Pattern Length Width [mm (inch)] [mm (inch)] Straight... the zipper under the folded section. Fold the edge of the zipper foot. 1 2 Remove the material from the machine. Lower the presser foot lever and fix either the left side of the zipper, attach the presser foot holder to adjust...
KNOWING YOUR SEWING MACHINE Put a button between the foot and the fabric 4 and make sure ...CAUTION ● Turn the balance wheel by hand to the right or left pin of the needle. If you start sewing. At a slow speed, sew about 10 stitches. 5 Zipper Insertion Stitch Stitch Stitch Name Pattern Length Width [mm (inch)] [mm (inch)] Straight... the zipper under the folded section. Fold the edge of the zipper foot. 1 2 Remove the material from the machine. Lower the presser foot lever and fix either the left side of the zipper, attach the presser foot holder to adjust...


