
Users Manual - English
Page 2
... (spray) products are being administered. 8. Always unplug the machine from the outlet. 9. This sewing machine is being used as contained in the instruction manual. 16. SAVE THESE INSTRUCTIONS This machine is required around the machine needle. 11. IMPORTANT SAFETY INSTRUCTIONS When using it and before... with any object into water. Use this machine, basic safety precautions, including the following, should never be taken: Read all moving parts. Use only accessories recommended by pulling on the cord. Never operate the machine with the same type and rated 15 watts...
... (spray) products are being administered. 8. Always unplug the machine from the outlet. 9. This sewing machine is being used as contained in the instruction manual. 16. SAVE THESE INSTRUCTIONS This machine is required around the machine needle. 11. IMPORTANT SAFETY INSTRUCTIONS When using it and before... with any object into water. Use this machine, basic safety precautions, including the following, should never be taken: Read all moving parts. Use only accessories recommended by pulling on the cord. Never operate the machine with the same type and rated 15 watts...

Users Manual - English
Page 4
... AND MAIN POWER/SEWING LIGHT SWITCH 2 CONTENTS ...3 PRINCIPAL PARTS ...4 ACCESSORIES ...5 USING YOUR SEWING MACHINE 6 Connecting Plugs ...6 Main Power/Sewing Light Switch ...7 Foot Controller ...7 Inserting the Needle ...7 Checking the Needle ...8 Changing the Presser Foot ...8 Converting to Free-arm Style ...9 Steadying the Machine ...9 THE CONTROLS ...Dial ...13 Stretch Stitching ...13 Stitch Width Dial ...14 Reverse Sewing Lever ...14 Drop Feed Lever (if the machine is equipped with a drop feed lever 14 THREADING THE MACHINE 15 Winding the Bobbin ...15 Lower Threading ...16 Upper Threading...
... AND MAIN POWER/SEWING LIGHT SWITCH 2 CONTENTS ...3 PRINCIPAL PARTS ...4 ACCESSORIES ...5 USING YOUR SEWING MACHINE 6 Connecting Plugs ...6 Main Power/Sewing Light Switch ...7 Foot Controller ...7 Inserting the Needle ...7 Checking the Needle ...8 Changing the Presser Foot ...8 Converting to Free-arm Style ...9 Steadying the Machine ...9 THE CONTROLS ...Dial ...13 Stretch Stitching ...13 Stitch Width Dial ...14 Reverse Sewing Lever ...14 Drop Feed Lever (if the machine is equipped with a drop feed lever 14 THREADING THE MACHINE 15 Winding the Bobbin ...15 Lower Threading ...16 Upper Threading...

Users Manual - English
Page 5
... width dial (page 14) This controls the stitch width. 8 Pattern selection dial (page 10) You can turn this in the reverse direction. KNOWING YOUR SEWING MACHINE PRINCIPAL PARTS 1 Bobbin-winding assembly (page 15) This winds the thread onto the bobbin, which you use this to control the... sewing speed, and to raise and lower the needle. G Foot controller receptacle (page 6) Plug in the foot controller plug and connect the machine to stitch in either direction to choose ...
... width dial (page 14) This controls the stitch width. 8 Pattern selection dial (page 10) You can turn this in the reverse direction. KNOWING YOUR SEWING MACHINE PRINCIPAL PARTS 1 Bobbin-winding assembly (page 15) This winds the thread onto the bobbin, which you use this to control the... sewing speed, and to raise and lower the needle. G Foot controller receptacle (page 6) Plug in the foot controller plug and connect the machine to stitch in either direction to choose ...
Users Manual - English
Page 6
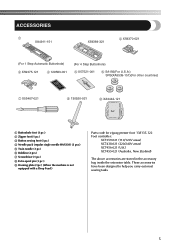
...001 6 SA156(For U.S.A.) SFB(XA5539-151)(For other countries) 7 X55467-021 8 130920-021 9 XA3442-121 1 Buttonhole foot (1 pc.) 2 Zipper foot (1 pc.) 3 Button sewing foot (1 pc.) 4 Needle pack (regular single needle HAX130) (3 pcs.) 5 Twin needle (1 pc.) 6 Bobbins (3 pcs.) 7 Screwdriver (1 pc.) 8 Extra spool pin (1 ...pc.) 9 Darning plate (1pc.) (When the machine is not equipped with a Drop Feed.) Parts code for zigzag presser foot: 138135-122 Foot controller: XC7359-021 (110/120V areas) XC7438-021 (220/240V areas) XC7456-021 ...
...001 6 SA156(For U.S.A.) SFB(XA5539-151)(For other countries) 7 X55467-021 8 130920-021 9 XA3442-121 1 Buttonhole foot (1 pc.) 2 Zipper foot (1 pc.) 3 Button sewing foot (1 pc.) 4 Needle pack (regular single needle HAX130) (3 pcs.) 5 Twin needle (1 pc.) 6 Bobbins (3 pcs.) 7 Screwdriver (1 pc.) 8 Extra spool pin (1 ...pc.) 9 Darning plate (1pc.) (When the machine is not equipped with a Drop Feed.) Parts code for zigzag presser foot: 138135-122 Foot controller: XC7359-021 (110/120V areas) XC7438-021 (220/240V areas) XC7456-021 ...
Users Manual - English
Page 9
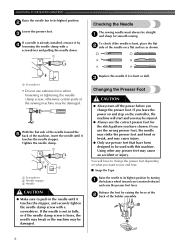
... or tightening the needle clamp screw, otherwise certain parts of the sewing machine may be injured. ● Always use the correct presser foot for smooth sewing. If you leave the power on and step on the controller, the machine will have to change the presser foot. Using ...clamp screw with a screwdriver and pulling the needle down. 1 Checking the Needle The sewing needle must always be damaged. Replace the needle if it by 4 loosening the needle clamp with a screwdriver. KNOWING YOUR SEWING MACHINE Raise the needle bar to its highest position. 2 Lower the presser foot. 3...
... or tightening the needle clamp screw, otherwise certain parts of the sewing machine may be injured. ● Always use the correct presser foot for smooth sewing. If you leave the power on and step on the controller, the machine will have to change the presser foot. Using ...clamp screw with a screwdriver and pulling the needle down. 1 Checking the Needle The sewing needle must always be damaged. Replace the needle if it by 4 loosening the needle clamp with a screwdriver. KNOWING YOUR SEWING MACHINE Raise the needle bar to its highest position. 2 Lower the presser foot. 3...
Users Manual - English
Page 16
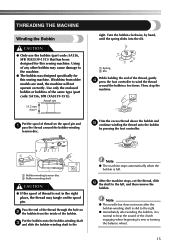
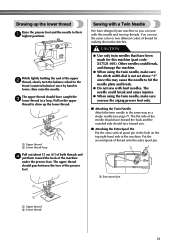
... the hole on 2 the bobbin from older models are used, the machine will not operate correctly. right. THREADING THE MACHINE Winding the Bobbin CAUTION ● Only use the bobbin (part code: SA156, SFB (XA5539-151)) that has been designed for this sewing machine. After the machine stops, cut the thread, slide 6 the shaft to the left...
... the hole on 2 the bobbin from older models are used, the machine will not operate correctly. right. THREADING THE MACHINE Winding the Bobbin CAUTION ● Only use the bobbin (part code: SA156, SFB (XA5539-151)) that has been designed for this sewing machine. After the machine stops, cut the thread, slide 6 the shaft to the left...

Users Manual - English
Page 17
... evenly 2 Wound poorly 1 2 1 Wound evenly 2 Wound poorly ● The bobbin was designed specifically for this sewing machine. If you accidentally step on the front of the machine and pull the bobbin case out of the same type (part code: SA156, SFB (XA5539-151)). If bobbins from older models are used, the... bobbins of the shuttle race by turning 1 the balance wheel toward you (counterclockwise) and raise the presser foot lever. KNOWING YOUR SEWING MACHINE CAUTION ● Make sure you do not cut the thread completely, and the bobbin is wound, when the thread runs low it...
... evenly 2 Wound poorly 1 2 1 Wound evenly 2 Wound poorly ● The bobbin was designed specifically for this sewing machine. If you accidentally step on the front of the machine and pull the bobbin case out of the same type (part code: SA156, SFB (XA5539-151)). If bobbins from older models are used, the... bobbins of the shuttle race by turning 1 the balance wheel toward you (counterclockwise) and raise the presser foot lever. KNOWING YOUR SEWING MACHINE CAUTION ● Make sure you do not cut the thread completely, and the bobbin is wound, when the thread runs low it...
Users Manual - English
Page 18
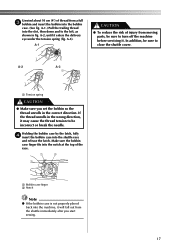
Unwind about 10 cm (4") of injury from moving parts, be sure to turn off the machine before servicing it. A-1 CAUTION ● To reduce the risk of ...bobbin case into the bobbin case. (See fig. A-2 A-3 1 1 Tension spring CAUTION ● Make sure you start sewing. 17 If the thread unrolls in the wrong direction, it may cause the thread tension to be sure to the left,... as shown in the correct direction. A-1.) Pull the trailing thread into the machine, it enters the delivery eye under the tension spring (fig. Make sure the bobbin case finger fits into...
Unwind about 10 cm (4") of injury from moving parts, be sure to turn off the machine before servicing it. A-1 CAUTION ● To reduce the risk of ...bobbin case into the bobbin case. (See fig. A-2 A-3 1 1 Tension spring CAUTION ● Make sure you start sewing. 17 If the thread unrolls in the wrong direction, it may cause the thread tension to be sure to the left,... as shown in the correct direction. A-1.) Pull the trailing thread into the machine, it enters the delivery eye under the tension spring (fig. Make sure the bobbin case finger fits into...
Users Manual - English
Page 22
... positions. The upper thread should face toward you use the same color or two different colors of thread for this machine (part code: X57521-001). The needle could break, and damage the machine. ● When using the twin needle, make sure the stitch width dial is not set above "3" since this ... 2 thread, slowly turn the balance wheel to the front (counterclockwise) once by hand to hit the needle plate and break. ● Do not sew with this may cause the needle to lower, then raise the needle. Other needles could break and cause injuries. ● When using the twin needle...
... positions. The upper thread should face toward you use the same color or two different colors of thread for this machine (part code: X57521-001). The needle could break, and damage the machine. ● When using the twin needle, make sure the stitch width dial is not set above "3" since this ... 2 thread, slowly turn the balance wheel to the front (counterclockwise) once by hand to hit the needle plate and break. ● Do not sew with this may cause the needle to lower, then raise the needle. Other needles could break and cause injuries. ● When using the twin needle...
Users Manual - English
Page 26
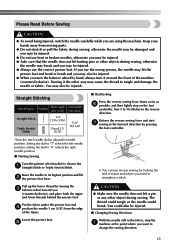
... thread could tangle or the needle could also be injured. ■ Changing Sewing Direction With the needle still in the fabric, stop the 1 machine at the point where you may cause the thread to strengthen a stitch. Sew 5 to 10 stitches in the forward direction by pressing the foot controller. ...and lift 2 the presser foot lever. Put the fabric under the presser foot and 4 position the needle 1 cm (3/8") from moving parts. ● Do not stretch or pull the fabric during sewing. If you use bent or broken needles, otherwise you may also be injured. ● Always use reverse...
... thread could tangle or the needle could also be injured. ■ Changing Sewing Direction With the needle still in the fabric, stop the 1 machine at the point where you may cause the thread to strengthen a stitch. Sew 5 to 10 stitches in the forward direction by pressing the foot controller. ...and lift 2 the presser foot lever. Put the fabric under the presser foot and 4 position the needle 1 cm (3/8") from moving parts. ● Do not stretch or pull the fabric during sewing. If you use bent or broken needles, otherwise you may also be injured. ● Always use reverse...
Users Manual - English
Page 44
... for Extra Spool Pin 21 I Inserting the Needle 7 L Leaf Stitch 11, 12, 13 Legs Stitch 11 Lower Threading 16 M Main Power and Sewing Light Switch 2, 7 Maintenance 38 Making a Buttonhole 30, 31 Monogramming and Embroidering 36 N Needle Replacement 7 Needle Threader 19 O Oiling 38 Overedge Stitching... Selection Dial 10 Pattern Width 11 Performance Checklist 40 Presser foot lever 4 Presser Foot Replacement 8 Principal Parts 4 Q Quick Thread-setting System 20 R Rampart Stitch 11 Recommended Widths and Lengths for Stitches 11 Repacking the Machine 42 Reverse Sewing Lever 14 43
... for Extra Spool Pin 21 I Inserting the Needle 7 L Leaf Stitch 11, 12, 13 Legs Stitch 11 Lower Threading 16 M Main Power and Sewing Light Switch 2, 7 Maintenance 38 Making a Buttonhole 30, 31 Monogramming and Embroidering 36 N Needle Replacement 7 Needle Threader 19 O Oiling 38 Overedge Stitching... Selection Dial 10 Pattern Width 11 Performance Checklist 40 Presser foot lever 4 Presser Foot Replacement 8 Principal Parts 4 Q Quick Thread-setting System 20 R Rampart Stitch 11 Recommended Widths and Lengths for Stitches 11 Repacking the Machine 42 Reverse Sewing Lever 14 43

Accessory Catalog
Page 4
...with just right pressure. 1. Brother General Sewing Accessories 05 Sew as you like. SA161 All Brother home-use sewing machines www.brother.com Adjustable Zipper & Piping Foot Brother General Sewing Accessories 06 Adjustable Zipper & Piping Foot Attaches zippers and pipings easily. Screw on the edge of zipper/piping, avoiding the non-flat parts of the presser foot and... foot and select a straight stitch (left or right. 3. Requires Low Shank Adapter for ULT series, PC-6500, PC-8200 and PC-8500 sewing machines. Position the presser foot over the long feed dogs on the presser foot...
...with just right pressure. 1. Brother General Sewing Accessories 05 Sew as you like. SA161 All Brother home-use sewing machines www.brother.com Adjustable Zipper & Piping Foot Brother General Sewing Accessories 06 Adjustable Zipper & Piping Foot Attaches zippers and pipings easily. Screw on the edge of zipper/piping, avoiding the non-flat parts of the presser foot and... foot and select a straight stitch (left or right. 3. Requires Low Shank Adapter for ULT series, PC-6500, PC-8200 and PC-8500 sewing machines. Position the presser foot over the long feed dogs on the presser foot...

Accessory Catalog
Page 6
... facing up under the presser foot. 3. Brother General Sewing Accessories 09 Narrow Hemmer Foot Non Stick Foot Overlock Foot Picot Foot Brother General Sewing Accessories 10 SA126 ABCDEFJKMN SA127 GHILOP Skirt Innov...Innov-is exactly against the edge of the foot. 6. Overlock Foot For vertical bobbin machines only. Position the edge of the fabric. Place the fabric with fabrics such as ...the curled part of the fabric. 4. Slowly sew 2-3 stitches, making sure the fabric is rolling around the curled part of the foot. 7. Position the edge of the fabric. Sews overcast seams...
... facing up under the presser foot. 3. Brother General Sewing Accessories 09 Narrow Hemmer Foot Non Stick Foot Overlock Foot Picot Foot Brother General Sewing Accessories 10 SA126 ABCDEFJKMN SA127 GHILOP Skirt Innov...Innov-is exactly against the edge of the foot. 6. Overlock Foot For vertical bobbin machines only. Position the edge of the fabric. Place the fabric with fabrics such as ...the curled part of the fabric. 4. Slowly sew 2-3 stitches, making sure the fabric is rolling around the curled part of the foot. 7. Position the edge of the fabric. Sews overcast seams...


