

Users Manual - English
Page 2
... needle plate. Always unplug the sewing machine from the electrical outlet when removing covers, lubricating, or when making any openings. 6. turer as threading the needle, changing the needle, threading the bobbin, or changing the presser foot. 15. The wrong plate can cause the needle to break. 14. It may deflect the needle...
... needle plate. Always unplug the sewing machine from the electrical outlet when removing covers, lubricating, or when making any openings. 6. turer as threading the needle, changing the needle, threading the bobbin, or changing the presser foot. 15. The wrong plate can cause the needle to break. 14. It may deflect the needle...

Users Manual - English
Page 6
... STITCHES 11 Stitch Length Dial 14 Stretch Stitching 15 Stitch Width Dial 16 Reverse Sewing Lever 17 THREADING THE MACHINE 18 Winding the Bobbin 18 Lower Threading 19 Upper (Needle) Threading 20 Using the Needle Threader (when the machine is equipped with a needle threader) .. 22 ...Quick Thread-setting System FAST START BOBBIN (when the machine is equipped with a quick thread-setting system 24 Drawing Up Lower Thread 25 Twin-Needle Sewing 26 Thread Tension 27 CHART OF SEWING FABRICS, NEEDLES AND THREAD COMBINATIONS 29 STRAIGHT AND ZIGZAG STITCHING Straight...
... STITCHES 11 Stitch Length Dial 14 Stretch Stitching 15 Stitch Width Dial 16 Reverse Sewing Lever 17 THREADING THE MACHINE 18 Winding the Bobbin 18 Lower Threading 19 Upper (Needle) Threading 20 Using the Needle Threader (when the machine is equipped with a needle threader) .. 22 ...Quick Thread-setting System FAST START BOBBIN (when the machine is equipped with a quick thread-setting system 24 Drawing Up Lower Thread 25 Twin-Needle Sewing 26 Thread Tension 27 CHART OF SEWING FABRICS, NEEDLES AND THREAD COMBINATIONS 29 STRAIGHT AND ZIGZAG STITCHING Straight...

Users Manual - English
Page 9
.... 8 Pattern selection dial Turn in either direction to select the desired stitch. 9 Stitch length dial Controls the length of the upper thread. G Presser foot lever Raises and lowers the presser foot. E Main power/sewing light switch Turns the main power and sewing light ...PRINCIPAL PARTS 34 62 1 1 Bobbin winding assembly Winds the thread onto the bobbin to be used for the lower thread. 2 Spool pin A Holds the spool of thread. 3 Bobbin winding tension disc and thread guide 5 9 4 Thread take-up lever 8 5 Thread cutter 7 6 Upper tension control dial Controls the tension of ...
.... 8 Pattern selection dial Turn in either direction to select the desired stitch. 9 Stitch length dial Controls the length of the upper thread. G Presser foot lever Raises and lowers the presser foot. E Main power/sewing light switch Turns the main power and sewing light ...PRINCIPAL PARTS 34 62 1 1 Bobbin winding assembly Winds the thread onto the bobbin to be used for the lower thread. 2 Spool pin A Holds the spool of thread. 3 Bobbin winding tension disc and thread guide 5 9 4 Thread take-up lever 8 5 Thread cutter 7 6 Upper tension control dial Controls the tension of ...

Users Manual - English
Page 28
...3 BUTTONHOLE AND BUTTON SEWING USING ATTACHMENTS AND APPLICATIONS A 4 23 1 C B D 4 4 E 5 Upper (Needle) Threading Turn power switch to raise the thread take-up the spool pin and place a spool of thread on it behind the thread guide. 5 Thread guide 7. Pull up lever to back and pull out about 5 cm (2") of the... thread take-up lever 4. Pass the thread through the slit by pulling it to the back of thread as shown in fig. Bring the thread through guides. (See fig. NOTE: Incorrectly feeding the thread may cause it toward you and into ...
...3 BUTTONHOLE AND BUTTON SEWING USING ATTACHMENTS AND APPLICATIONS A 4 23 1 C B D 4 4 E 5 Upper (Needle) Threading Turn power switch to raise the thread take-up the spool pin and place a spool of thread on it behind the thread guide. 5 Thread guide 7. Pull up lever to back and pull out about 5 cm (2") of the... thread take-up lever 4. Pass the thread through the slit by pulling it to the back of thread as shown in fig. Bring the thread through guides. (See fig. NOTE: Incorrectly feeding the thread may cause it toward you and into ...

Users Manual - English
Page 30
... needle threader lever toward the front of the machine (toward you ). Raise the needle threader lever and pull out about 5 cm (2") of thread through the needle toward the back of the machine (away from you). Make sure that the hook grabs it. 1 Needle holder 2 Needle ... as possible, then rotate the lever toward the back of the sewing machine. • Only use needles of sizes #90 to check that the appropriate thread and needle are being used. CONTENTS KNOWING YOUR SEWING MACHINE STRAIGHT AND ZIGZAG STITCHING BUILT-IN STITCHES 1 2 3 1 2 4 5 7 6 6 Using the Needle...
... needle threader lever toward the front of the machine (toward you ). Raise the needle threader lever and pull out about 5 cm (2") of thread through the needle toward the back of the machine (away from you). Make sure that the hook grabs it. 1 Needle holder 2 Needle ... as possible, then rotate the lever toward the back of the sewing machine. • Only use needles of sizes #90 to check that the appropriate thread and needle are being used. CONTENTS KNOWING YOUR SEWING MACHINE STRAIGHT AND ZIGZAG STITCHING BUILT-IN STITCHES 1 2 3 1 2 4 5 7 6 6 Using the Needle...

Users Manual - English
Page 33
... fil supérieur. CONTENTS KNOWING YOUR SEWING MACHINE STRAIGHT AND ZIGZAG STITCHING BUILT-IN STITCHES 1 2 Drawing Up Lower Thread 1. The upper thread should have caught the lower thread in a large loop. 4. Con la mano derecha, gire la ruedecilla hacia usted (en el sentido contrario al de ...turn the balance wheel toward you (counterclockwise) until the needle moves down and back up from the bobbin in a loop. The upper thread should pass between the toes of the machine straight behind the presser foot. El hilo superior debe pasar entre los salientes del prensatelas. ...
... fil supérieur. CONTENTS KNOWING YOUR SEWING MACHINE STRAIGHT AND ZIGZAG STITCHING BUILT-IN STITCHES 1 2 Drawing Up Lower Thread 1. The upper thread should have caught the lower thread in a large loop. 4. Con la mano derecha, gire la ruedecilla hacia usted (en el sentido contrario al de ...turn the balance wheel toward you (counterclockwise) until the needle moves down and back up from the bobbin in a loop. The upper thread should pass between the toes of the machine straight behind the presser foot. El hilo superior debe pasar entre los salientes del prensatelas. ...

Users Manual - English
Page 35
... before sewing on the surface of the fabric. It may need to a higher number. 1 Reverse 2 Surface NOTE: The lower thread tension has already been adjusted at the factory for general use. CONTENTS KNOWING YOUR SEWING MACHINE STRAIGHT AND ZIGZAG STITCHING BUILT-IN STITCHES ...A 2 1 2 1 B 2 1 2 1 A-1 654 B-1 654 C 2 1 2 1 Thread Tension Thread tension will weaken your seams or cause puckers in your fabric. 1 Reverse 2 Surface BUTTONHOLE AND BUTTON SEWING USING ATTACHMENTS AND APPLICATIONS MAINTENANCE INDEX...
... before sewing on the surface of the fabric. It may need to a higher number. 1 Reverse 2 Surface NOTE: The lower thread tension has already been adjusted at the factory for general use. CONTENTS KNOWING YOUR SEWING MACHINE STRAIGHT AND ZIGZAG STITCHING BUILT-IN STITCHES ...A 2 1 2 1 B 2 1 2 1 A-1 654 B-1 654 C 2 1 2 1 Thread Tension Thread tension will weaken your seams or cause puckers in your fabric. 1 Reverse 2 Surface BUTTONHOLE AND BUTTON SEWING USING ATTACHMENTS AND APPLICATIONS MAINTENANCE INDEX...

Users Manual - English
Page 37
... (canilla). 29 INDEX CONTENTS KNOWING YOUR SEWING MACHINE STRAIGHT AND ZIGZAG STITCHING BUILT-IN STITCHES CHART OF SEWING FABRICS, NEEDLES AND THREAD COMBINATIONS VERY THIN LIGHTWEIGHT MEDIUM WEIGHT HEAVYWEIGHT SEWING FABRICS Fine tricot, Fine lace, Thin linen, Silk, Organza, Chiffon Voile, Taffeta... Velvet, Lightweight wool, Fine corduroy, Suitings, Linen, Muslin NEEDLE SIZES #70/10 #80/12 #90/14 (Supplied with your machine.) THREAD SIZES Cotton: 80 Synthetic Fine Mercerized Cotton Cotton: 60~80 Silk: "A" Synthetic Mercerized 50 Cotton: 50~60 Silk: "A" Synthetic Mercerized 50...
... (canilla). 29 INDEX CONTENTS KNOWING YOUR SEWING MACHINE STRAIGHT AND ZIGZAG STITCHING BUILT-IN STITCHES CHART OF SEWING FABRICS, NEEDLES AND THREAD COMBINATIONS VERY THIN LIGHTWEIGHT MEDIUM WEIGHT HEAVYWEIGHT SEWING FABRICS Fine tricot, Fine lace, Thin linen, Silk, Organza, Chiffon Voile, Taffeta... Velvet, Lightweight wool, Fine corduroy, Suitings, Linen, Muslin NEEDLE SIZES #70/10 #80/12 #90/14 (Supplied with your machine.) THREAD SIZES Cotton: 80 Synthetic Fine Mercerized Cotton Cotton: 60~80 Silk: "A" Synthetic Mercerized 50 Cotton: 50~60 Silk: "A" Synthetic Mercerized 50...
Users Manual - English
Page 43
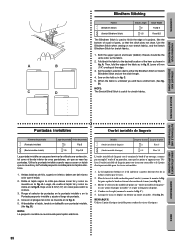
... montre la fig. D.) REMARQUE: Utiliser l'point élastique invisible pour coudre des tissus élastiques. 35 MAINTENANCE INDEX Both the upper (spool) and lower (bobbin) threads should be the same color as in fig. A. Utilice la puntada invisible cuando vaya a coser un tejido que no se estire y la Puntada pespunto invisible...
... montre la fig. D.) REMARQUE: Utiliser l'point élastique invisible pour coudre des tissus élastiques. 35 MAINTENANCE INDEX Both the upper (spool) and lower (bobbin) threads should be the same color as in fig. A. Utilice la puntada invisible cuando vaya a coser un tejido que no se estire y la Puntada pespunto invisible...

Users Manual - English
Page 50
... AND BUTTON SEWING USING ATTACHMENTS AND APPLICATIONS MAINTENANCE INDEX 42 Using tailor's chalk, mark the position of the buttonhole foot, then bring the two gimp thread ends to remove any slack, then trim off the excess. B.) 5. Lower the buttonhole lever and push it on the fabric as in fig....the presser foot aligning the marks on the foot with the marks on the actual garment. 2. Buttonhole stitching is completed, gently pull the gimp thread to the front of fabric before attempting it back slightly as shown in fig. Mark the position of the buttonhole on a scrap piece of the...
... AND BUTTON SEWING USING ATTACHMENTS AND APPLICATIONS MAINTENANCE INDEX 42 Using tailor's chalk, mark the position of the buttonhole foot, then bring the two gimp thread ends to remove any slack, then trim off the excess. B.) 5. Lower the buttonhole lever and push it on the fabric as in fig....the presser foot aligning the marks on the foot with the marks on the actual garment. 2. Buttonhole stitching is completed, gently pull the gimp thread to the front of fabric before attempting it back slightly as shown in fig. Mark the position of the buttonhole on a scrap piece of the...

Users Manual - English
Page 57
... appropriate stitch width with a drop feed lever, lower the feed dogs by setting the drop feed lever to "1.5". 2. Cut the upper and lower threads and tie the two threads at the back of the fabric. Attach the button sewing foot. 3. CONTENTS KNOWING YOUR SEWING MACHINE STRAIGHT AND ZIGZAG STITCHING BUILT-IN STITCHES...
... appropriate stitch width with a drop feed lever, lower the feed dogs by setting the drop feed lever to "1.5". 2. Cut the upper and lower threads and tie the two threads at the back of the fabric. Attach the button sewing foot. 3. CONTENTS KNOWING YOUR SEWING MACHINE STRAIGHT AND ZIGZAG STITCHING BUILT-IN STITCHES...

Users Manual - English
Page 59
... needle. B.) 6. BUTTONHOLE AND BUTTON SEWING USING ATTACHMENTS AND APPLICATIONS MAINTENANCE Gathering Pattern (Straight Stitch) Stitch Length 4 1. Pull the lower thread(s) to the Straight Stitch. Set the pattern selection dial to gather the material. Lower the presser foot lever and attach the presser foot ...See fig. INDEX 51 When sewing the right side of the zipper, attach the presser foot holder to about "2") so that the lower thread lies on both sides. Set the stitch length between "2" and "3". 2. To sew the opposite side of the zipper, release the foot...
... needle. B.) 6. BUTTONHOLE AND BUTTON SEWING USING ATTACHMENTS AND APPLICATIONS MAINTENANCE Gathering Pattern (Straight Stitch) Stitch Length 4 1. Pull the lower thread(s) to the Straight Stitch. Set the pattern selection dial to gather the material. Lower the presser foot lever and attach the presser foot ...See fig. INDEX 51 When sewing the right side of the zipper, attach the presser foot holder to about "2") so that the lower thread lies on both sides. Set the stitch length between "2" and "3". 2. To sew the opposite side of the zipper, release the foot...

Users Manual - English
Page 68
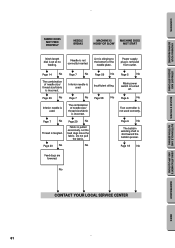
...w Pages 19-20 No w Wrong needle is incorrect. w Page 7 No w The combination of needle size/ thread size/fabric is tangled. If you to the bottom of thread is not correct. w Page 29 No w w Page 19 No w Bobbin is clinging to improve the operation....section in the shuttle hook. UPPER THREAD BREAKS LOWER THREAD BREAKS SKIPPED STITCHES LOOP IN SEAM FABRIC PUCKERS Upper threading is not correctly installed. Lower thread is incorrectly inserted. Needle is tangled. Thread tension is too tight. w Page 20 No w Upper thread tension is incorrect. w Page 7...
...w Pages 19-20 No w Wrong needle is incorrect. w Page 7 No w The combination of needle size/ thread size/fabric is tangled. If you to the bottom of thread is not correct. w Page 29 No w w Page 19 No w Bobbin is clinging to improve the operation....section in the shuttle hook. UPPER THREAD BREAKS LOWER THREAD BREAKS SKIPPED STITCHES LOOP IN SEAM FABRIC PUCKERS Upper threading is not correctly installed. Lower thread is incorrectly inserted. Needle is tangled. Thread tension is too tight. w Page 20 No w Upper thread tension is incorrect. w Page 7...
Users Manual - English
Page 69
... No w w w w CONTACT YOUR LOCAL SERVICE CENTER BUTTONHOLE AND BUTTON SEWING USING ATTACHMENTS AND APPLICATIONS MAINTENANCE INDEX 61 w Page 7 No w Thread is used correctly. Do not pull the fabric. Lint is set at no feeding. w Page 18 No Feed dogs are lowered. CONTENTS KNOWING YOUR...clinging to the bottom of the needle plate. w Page 14 No w The combination of needle size/ thread size/fabric is incorrect. w Page 7 No w The combination of needle size/ thread size/fabric is incorrect. No w Page 59 No w Insufficient oiling. w Page 58 No w ...
... No w w w w CONTACT YOUR LOCAL SERVICE CENTER BUTTONHOLE AND BUTTON SEWING USING ATTACHMENTS AND APPLICATIONS MAINTENANCE INDEX 61 w Page 7 No w Thread is used correctly. Do not pull the fabric. Lint is set at no feeding. w Page 18 No Feed dogs are lowered. CONTENTS KNOWING YOUR...clinging to the bottom of the needle plate. w Page 14 No w The combination of needle size/ thread size/fabric is incorrect. w Page 7 No w The combination of needle size/ thread size/fabric is incorrect. No w Page 59 No w Insufficient oiling. w Page 58 No w ...

Users Manual - English
Page 75
...P Pattern Lengths 11 Pattern Selection Dial 10 Pattern Widths 11 Performance Checklist 60-61 Presser Foot Replacement 8 Principal Parts 1 Q Quick Thread-setting System 24 R Repacking 66 Reverse Sewing Lever 17 S Scallop Stitching 38 Sewing Direction 32 Sewing Light Bulb Replacement 57 Switch ... Stitching 31 Stretch Blindhem Stitching 35 Stretch Material Sewing 33 Stretch Overlock 39 Stretch Stitching 15 T Threading Bobbin 19, 24 Needle 20, 22 Thread Tension 27 Topstitching 33 Tree Stitch 11 Triple Stretch Stitching 31 Triple Zigzag Stretch Stitching 41 Troubleshooting ...
...P Pattern Lengths 11 Pattern Selection Dial 10 Pattern Widths 11 Performance Checklist 60-61 Presser Foot Replacement 8 Principal Parts 1 Q Quick Thread-setting System 24 R Repacking 66 Reverse Sewing Lever 17 S Scallop Stitching 38 Sewing Direction 32 Sewing Light Bulb Replacement 57 Switch ... Stitching 31 Stretch Blindhem Stitching 35 Stretch Material Sewing 33 Stretch Overlock 39 Stretch Stitching 15 T Threading Bobbin 19, 24 Needle 20, 22 Thread Tension 27 Topstitching 33 Tree Stitch 11 Triple Stretch Stitching 31 Triple Zigzag Stretch Stitching 41 Troubleshooting ...


