

Users Manual - English
Page 2
... machine to break. 12. Do not use as a toy. To unplug, grasp the plug and pull, not the cord. 10. turer as threading the needle, changing the needle, threading the bobbin, or changing the presser foot. 15. Always unplug this machine to the off , then remove plug from the electrical outlet immediately...
... machine to break. 12. Do not use as a toy. To unplug, grasp the plug and pull, not the cord. 10. turer as threading the needle, changing the needle, threading the bobbin, or changing the presser foot. 15. Always unplug this machine to the off , then remove plug from the electrical outlet immediately...

Users Manual - English
Page 6
... STITCHES 11 Stitch Length Dial 14 Stretch Stitching 15 Stitch Width Dial 16 Reverse Sewing Lever 17 THREADING THE MACHINE 18 Winding the Bobbin 18 Lower Threading 19 Upper (Needle) Threading 20 Using the Needle Threader (when the machine is equipped with a needle threader) .. 22 ...Quick Thread-setting System FAST START BOBBIN (when the machine is equipped with a quick thread-setting system 24 Drawing Up Lower Thread 25 Twin-Needle Sewing 26 Thread Tension 27 CHART OF SEWING FABRICS, NEEDLES AND THREAD COMBINATIONS 29 STRAIGHT AND ZIGZAG STITCHING Straight...
... STITCHES 11 Stitch Length Dial 14 Stretch Stitching 15 Stitch Width Dial 16 Reverse Sewing Lever 17 THREADING THE MACHINE 18 Winding the Bobbin 18 Lower Threading 19 Upper (Needle) Threading 20 Using the Needle Threader (when the machine is equipped with a needle threader) .. 22 ...Quick Thread-setting System FAST START BOBBIN (when the machine is equipped with a quick thread-setting system 24 Drawing Up Lower Thread 25 Twin-Needle Sewing 26 Thread Tension 27 CHART OF SEWING FABRICS, NEEDLES AND THREAD COMBINATIONS 29 STRAIGHT AND ZIGZAG STITCHING Straight...

Users Manual - English
Page 9
...IN STITCHES PRINCIPAL PARTS 34 62 1 1 Bobbin winding assembly Winds the thread onto the bobbin to be used for the lower thread. 2 Spool pin A Holds the spool of thread. 3 Bobbin winding tension disc and thread guide 5 9 4 Thread take-up lever 8 5 Thread cutter 7 6 Upper tension control dial Controls the tension of the stitches... selection dial Turn in either direction to select the desired stitch. 9 Stitch length dial Controls the length of the upper thread. H Foot controller Used to raise and lower the needle. G Presser foot lever Raises and lowers the presser foot.
...IN STITCHES PRINCIPAL PARTS 34 62 1 1 Bobbin winding assembly Winds the thread onto the bobbin to be used for the lower thread. 2 Spool pin A Holds the spool of thread. 3 Bobbin winding tension disc and thread guide 5 9 4 Thread take-up lever 8 5 Thread cutter 7 6 Upper tension control dial Controls the tension of the stitches... selection dial Turn in either direction to select the desired stitch. 9 Stitch length dial Controls the length of the upper thread. H Foot controller Used to raise and lower the needle. G Presser foot lever Raises and lowers the presser foot.

Users Manual - English
Page 28
...guides. (See fig. NOTE: Incorrectly feeding the thread may cause it behind the thread guide. 5 Thread guide 7. While holding the thread as shown in fig. Bring the thread down and pass it to its highest position. 2. A.) 1 Spool pin 2 Thread guide 3 Tension discs 4 Thread take -up lever to break, skip stitches or ...wrinkle the fabric. 20 MAINTENANCE INDEX Guide the thread to the left (fig. Thread the needle from front to back and pull out about 5 cm (2") of the thread take-up lever and around to the back of thread as shown in fig. B, C, pull it . 3. Pull ...
...guides. (See fig. NOTE: Incorrectly feeding the thread may cause it behind the thread guide. 5 Thread guide 7. While holding the thread as shown in fig. Bring the thread down and pass it to its highest position. 2. A.) 1 Spool pin 2 Thread guide 3 Tension discs 4 Thread take -up lever to break, skip stitches or ...wrinkle the fabric. 20 MAINTENANCE INDEX Guide the thread to the left (fig. Thread the needle from front to back and pull out about 5 cm (2") of the thread take-up lever and around to the back of thread as shown in fig. B, C, pull it . 3. Pull ...

Users Manual - English
Page 30
... as possible, then rotate the lever toward the back of the needlethreading-hook holder. 1 Needle holder 2 Needle threader lever NOTE: When using transparent nylon thread, use the needle threader with needle sizes #70 to #100. In addition, refer to the CHART OF SEWING FABRICS, NEEDLES AND...Guide 4 Hook holder 5 Align 5. Otherwise, the hook may be sure to check that the hook passes through the eye of the needle and grabs the thread. • Hold the thread in order to "O". 1. Turn the balance wheel toward you ). Lower the presser foot lever. 2. While lightly holding the...
... as possible, then rotate the lever toward the back of the needlethreading-hook holder. 1 Needle holder 2 Needle threader lever NOTE: When using transparent nylon thread, use the needle threader with needle sizes #70 to #100. In addition, refer to the CHART OF SEWING FABRICS, NEEDLES AND...Guide 4 Hook holder 5 Align 5. Otherwise, the hook may be sure to check that the hook passes through the eye of the needle and grabs the thread. • Hold the thread in order to "O". 1. Turn the balance wheel toward you ). Lower the presser foot lever. 2. While lightly holding the...

Users Manual - English
Page 33
..., juste derrière le pied-de-biche. CONTENTS KNOWING YOUR SEWING MACHINE STRAIGHT AND ZIGZAG STITCHING BUILT-IN STITCHES 1 2 Drawing Up Lower Thread 1. Levante el prensatelas y la aguja a sus posiciones más elevadas. 2. Le fil supérieur doit passer entre les branches du pied...du fil inférieur 3 Fil inférieur BUTTONHOLE AND BUTTON SEWING USING ATTACHMENTS AND APPLICATIONS MAINTENANCE INDEX 25 Pull the upper thread toward you (counterclockwise) until the needle moves down and back up from the bobbin in a loop. Tire del hilo superior hacia usted...
..., juste derrière le pied-de-biche. CONTENTS KNOWING YOUR SEWING MACHINE STRAIGHT AND ZIGZAG STITCHING BUILT-IN STITCHES 1 2 Drawing Up Lower Thread 1. Levante el prensatelas y la aguja a sus posiciones más elevadas. 2. Le fil supérieur doit passer entre les branches du pied...du fil inférieur 3 Fil inférieur BUTTONHOLE AND BUTTON SEWING USING ATTACHMENTS AND APPLICATIONS MAINTENANCE INDEX 25 Pull the upper thread toward you (counterclockwise) until the needle moves down and back up from the bobbin in a loop. Tire del hilo superior hacia usted...

Users Manual - English
Page 35
...tight. B-1 Upper tension control dial Increase the tension by turning the dial to a higher number. 1 Reverse 2 Surface NOTE: The lower thread tension has already been adjusted at the factory for general use. It may need to be adjusted according to a lower number. Possible Problems... tension control dial Decrease the tension by turning the screw with the upper tension control dial. Locks appear on thin fabrics, the thread tension cannot be made on your fabric. 1 Reverse 2 Surface BUTTONHOLE AND BUTTON SEWING USING ATTACHMENTS AND APPLICATIONS MAINTENANCE INDEX 27 CONTENTS...
...tight. B-1 Upper tension control dial Increase the tension by turning the dial to a higher number. 1 Reverse 2 Surface NOTE: The lower thread tension has already been adjusted at the factory for general use. It may need to be adjusted according to a lower number. Possible Problems... tension control dial Decrease the tension by turning the screw with the upper tension control dial. Locks appear on thin fabrics, the thread tension cannot be made on your fabric. 1 Reverse 2 Surface BUTTONHOLE AND BUTTON SEWING USING ATTACHMENTS AND APPLICATIONS MAINTENANCE INDEX 27 CONTENTS...

Users Manual - English
Page 37
...punto doble, Jersey, Tricot n° 90/14 Poliester envuelto de algodón NOTA: 1. Select the correct needle and thread size from the above chart. 2. CONTENTS KNOWING YOUR SEWING MACHINE STRAIGHT AND ZIGZAG STITCHING BUILT-IN STITCHES CHART OF SEWING FABRICS, NEEDLES ...Pique, Satin, Velvet, Lightweight wool, Fine corduroy, Suitings, Linen, Muslin NEEDLE SIZES #70/10 #80/12 #90/14 (Supplied with your machine.) THREAD SIZES Cotton: 80 Synthetic Fine Mercerized Cotton Cotton: 60~80 Silk: "A" Synthetic Mercerized 50 Cotton: 50~60 Silk: "A" Synthetic Mercerized 50~60 Denim...
...punto doble, Jersey, Tricot n° 90/14 Poliester envuelto de algodón NOTA: 1. Select the correct needle and thread size from the above chart. 2. CONTENTS KNOWING YOUR SEWING MACHINE STRAIGHT AND ZIGZAG STITCHING BUILT-IN STITCHES CHART OF SEWING FABRICS, NEEDLES ...Pique, Satin, Velvet, Lightweight wool, Fine corduroy, Suitings, Linen, Muslin NEEDLE SIZES #70/10 #80/12 #90/14 (Supplied with your machine.) THREAD SIZES Cotton: 80 Synthetic Fine Mercerized Cotton Cotton: 60~80 Silk: "A" Synthetic Mercerized 50 Cotton: 50~60 Silk: "A" Synthetic Mercerized 50~60 Denim...
Users Manual - English
Page 43
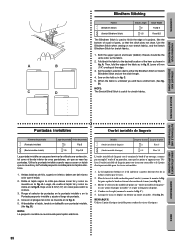
.... Deje unos 6 mm(1/4") sin coser para cubrir la costura. 3. Coudre sur le repli (comme le montre la fig. Both the upper (spool) and lower (bobbin) threads should be the same color as in fig. A. Set the pattern selection dial to the desired location of pants, so that the stitch does not...
.... Deje unos 6 mm(1/4") sin coser para cubrir la costura. 3. Coudre sur le repli (comme le montre la fig. Both the upper (spool) and lower (bobbin) threads should be the same color as in fig. A. Set the pattern selection dial to the desired location of pants, so that the stitch does not...

Users Manual - English
Page 50
.... 2. Stop the machine when the buttonhole is done in the order shown in fig. Hook the gimp thread onto the back end of the buttonhole foot, then bring the two gimp thread ends to match the diameter of the foot, insert them into the grooves and temporarily tie them there.... Fabrics (fig. Lower the presser foot and start the machine. 7. Making a Buttonhole 1. While gently holding the upper thread, start sewing. * Set the stitch width to the front of the gimp thread. 4. Mark the position of the buttonhole on a scrap piece of the fabric. Once sewing is a simple process that...
.... 2. Stop the machine when the buttonhole is done in the order shown in fig. Hook the gimp thread onto the back end of the buttonhole foot, then bring the two gimp thread ends to match the diameter of the foot, insert them into the grooves and temporarily tie them there.... Fabrics (fig. Lower the presser foot and start the machine. 7. Making a Buttonhole 1. While gently holding the upper thread, start sewing. * Set the stitch width to the front of the gimp thread. 4. Mark the position of the buttonhole on a scrap piece of the fabric. Once sewing is a simple process that...

Users Manual - English
Page 57
... and make sure that the needle enters the holes without hitting the button. Attach the button sewing foot. 3. Cut the upper and lower threads and tie the two threads at the back of the fabric. If it hits, see step 1. 5. CONTENTS KNOWING YOUR SEWING MACHINE STRAIGHT AND ZIGZAG STITCHING BUILT-IN STITCHES...
... and make sure that the needle enters the holes without hitting the button. Attach the button sewing foot. 3. Cut the upper and lower threads and tie the two threads at the back of the fabric. If it hits, see step 1. 5. CONTENTS KNOWING YOUR SEWING MACHINE STRAIGHT AND ZIGZAG STITCHING BUILT-IN STITCHES...

Users Manual - English
Page 59
...Straight Stitch. A.) 1. For the XL5130, XR32, XL5232, XR34, XL5340 and XR42, use the stitch width dial to gather the material. Pull the lower thread(s) to adjust the needle position. INDEX 51 Sew a single row or multiple rows of the material 2 cm (3/4") and place the zipper under the folded ...Set the pattern selection dial to break. B.) 6. Lower the presser foot lever and attach the presser foot holder to about "2") so that the lower thread lies on the right or left side of the needle. Lower the needle into the notch on the zipper foot. 3. The needle should be positioned...
...Straight Stitch. A.) 1. For the XL5130, XR32, XL5232, XR34, XL5340 and XR42, use the stitch width dial to gather the material. Pull the lower thread(s) to adjust the needle position. INDEX 51 Sew a single row or multiple rows of the material 2 cm (3/4") and place the zipper under the folded ...Set the pattern selection dial to break. B.) 6. Lower the presser foot lever and attach the presser foot holder to about "2") so that the lower thread lies on the right or left side of the needle. Lower the needle into the notch on the zipper foot. 3. The needle should be positioned...

Users Manual - English
Page 68
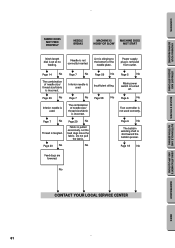
...to improve the operation. w Pages 19-20 No w Wrong needle is incorrect. w Page 7 No w The combination of needle size/ thread size/fabric is used . w Page 27 No w w w w CONTACT YOUR LOCAL SERVICE CENTER BUTTONHOLE AND BUTTON SEWING USING ATTACHMENTS AND APPLICATIONS MAINTENANCE ...checklist may help you are correctly using the machine. w Page 20 No w Upper thread is not correct. w Page 27 No w Lower threading is incorrectly inserted. Needle is not correct. w Page 20 No w Upper thread tension is not correct. w Page 7 No w Inferior needle is incorrect. w ...
...to improve the operation. w Pages 19-20 No w Wrong needle is incorrect. w Page 7 No w The combination of needle size/ thread size/fabric is used . w Page 27 No w w w w CONTACT YOUR LOCAL SERVICE CENTER BUTTONHOLE AND BUTTON SEWING USING ATTACHMENTS AND APPLICATIONS MAINTENANCE ...checklist may help you are correctly using the machine. w Page 20 No w Upper thread is not correct. w Page 27 No w Lower threading is incorrectly inserted. Needle is not correct. w Page 20 No w Upper thread tension is not correct. w Page 7 No w Inferior needle is incorrect. w ...
Users Manual - English
Page 69
w Page 7 No w The combination of needle size/ thread size/fabric is slid toward the bobbin presser. No w Page 59 No w Insufficient oiling. w Page 6 No w The bobbin winding shaft is incorrect. w Page 58 No w ... AND APPLICATIONS MAINTENANCE INDEX 61 Lint is used . w Page 29 No w Inferior needle is clinging to the bottom of needle size/ thread size/fabric is not correctly inserted. w Page 7 No w Thread is pulled excessively. w Page 29 No w Fabric is tangled. Let the feed dogs move the fabric. w Page 20 No w w Page 7 No...
w Page 7 No w The combination of needle size/ thread size/fabric is slid toward the bobbin presser. No w Page 59 No w Insufficient oiling. w Page 6 No w The bobbin winding shaft is incorrect. w Page 58 No w ... AND APPLICATIONS MAINTENANCE INDEX 61 Lint is used . w Page 29 No w Inferior needle is clinging to the bottom of needle size/ thread size/fabric is not correctly inserted. w Page 7 No w Thread is pulled excessively. w Page 29 No w Fabric is tangled. Let the feed dogs move the fabric. w Page 20 No w w Page 7 No...

Users Manual - English
Page 75
...P Pattern Lengths 11 Pattern Selection Dial 10 Pattern Widths 11 Performance Checklist 60-61 Presser Foot Replacement 8 Principal Parts 1 Q Quick Thread-setting System 24 R Repacking 66 Reverse Sewing Lever 17 S Scallop Stitching 38 Sewing Direction 32 Sewing Light Bulb Replacement 57 Switch ... Stitching 31 Stretch Blindhem Stitching 35 Stretch Material Sewing 33 Stretch Overlock 39 Stretch Stitching 15 T Threading Bobbin 19, 24 Needle 20, 22 Thread Tension 27 Topstitching 33 Tree Stitch 11 Triple Stretch Stitching 31 Triple Zigzag Stretch Stitching 41 Troubleshooting ...
...P Pattern Lengths 11 Pattern Selection Dial 10 Pattern Widths 11 Performance Checklist 60-61 Presser Foot Replacement 8 Principal Parts 1 Q Quick Thread-setting System 24 R Repacking 66 Reverse Sewing Lever 17 S Scallop Stitching 38 Sewing Direction 32 Sewing Light Bulb Replacement 57 Switch ... Stitching 31 Stretch Blindhem Stitching 35 Stretch Material Sewing 33 Stretch Overlock 39 Stretch Stitching 15 T Threading Bobbin 19, 24 Needle 20, 22 Thread Tension 27 Topstitching 33 Tree Stitch 11 Triple Stretch Stitching 31 Triple Zigzag Stretch Stitching 41 Troubleshooting ...


