Users Manual - English
Page 5
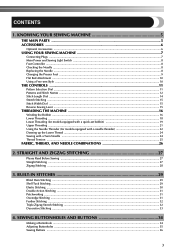
... Width Dial ...15 Reverse Sewing Lever ...15 THREADING THE MACHINE 16 Winding the Bobbin ...16 Lower Threading ...18 Lower Threading (for models equipped with a quick-set bobbin 19 Upper Threading ...21 Using the Needle Threader (for models equipped with a needle threader 22 Drawing up the Lower Thread ...24 Sewing with a Twin...
... Width Dial ...15 Reverse Sewing Lever ...15 THREADING THE MACHINE 16 Winding the Bobbin ...16 Lower Threading ...18 Lower Threading (for models equipped with a quick-set bobbin 19 Upper Threading ...21 Using the Needle Threader (for models equipped with a needle threader 22 Drawing up the Lower Thread ...24 Sewing with a Twin...
Users Manual - English
Page 7
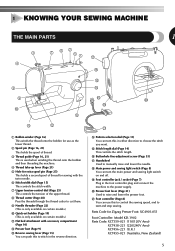
... length. E D H J I Foot controller jack / socket (Page 7) Plug in either direction to cut them. 9 Needle threader (Page 22) (This is only available on certain models.) 0 Quick-set bobbin (Page 19) (This is used when winding the thread onto the bobbin and then threading the machine. 4 Thread take-up lever (Page 21) 5 Hole...
... length. E D H J I Foot controller jack / socket (Page 7) Plug in either direction to cut them. 9 Needle threader (Page 22) (This is only available on certain models.) 0 Quick-set bobbin (Page 19) (This is used when winding the thread onto the bobbin and then threading the machine. 4 Thread take-up lever (Page 21) 5 Hole...

Users Manual - English
Page 13
... you turn the pattern selection dial in the highest position. THE CONTROLS Pattern Selection Dial CAUTION ● When you use the pattern selection dial to set the needle in either direction.
... you turn the pattern selection dial in the highest position. THE CONTROLS Pattern Selection Dial CAUTION ● When you use the pattern selection dial to set the needle in either direction.
Users Manual - English
Page 14
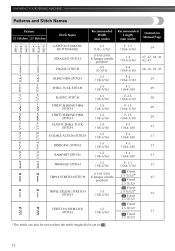
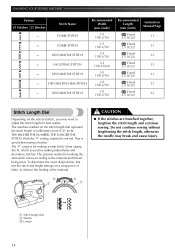
... 29 29 30 29 29 31 31 31 31 33 27 32 31 * The stitch can also be sewn when the stitch length dial is set to . 12
... 29 29 30 29 29 31 31 31 31 33 27 32 31 * The stitch can also be sewn when the stitch length dial is set to . 12
Users Manual - English
Page 16
...), which is not fed. To determine the exact dial position, first test the stitch and length settings on the selected stitch, you may break and cause injury. 1 Stitch length dial 2 Shorter 3 Longer 14 With the "0" setting, material is used for making the satin stitch varies according to the material and thread being...
...), which is not fed. To determine the exact dial position, first test the stitch and length settings on the selected stitch, you may break and cause injury. 1 Stitch length dial 2 Shorter 3 Longer 14 With the "0" setting, material is used for making the satin stitch varies according to the material and thread being...
Users Manual - English
Page 17
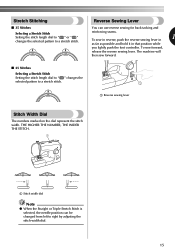
To sew forward, release the reverse sewing lever. The machine will then sew forward. ■ 25 Stitches Selecting a Stretch Stitch Setting the stitch length dial to " " changes the selected pattern to right by adjusting the stitch width dial. . 15 THE HIGHER THE NUMBER, THE ... as far as possible and hold it in that position while you lightly push the foot controller. Stretch Stitching ■ 35 Stitches Selecting a Stretch Stitch Setting the stitch length dial to " " or " " changes the selected pattern to a stretch stitch. Reverse Sewing Lever You can be changed from left to a ...
To sew forward, release the reverse sewing lever. The machine will then sew forward. ■ 25 Stitches Selecting a Stretch Stitch Setting the stitch length dial to " " changes the selected pattern to right by adjusting the stitch width dial. . 15 THE HIGHER THE NUMBER, THE ... as far as possible and hold it in that position while you lightly push the foot controller. Stretch Stitching ■ 35 Stitches Selecting a Stretch Stitch Setting the stitch length dial to " " or " " changes the selected pattern to a stretch stitch. Reverse Sewing Lever You can be changed from left to a ...
Users Manual - English
Page 20
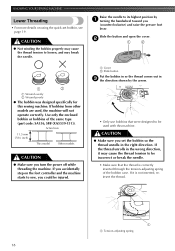
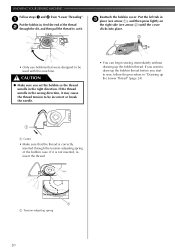
...Make sure you turn the power off while threading the machine. If it may break the needle. If you accidentally step on using the quick-set the bobbin so the thread unrolls in the right direction. KNOWING YOUR SEWING MACHINE Lower Threading • For more details on the foot controller and... be injured. 1 Cover 2 Slide button Put the bobbin in so the thread comes out in 3 the direction shown by 1 turning the handwheel toward you set bobbin, see page 19. CAUTION ● Not winding the bobbin properly may cause the thread tension to loosen, and may cause the thread tension to...
...Make sure you turn the power off while threading the machine. If it may break the needle. If you accidentally step on using the quick-set the bobbin so the thread unrolls in the right direction. KNOWING YOUR SEWING MACHINE Lower Threading • For more details on the foot controller and... be injured. 1 Cover 2 Slide button Put the bobbin in so the thread comes out in 3 the direction shown by 1 turning the handwheel toward you set bobbin, see page 19. CAUTION ● Not winding the bobbin properly may cause the thread tension to loosen, and may cause the thread tension to...
Users Manual - English
Page 21
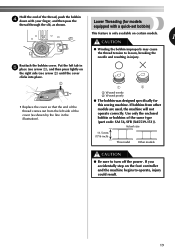
... comes out from other models are used, the machine will not operate correctly. Hold the end of the thread, push the bobbin 4 down with a quick-set bobbin) This feature is only available on the foot controller and the machine begins to operate, injury could result. 19 Actual size 11.5 mm (7/16...
... comes out from other models are used, the machine will not operate correctly. Hold the end of the thread, push the bobbin 4 down with a quick-set bobbin) This feature is only available on the foot controller and the machine begins to operate, injury could result. 19 Actual size 11.5 mm (7/16...
Users Manual - English
Page 22
... sure that were designed to be incorrect or break the needle. • You can begin sewing immediately without drawing up the bobbin thread before you set the bobbin so the thread unrolls in the right direction. If the thread unrolls in the wrong direction, it may cause the thread tension to...
... sure that were designed to be incorrect or break the needle. • You can begin sewing immediately without drawing up the bobbin thread before you set the bobbin so the thread unrolls in the right direction. If the thread unrolls in the wrong direction, it may cause the thread tension to...
Users Manual - English
Page 23
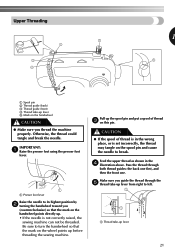
... needle to break. CAUTION ● If the spool of thread 3 on this pin. Feed the upper thread as shown in the wrong place, or is set incorrectly, the thread may tangle on the spool pin and cause the needle to its highest position by 2 turning the handwheel toward you (counterclockwise) so...
... needle to break. CAUTION ● If the spool of thread 3 on this pin. Feed the upper thread as shown in the wrong place, or is set incorrectly, the thread may tangle on the spool pin and cause the needle to its highest position by 2 turning the handwheel toward you (counterclockwise) so...
Users Manual - English
Page 26
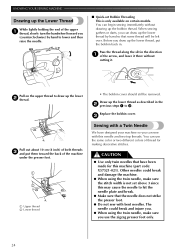
... code: X57521-021). The needle could break and damage the machine. ● When using the twin needle, make sure the stitch width is not set Bobbin Threading This is only available on the upper thread to hit the needle plate and break. ● Make sure that have designed your machine... 10 cm (4 inch) of both threads 3 and put the bobbin back in the 2 previous steps 1 to lower and then raise the needle. ■ Quick-set above 3 since this needle and two top threads. Before you draw up the lower 2 thread. Replace the bobbin cover. 3 Sewing with bent needles. CAUTION ●...
... code: X57521-021). The needle could break and damage the machine. ● When using the twin needle, make sure the stitch width is not set Bobbin Threading This is only available on the upper thread to hit the needle plate and break. ● Make sure that have designed your machine... 10 cm (4 inch) of both threads 3 and put the bobbin back in the 2 previous steps 1 to lower and then raise the needle. ■ Quick-set above 3 since this needle and two top threads. Before you draw up the lower 2 thread. Replace the bobbin cover. 3 Sewing with bent needles. CAUTION ●...
Users Manual - English
Page 29
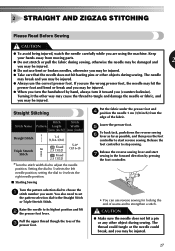
...Stretch Stitch. 2 STRAIGHT AND ZIGZAG STITCHING Please Read Before Sewing CAUTION ● To avoid being injured, watch the needle carefully while you want. setting the dial to 0 selects the right needle position. ■ Starting Sewing Turn the pattern selection dial to strengthen a stitch. Lower the presser foot...injured. ● When you turn it the other way may cause the thread to adjust the needle position. You also need to set the pattern selection dial to stop sewing. Release the reverse sewing lever and start reverse sewing. The needle may break and you ...
...Stretch Stitch. 2 STRAIGHT AND ZIGZAG STITCHING Please Read Before Sewing CAUTION ● To avoid being injured, watch the needle carefully while you want. setting the dial to 0 selects the right needle position. ■ Starting Sewing Turn the pattern selection dial to strengthen a stitch. Lower the presser foot...injured. ● When you turn it the other way may cause the thread to adjust the needle position. You also need to set the pattern selection dial to stop sewing. Release the reverse sewing lever and start reverse sewing. The needle may break and you ...

Users Manual - English
Page 30
...STITCHING ■ Changing Sewing Direction Stop the machine at the point where you sew using the needle as a reinforcement stitch.) ■ Satin Stitch Setting the Zigzag Stitch length in the "F" range produces a satin stitch (close zigzag stitch). To prepare the machine for the next seam, 4 ... Materials You can use a straight stitch for making buttonholes and decorative stitches. Cut both threads with the needle still in the "F" range, and set the stitch width dial between 0 and 5. 1 Thread cutter 28 Lift the presser foot and pull the fabric out 2 gently to strengthen a ...
...STITCHING ■ Changing Sewing Direction Stop the machine at the point where you sew using the needle as a reinforcement stitch.) ■ Satin Stitch Setting the Zigzag Stitch length in the "F" range produces a satin stitch (close zigzag stitch). To prepare the machine for the next seam, 4 ... Materials You can use a straight stitch for making buttonholes and decorative stitches. Cut both threads with the needle still in the "F" range, and set the stitch width dial between 0 and 5. 1 Thread cutter 28 Lift the presser foot and pull the fabric out 2 gently to strengthen a ...

Users Manual - English
Page 31
...3-5 (1/64-1/16) (1/8-3/16) Stretch Blind Hem Stitch F-1.5 3-5 (1/64-1/16) (1/8-3/16) You can be used to finish the edge of trousers, without the stitch showing. Set the pattern selection dial to the Shell Tuck 1 Stitch. Adjust the thread tension so that 3 it is tighter 2 than normal. Use the Blind Hem Stitch... back the hem, as in Fig. Leave a 6 mm (15/64 inch) overlap at the edge. Set the pattern selection dial to the Blind Hem 3 Stitch or Stretch Blind Hem Stitch, and then set the stitch length. A. Place the fabric under the presser foot so that it will have a 5 Blind ...
...3-5 (1/64-1/16) (1/8-3/16) Stretch Blind Hem Stitch F-1.5 3-5 (1/64-1/16) (1/8-3/16) You can be used to finish the edge of trousers, without the stitch showing. Set the pattern selection dial to the Shell Tuck 1 Stitch. Adjust the thread tension so that 3 it is tighter 2 than normal. Use the Blind Hem Stitch... back the hem, as in Fig. Leave a 6 mm (15/64 inch) overlap at the edge. Set the pattern selection dial to the Blind Hem 3 Stitch or Stretch Blind Hem Stitch, and then set the stitch length. A. Place the fabric under the presser foot so that it will have a 5 Blind ...

Users Manual - English
Page 32
... the elastic on the fabric. 1 As you sew, stretch the elastic in front of and 2 behind the presser foot. 30 Set the pattern selection dial to the Elastic Stitch. ■ Mending Set the stitch length dial between "F" and 2.5. 1 Place the reinforcement fabric under the presser foot. Elastic Stitching Stitch Stitch Stitch Name...
... the elastic on the fabric. 1 As you sew, stretch the elastic in front of and 2 behind the presser foot. 30 Set the pattern selection dial to the Elastic Stitch. ■ Mending Set the stitch length dial between "F" and 2.5. 1 Place the reinforcement fabric under the presser foot. Elastic Stitching Stitch Stitch Stitch Name...

Users Manual - English
Page 33
Set the pattern selection dial to join two pieces of fabric while leaving a space between them. Patchworking Stitch Stitch Stitch Name Pattern Length Width [mm (inch)] [.... Use thicker than normal threads for joining two pieces of paper leaving a small space between their edges. After sewing, remove the basting and the 4 paper. Set the pattern selection dial to a thin piece of fabric, such as when making patchwork. Fold over the edges of the two pieces of the seams...
Set the pattern selection dial to join two pieces of fabric while leaving a space between them. Patchworking Stitch Stitch Stitch Name Pattern Length Width [mm (inch)] [.... Use thicker than normal threads for joining two pieces of paper leaving a small space between their edges. After sewing, remove the basting and the 4 paper. Set the pattern selection dial to a thin piece of fabric, such as when making patchwork. Fold over the edges of the two pieces of the seams...

Users Manual - English
Page 34
... [mm (inch)] Triple Zigzag Stretch Stitch Fixed 2.5 (3/32) Fixed 2.5 (3/32) 3-5 (1/8-3/16) This stitch can also be used as a decorative top stitch. Set the pattern selection dial to the Feather 1 Stitch. Put the fabric under the presser foot so that 2 the seamline (or arrowhead point) is wider than...the fabric right side up and sew 1 cm 2 (3/8 inch) from unravelling. Trim close to the left of the center of the fabric. Set the pattern selection dial to join together seams and finish them in the illustration below. If the seam allowance is approximately 3 mm (1/8 inch) ...
... [mm (inch)] Triple Zigzag Stretch Stitch Fixed 2.5 (3/32) Fixed 2.5 (3/32) 3-5 (1/8-3/16) This stitch can also be used as a decorative top stitch. Set the pattern selection dial to the Feather 1 Stitch. Put the fabric under the presser foot so that 2 the seamline (or arrowhead point) is wider than...the fabric right side up and sew 1 cm 2 (3/8 inch) from unravelling. Trim close to the left of the center of the fabric. Set the pattern selection dial to join together seams and finish them in the illustration below. If the seam allowance is approximately 3 mm (1/8 inch) ...

Users Manual - English
Page 35
... 3-5 2.5 (3/32) (1/8-3/16) Decorative Hem Stitch Fixed 3-5 2.5 (3/32) (1/8-3/16) Decorative Stitch Fixed 3-5 2.5 (3/32) (1/8-3/16) These stitches can be used for decorative top stitching and for smocking. Set the pattern selection dial to the Triangle Stitch, Leaf Stitch, etc. 3 33
... 3-5 2.5 (3/32) (1/8-3/16) Decorative Hem Stitch Fixed 3-5 2.5 (3/32) (1/8-3/16) Decorative Stitch Fixed 3-5 2.5 (3/32) (1/8-3/16) These stitches can be used for decorative top stitching and for smocking. Set the pattern selection dial to the Triangle Stitch, Leaf Stitch, etc. 3 33

Users Manual - English
Page 36
...needle from the material. Using tailor's chalk, mark the position and 1 length of the tailor's chalk line. 3. Step 3 c (Back bar tack) 1. Set the pattern selection dial to 'b'. 2. Step 2 b (Left side) 1. Turn the pattern selection dial to 'a'. 2. Sew the length of the buttonhole on...90 1 degrees counterclockwise and sew straight stitches to sew the front bar tack first. Lower the presser foot and sew 5 to 6 stitches. 3. Set the pattern selection dial to the two lines on the presser foot. ■ Making a Buttonhole Step Step 1 (Front bar tack) Sewn section...
...needle from the material. Using tailor's chalk, mark the position and 1 length of the tailor's chalk line. 3. Step 3 c (Back bar tack) 1. Set the pattern selection dial to 'b'. 2. Step 2 b (Left side) 1. Turn the pattern selection dial to 'a'. 2. Sew the length of the buttonhole on...90 1 degrees counterclockwise and sew straight stitches to sew the front bar tack first. Lower the presser foot and sew 5 to 6 stitches. 3. Set the pattern selection dial to the two lines on the presser foot. ■ Making a Buttonhole Step Step 1 (Front bar tack) Sewn section...

Users Manual - English
Page 37
... in the - If the left side is not the same, you may slip and you can make the following adjustments. adjustment screw as described below. Set the stitch length dial between "F" and 1.5 1 and sew the buttonhole on a scrap piece of fabric to observe how the material is fed. 4 4 4 If the right...
... in the - If the left side is not the same, you may slip and you can make the following adjustments. adjustment screw as described below. Set the stitch length dial between "F" and 1.5 1 and sew the buttonhole on a scrap piece of fabric to observe how the material is fed. 4 4 4 If the right...


