Users Manual - English
Page 1
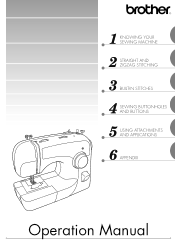
1 KNOWING YOUR SEWING MACHINE 2 STRAIGHT AND ZIGZAG STITCHING 3 BUILT-IN STITCHES 4 SEWING BUTTONHOLES AND BUTTONS 5 USING ATTACHMENTS AND APPLICATIONS 6 APPENDIX Operation Manual
1 KNOWING YOUR SEWING MACHINE 2 STRAIGHT AND ZIGZAG STITCHING 3 BUILT-IN STITCHES 4 SEWING BUTTONHOLES AND BUTTONS 5 USING ATTACHMENTS AND APPLICATIONS 6 APPENDIX Operation Manual
Users Manual - English
Page 2
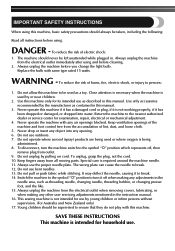
... needle plate. Always unplug the machine from outlet. 9. Return the machine to the nearest authorized dealer or service center for its intended use outdoors. 7. This sewing machine is intended for use . Young children should be taken, including the following: Read all moving parts. IMPORTANT SAFETY INSTRUCTIONS When using this machine, basic...
... needle plate. Always unplug the machine from outlet. 9. Return the machine to the nearest authorized dealer or service center for its intended use outdoors. 7. This sewing machine is intended for use . Young children should be taken, including the following: Read all moving parts. IMPORTANT SAFETY INSTRUCTIONS When using this machine, basic...
Users Manual - English
Page 4
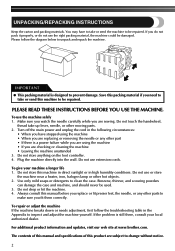
... damage the case and machine, and should never be repaired. If the problem is still there, consult your machine a longer life 1. If you are sewing. To use extension cords. To give your local authorized dealer. Do not store this manual before you replace or fit presser feet, the needle, or... this machine to prevent damage. Do not store anything on the foot controller. 4. For additional product information and updates, visit our web site at www.brother.com. You may have stopped using the machine • When you need to take -up lever, needle, or other part • If there is ...
... damage the case and machine, and should never be repaired. If the problem is still there, consult your machine a longer life 1. If you are sewing. To use extension cords. To give your local authorized dealer. Do not store this manual before you replace or fit presser feet, the needle, or... this machine to prevent damage. Do not store anything on the foot controller. 4. For additional product information and updates, visit our web site at www.brother.com. You may have stopped using the machine • When you need to take -up lever, needle, or other part • If there is ...
Users Manual - English
Page 5
...Stitching ...32 Triple Zigzag Stretch Stitching ...32 Decorative Stitching ...33 4. KNOWING YOUR SEWING MACHINE 5 THE MAIN PARTS ...5 ACCESSORIES ...6 Optional Accessories ...6 USING YOUR SEWING MACHINE 7 Connecting Plugs ...7 Main Power and Sewing Light Switch ...8 Foot Controller ...8 Checking the Needle ...8 Replacing the Needle ...8 ... ...11 Patterns and Stitch Names ...12 Stitch Length Dial ...14 Stretch Stitching ...15 Stitch Width Dial ...15 Reverse Sewing Lever ...15 THREADING THE MACHINE 16 Winding the Bobbin ...16 Lower Threading ...18 Lower Threading (for models equipped with...
...Stitching ...32 Triple Zigzag Stretch Stitching ...32 Decorative Stitching ...33 4. KNOWING YOUR SEWING MACHINE 5 THE MAIN PARTS ...5 ACCESSORIES ...6 Optional Accessories ...6 USING YOUR SEWING MACHINE 7 Connecting Plugs ...7 Main Power and Sewing Light Switch ...8 Foot Controller ...8 Checking the Needle ...8 Replacing the Needle ...8 ... ...11 Patterns and Stitch Names ...12 Stitch Length Dial ...14 Stretch Stitching ...15 Stitch Width Dial ...15 Reverse Sewing Lever ...15 THREADING THE MACHINE 16 Winding the Bobbin ...16 Lower Threading ...18 Lower Threading (for models equipped with...
Users Manual - English
Page 7
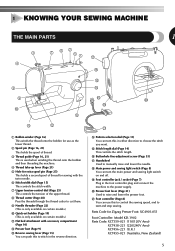
...220/240V Area) XC7456-221 (U.K.) XC7455-021 (Australia, New Zealand) 5 I K D Pattern selection dial (Page 11) You can turn this to control the sewing speed, and to choose the stitch you want. K Foot controller (Page 8) You can use as the lower thread. 2 Spool pin (Page 16, 21)... in the foot controller plug and connect the machine to stitch in either direction to start and stop sewing. Parts Code for sewing with accessory compartment (Page 10) B Presser foot (Page 9) C Reverse sewing lever (Page 15) You can push this to the power supply. F Buttonhole fine-adjustment screw (...
...220/240V Area) XC7456-221 (U.K.) XC7455-021 (Australia, New Zealand) 5 I K D Pattern selection dial (Page 11) You can turn this to control the sewing speed, and to choose the stitch you want. K Foot controller (Page 8) You can use as the lower thread. 2 Spool pin (Page 16, 21)... in the foot controller plug and connect the machine to stitch in either direction to start and stop sewing. Parts Code for sewing with accessory compartment (Page 10) B Presser foot (Page 9) C Reverse sewing lever (Page 15) You can push this to the power supply. F Buttonhole fine-adjustment screw (...
Users Manual - English
Page 8
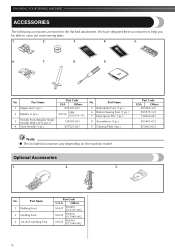
... ACCESSORIES The following accessories are stored in the flat bed attachment. Part Name 5 Buttonhole Foot (1 pc.) 6 Button Sewing Foot (1 pc.) 7 Extra Spool Pin (1 pc.) 8 Screwdriver (1 pc.) 9 Darning Plate (1pc.) Part Code USA Others X59369-321 X59375... F034N: XC2165-002 SA129 F005N: XC1948-002 SA125 F001N: XC1944-002 6 We have designed these accessories to help you be able to carry out most sewing tasks. 1. 2. 3. 4. 5. 6. 7. 8. 9. No. Part Name 1 Zipper foot (1 pc.) 2 Bobbin (3 pcs.) 3 Needle Pack (Regular Single Needle HAX130 (3 pcs.)) 4 Twin Needle (1...
... ACCESSORIES The following accessories are stored in the flat bed attachment. Part Name 5 Buttonhole Foot (1 pc.) 6 Button Sewing Foot (1 pc.) 7 Extra Spool Pin (1 pc.) 8 Screwdriver (1 pc.) 9 Darning Plate (1pc.) Part Code USA Others X59369-321 X59375... F034N: XC2165-002 SA129 F005N: XC1948-002 SA125 F001N: XC1944-002 6 We have designed these accessories to help you be able to carry out most sewing tasks. 1. 2. 3. 4. 5. 6. 7. 8. 9. No. Part Name 1 Zipper foot (1 pc.) 2 Bobbin (3 pcs.) 3 Needle Pack (Regular Single Needle HAX130 (3 pcs.)) 4 Twin Needle (1...
Users Manual - English
Page 9
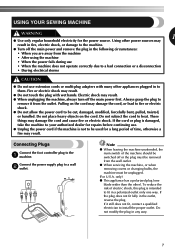
... result. ● When unplugging the machine, always turn off the main power first. If the plug does not fit fully in any way. 7 USING YOUR SEWING MACHINE WARNING 1 ● Use only regular household electricity for a long period of electric shock, this plug is not to be used for the power source...
... result. ● When unplugging the machine, always turn off the main power first. If the plug does not fit fully in any way. 7 USING YOUR SEWING MACHINE WARNING 1 ● Use only regular household electricity for a long period of electric shock, this plug is not to be used for the power source...
Users Manual - English
Page 10
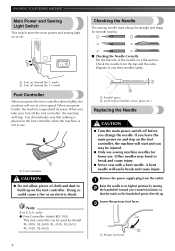
...controller when the machine is not in use . only) ● Foot Controller: Model KD-1902 This foot controller can be used for smooth sewing. ■ Checking the Needle Correctly 1 Put the flat side of cloth and dust to its highest position by turning 2 the handwheel toward...needle. Note (For U.S.A. Remove the power supply plug from the top and the sides. Other needles may be straight and sharp for Model XL-3500, XL-2600, XL-3510, XL-2610, XL-3520, XL-2620. 8 1 2 1 Parallel space 2 Level surface (bobbin cover, glass, etc.) Replacing the Needle CAUTION ● Turn the main...
...controller when the machine is not in use . only) ● Foot Controller: Model KD-1902 This foot controller can be used for smooth sewing. ■ Checking the Needle Correctly 1 Put the flat side of cloth and dust to its highest position by turning 2 the handwheel toward...needle. Note (For U.S.A. Remove the power supply plug from the top and the sides. Other needles may be straight and sharp for Model XL-3500, XL-2600, XL-3510, XL-2610, XL-3520, XL-2620. 8 1 2 1 Parallel space 2 Level surface (bobbin cover, glass, etc.) Replacing the Needle CAUTION ● Turn the main...
Users Manual - English
Page 11
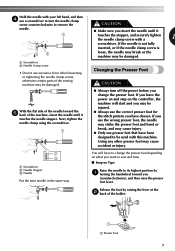
... you leave the power on and step on Type Raise the needle to its highest position by raising the lever at the 2 back of the sewing machine may be damaged. 1 Screwdriver 2 Needle clamp screw • Do not use the correct presser foot for the stitch pattern you (counterclockwise), and then raise... foot may cause injury. ● Only use a screwdriver to turn off the power before you change the presser foot depending on what you want to sew and how. ■ Snap-on the controller, the machine will have to change the presser foot. If you insert the needle until it 1 touches the...
... you leave the power on and step on Type Raise the needle to its highest position by raising the lever at the 2 back of the sewing machine may be damaged. 1 Screwdriver 2 Needle clamp screw • Do not use the correct presser foot for the stitch pattern you (counterclockwise), and then raise... foot may cause injury. ● Only use a screwdriver to turn off the power before you change the presser foot depending on what you want to sew and how. ■ Snap-on the controller, the machine will have to change the presser foot. If you insert the needle until it 1 touches the...
Users Manual - English
Page 12
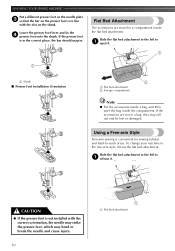
... bar should snap in a bag, they may bend or break the needle and cause injury. 10 1 1 Flat bed attachment Using a Free-arm Style Free-arm sewing is in a compartment inside the compartment. Slide the flat bed attachment to the left to 1 open it . CAUTION ● If the presser foot is not... installed with the slot on the presser foot is convenient for sewing tubular and hard-to the free-arm style, lift out the flat bed attachment. KNOWING YOUR SEWING MACHINE Put a different presser foot on the needle plate 3 so that the bar on the shank. Flat...
... bar should snap in a bag, they may bend or break the needle and cause injury. 10 1 1 Flat bed attachment Using a Free-arm Style Free-arm sewing is in a compartment inside the compartment. Slide the flat bed attachment to the left to 1 open it . CAUTION ● If the presser foot is not... installed with the slot on the presser foot is convenient for sewing tubular and hard-to the free-arm style, lift out the flat bed attachment. KNOWING YOUR SEWING MACHINE Put a different presser foot on the needle plate 3 so that the bar on the shank. Flat...
Users Manual - English
Page 14
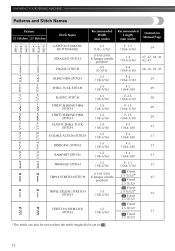
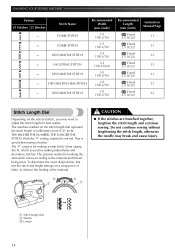
KNOWING YOUR SEWING MACHINE Patterns and Stitch Names Pattern 35 Stitches 25 Stitches Stitch Name Recommended Width (mm (inch)) Recommended Length (mm (inch)) Instruction Manual Page 4-STEP AUTOMATIC ...
KNOWING YOUR SEWING MACHINE Patterns and Stitch Names Pattern 35 Stitches 25 Stitches Stitch Name Recommended Width (mm (inch)) Recommended Length (mm (inch)) Instruction Manual Page 4-STEP AUTOMATIC ...
Users Manual - English
Page 16
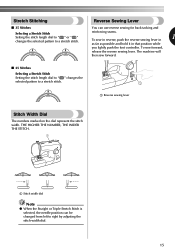
... 3 1 CAUTION ● If the stitches are bunched together, lengthen the stitch length and continue sewing. With the "0" setting, material is for making buttonholes and decorative stitches. This is used when sewing a button. The position needed for making a satin stitch (close zigzag stitch), which is used for...settings on the selected stitch, you may break and cause injury. 1 Stitch length dial 2 Shorter 3 Longer 14 Do not continue sewing without lengthening the stitch length, otherwise the needle may need to the material and thread being used. The "F" range is not fed....
... 3 1 CAUTION ● If the stitches are bunched together, lengthen the stitch length and continue sewing. With the "0" setting, material is for making buttonholes and decorative stitches. This is used when sewing a button. The position needed for making a satin stitch (close zigzag stitch), which is used for...settings on the selected stitch, you may break and cause injury. 1 Stitch length dial 2 Shorter 3 Longer 14 Do not continue sewing without lengthening the stitch length, otherwise the needle may need to the material and thread being used. The "F" range is not fed....
Users Manual - English
Page 17
... You can be changed from left to right by adjusting the stitch width dial. . 15 To sew forward, release the reverse sewing lever. The machine will then sew forward. ■ 25 Stitches Selecting a Stretch Stitch Setting the stitch length dial to " " changes the selected pattern to a stretch stitch. THE ... ● When the Straight or Triple Stretch Stitch is selected, the needle position can use reverse sewing for back tacking and reinforcing seams. 1 To sew in reverse, push the reverse sewing lever in as far as possible and hold it in that position while you lightly push the foot...
... You can be changed from left to right by adjusting the stitch width dial. . 15 To sew forward, release the reverse sewing lever. The machine will then sew forward. ■ 25 Stitches Selecting a Stretch Stitch Setting the stitch length dial to " " changes the selected pattern to a stretch stitch. THE ... ● When the Straight or Triple Stretch Stitch is selected, the needle position can use reverse sewing for back tacking and reinforcing seams. 1 To sew in reverse, push the reverse sewing lever in as far as possible and hold it in that position while you lightly push the foot...
Users Manual - English
Page 18
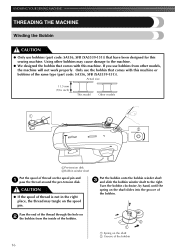
KNOWING YOUR SEWING MACHINE THREADING THE MACHINE Winding the Bobbin CAUTION ● Only use bobbins (part code: SA156, SFB (XA5539-151)) that have been designed for this machine ..., by hand, until the spring on the shaft slides into the groove of the bobbin 16 If you use the bobbin that comes with this sewing machine. Using other models, the machine will not work properly. Pass the end of the thread through the hole on 2 the bobbin from other bobbins...
KNOWING YOUR SEWING MACHINE THREADING THE MACHINE Winding the Bobbin CAUTION ● Only use bobbins (part code: SA156, SFB (XA5539-151)) that have been designed for this machine ..., by hand, until the spring on the shaft slides into the groove of the bobbin 16 If you use the bobbin that comes with this sewing machine. Using other models, the machine will not work properly. Pass the end of the thread through the hole on 2 the bobbin from other bobbins...
Users Manual - English
Page 19
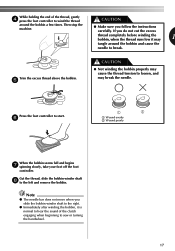
While holding the end of the clutch engaging when beginning to sew or turning the handwheel. 17 Trim the excess thread above the bobbin. 5 CAUTION ● Not winding the bobbin properly may cause the thread tension to ...
While holding the end of the clutch engaging when beginning to sew or turning the handwheel. 17 Trim the excess thread above the bobbin. 5 CAUTION ● Not winding the bobbin properly may cause the thread tension to ...
Users Manual - English
Page 20
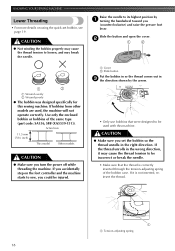
If bobbins from other models are used with this sewing machine. Actual size 11.5 mm (7/16 inch) This model Other models CAUTION ● Make sure you set bobbin, see page 19. CAUTION ● Make sure ... on using the quick-set the bobbin so the thread unrolls in the right direction. KNOWING YOUR SEWING MACHINE Lower Threading • For more details on the foot controller and the machine starts to sew, you (counterclockwise) and raise the presser foot lever. Raise the needle to its highest position by the...
If bobbins from other models are used with this sewing machine. Actual size 11.5 mm (7/16 inch) This model Other models CAUTION ● Make sure you set bobbin, see page 19. CAUTION ● Make sure ... on using the quick-set the bobbin so the thread unrolls in the right direction. KNOWING YOUR SEWING MACHINE Lower Threading • For more details on the foot controller and the machine starts to sew, you (counterclockwise) and raise the presser foot lever. Raise the needle to its highest position by the...
Users Manual - English
Page 21
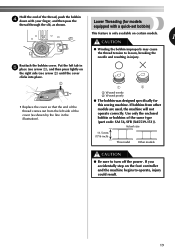
... to operate, injury could result. 19 Put the left tab in the illustration). 1 2 1 Wound evenly 2 Wound poorly ● The bobbin was designed specifically for this sewing machine.
... to operate, injury could result. 19 Put the left tab in the illustration). 1 2 1 Wound evenly 2 Wound poorly ● The bobbin was designed specifically for this sewing machine.
Users Manual - English
Page 22
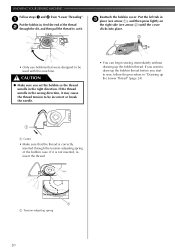
...; Make sure you start to be incorrect or break the needle. • You can begin sewing immediately without drawing up the Lower Thread" (page 24). 1 1 Cutter • Make sure that were designed to sew, follow the procedure in the right direction. If you want to draw up the bobbin thread before... you set the bobbin so the thread unrolls in "Drawing up the bobbin thread. KNOWING YOUR SEWING MACHINE Follow steps 1 and 2 from "Lower Threading". 1 Put the bobbin in, feed the end of the thread 2 through the tension-adjusting spring of the...
...; Make sure you start to be incorrect or break the needle. • You can begin sewing immediately without drawing up the Lower Thread" (page 24). 1 1 Cutter • Make sure that were designed to sew, follow the procedure in the right direction. If you want to draw up the bobbin thread before... you set the bobbin so the thread unrolls in "Drawing up the bobbin thread. KNOWING YOUR SEWING MACHINE Follow steps 1 and 2 from "Lower Threading". 1 Put the bobbin in, feed the end of the thread 2 through the tension-adjusting spring of the...
Users Manual - English
Page 23
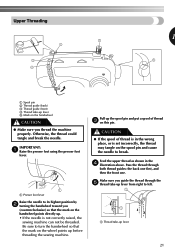
...a spool of thread is in the 4 illustration above. Feed the upper thread as shown in the wrong place, or is not correctly raised, the sewing machine can not be threaded. Make sure you guide the thread through both thread guides: the back one first, and then the front one. CAUTION... presser foot lever. 1 1 Presser foot lever Raise the needle to turn the handwheel so that the mark on the wheel points up before threading the sewing machine. Upper Threading 1 1 Spool pin 2 Thread guide (back) 3 Thread guide (front) 4 Thread take -up lever 21 Be sure to its highest position by 2 ...
...a spool of thread is in the 4 illustration above. Feed the upper thread as shown in the wrong place, or is not correctly raised, the sewing machine can not be threaded. Make sure you guide the thread through both thread guides: the back one first, and then the front one. CAUTION... presser foot lever. 1 1 Presser foot lever Raise the needle to turn the handwheel so that the mark on the wheel points up before threading the sewing machine. Upper Threading 1 1 Spool pin 2 Thread guide (back) 3 Thread guide (front) 4 Thread take -up lever 21 Be sure to its highest position by 2 ...
Users Manual - English
Page 24
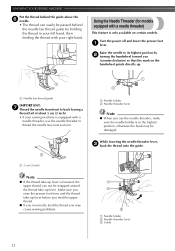
...cm (2 inch) While lowering the needle threader lever, 3 hook the thread onto the guide. Using the Needle Threader (for models equipped with your sewing machine is equipped with a needle threader, use the needle threader, make sure the needle holder is lowered, the upper thread can easily be passed ...about 5 cm (2 inch). • If your right hand. Turn the power off and lower the presser foot 1 lever. KNOWING YOUR SEWING MACHINE Put the thread behind the needle bar thread guide by 2 turning the handwheel toward you (counterclockwise) so that the mark on certain models.
...cm (2 inch) While lowering the needle threader lever, 3 hook the thread onto the guide. Using the Needle Threader (for models equipped with your sewing machine is equipped with a needle threader, use the needle threader, make sure the needle holder is lowered, the upper thread can easily be passed ...about 5 cm (2 inch). • If your right hand. Turn the power off and lower the presser foot 1 lever. KNOWING YOUR SEWING MACHINE Put the thread behind the needle bar thread guide by 2 turning the handwheel toward you (counterclockwise) so that the mark on certain models.


